Crossing boundaries with the new Android ViewOverlay
September 19, 2013 | 4 min ReadAnimations are an integral part of mobile applications. They make an app more enjoyable, emphasize actions and, in general enrich the user experience. While there are many ways to perform animations on Android, certain advanced effects are not always easy to achieve.
Inspiration
Inspired by the excellent Android Dev Bytes series from +Chet Haase and his recent blog post on ViewOverlay, other people have written blog posts about the ViewOverlay class. While these posts are accurate, I wanted to provide a real world example of how the ViewOverlay can be helpful when building animations.
[ Want to develop mobile apps faster? Try Tabris. Download the 30-day trial. ]
So what is the ViewOverlay? Basically it allows you to take a View from your regular view hierarchy and place it above the hierarchy. In this way it is not part of the View tree anymore but “floats” on its own layer above the UI. This post explores how this mechanism can be used to perform an animation that moves a View from one parent to another.
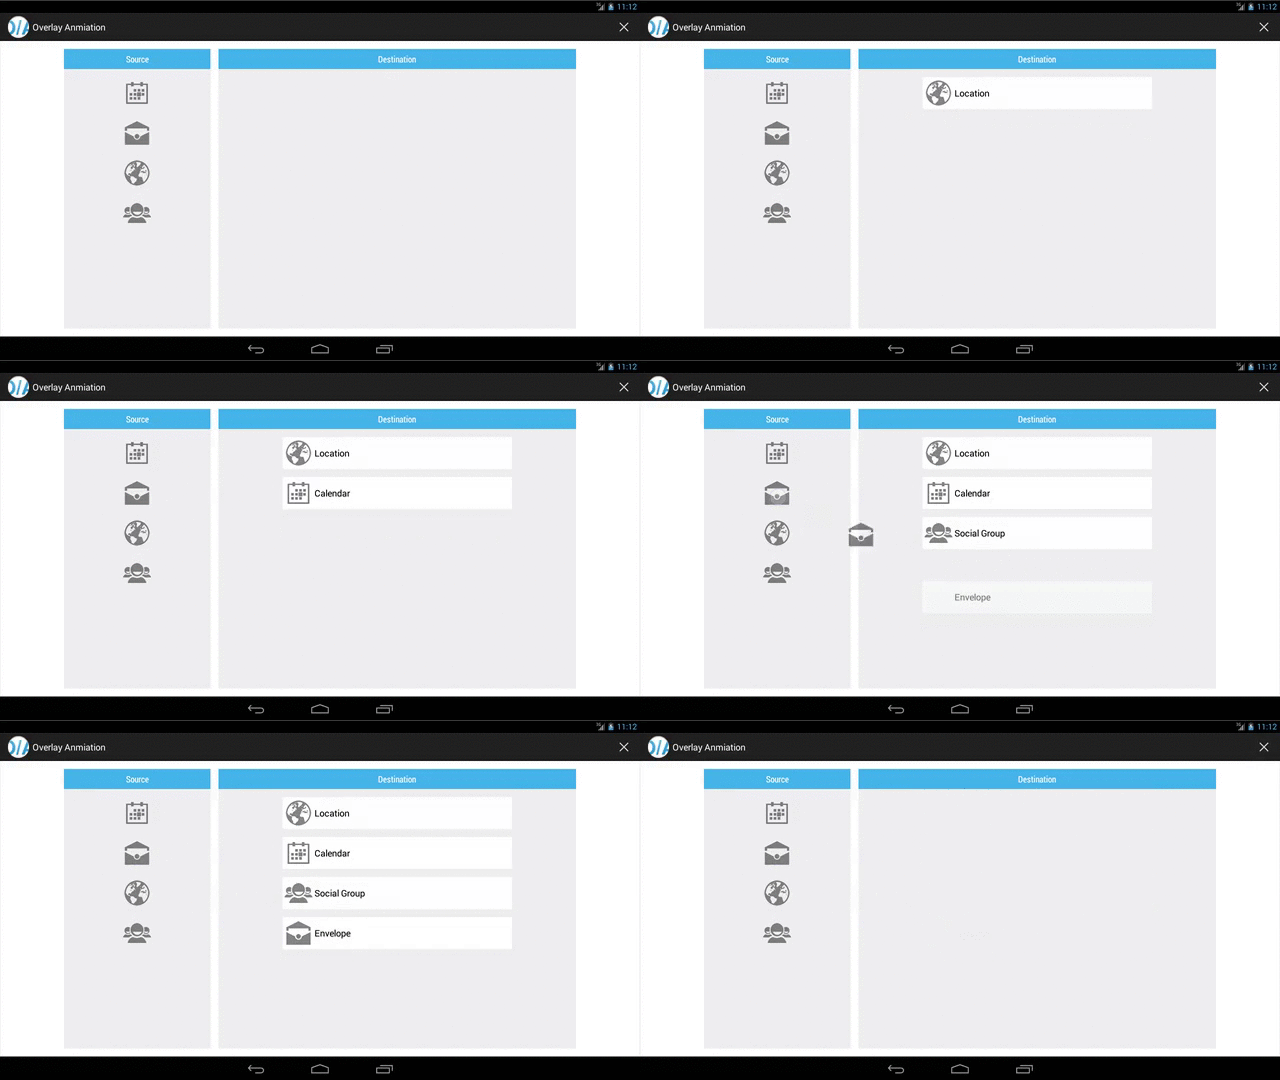
As you can see in the animated gif above, clicking on a source item animates it to move to the right, then to fall into place in a new entry. While the image flies across the screen, the new destination entry also slides in from the bottom. Both of these effects are achieved using the ViewOverlay.
Implementation
The following snippet describes the implementation that starts with clicking on the source item. The full source code can be downloaded from this gist.
@Override
public void onClick( View v ) {
  final FrameLayout destView = createDestView();
  final ViewTreeObserver observer = destView.getViewTreeObserver();
  observer.addOnPreDrawListener( new OnPreDrawListener() {

    @Override
    public boolean onPreDraw() {
      observer.removeOnPreDrawListener( this );

      LinearLayout entryView = ( LinearLayout )destView.findViewById( R.id.entry );
      ImageView imageView = ( ImageView )destView.findViewById( R.id.entry_image );

      imageView.setTranslationX( getAbsX( srcView ) - getAbsX( imageView ) );
      imageView.setTranslationY( getAbsY( srcView ) - getAbsY( imageView ) );
      rootView.getOverlay().add( imageView );
      imageView.animate().translationX( 0 ).translationY( 0 )
        .setInterpolator( new DecelerateInterpolator( 2 ) )
        .setDuration( 500 );

      destView.getLayoutParams().height = entryView.getMeasuredHeight();
      destContainer.getOverlay().add( entryView );
      entryView.setAlpha( 0 );
      entryView.setTranslationY( 100 );
      entryView.animate().translationY( 0 ).setDuration( 500 ).alpha( 1 )
        .setStartDelay( 0 ).setInterpolator( new DecelerateInterpolator( 2 ) )
        .withEndAction( new Runnable() {

          @Override
          public void run() {
            destContainer.getOverlay().remove( entryView );
            destView.addView( entryView );
            rootView.getOverlay().remove( imageView );
            entryView.addView( imageView, 0 );
          }
        } );
      return true;
    }
  } );
}
While it seems as if the source icon is moving across the screen, that is actually not what is happening. When clicking the source icon we create the new entry in the destination container and let the layout mechanism completely position it at its final location. To create the animations we register an OnPreDrawListener on the global ViewTreeObserver. This listener will be called after the layout has been calculated but just before our new item will be drawn on screen. Therefore we can use the final positions and dimensions to perform our animation.
The first step is to remove our OnPreDrawListener because we only needed it once. Next we get the item container and the image we want to animate. To animate the image we calculate the position of the source view (the view we just clicked on) and translate our destination image to that position. Although our destination image is now at the right position, it will normally not be drawn because it can not be drawn outside of its parent’s bounds. This is where the ViewOverlay comes into play.
From the root layout of our activity we get the ViewOverlay and add the image to it. The image now hovers above the entire root view (ie. over our Activity) and will be drawn at the correct location. As a last step, we need to animate the image back to its original position 0,0. For the entry container we use a similar strategy. First, we translate the container to the lower position, place it into the ViewOverlay of the destination container and tell it to animate back to its origin at 0,0.
Finally, when the two views have animated back to their origin, we remove the animated views from the ViewOverlays and place them back into their respective parents.
Note that a destination entry uses an invisible container in which its white background is placed. This invisible container blocks the space while the white background is animating so that items can be added quickly without messing up the item order.
Wrap up and another example
This post describes how to use the ViewOverlay in combination with an OnPreDrawListener to create arbitrary animation effects. The example code can be downloaded from this gist.
A future revision of the example presented could improve usability by placing the destination container in a ScrollView. In that case we would have to defer the animation until the ScrollView is scrolled into place. Stay tuned for more examples in a future post!
