


Jonas Helming is co-lead for the EclipseSource team and the project lead of the Eclipse EMF Client Platform and the EMFStore project. He works as an Eclipse Consultant …
Eclipse 4 (e4) Tutorial Part 2
From the Application Model to the Implementation of Views
This tutorial series introduces the core concepts of the Eclipse 4 Application Platform (e4). One of the key innovations of e4 is the separation and independance between the application model and the implementation of the application’s parts, such as view. In the first part of this tutorial we provided an overview of the application model, as well as the different ways to modify it, using the editor or the API. With the application model, it is possible to define and test the basic design of an application without having already implemented single views. In this second part of the tutorial, we explain how to create the missing part, the implementation of views, for which we have thus far created only placeholders in the application model. This tutorial and all other parts of the series are now available as a downloadable PDF.
An application model without views?
At first glance, it might be confusing as to why Eclipse 4 facilitates such a clear separation between the application model and the implementation of UI components. This is especially true, as one part doesn’t really make sense without the other. In Eclipse 3.x and also in other frameworks, implementations of UI components, such as views, have to implement given interfaces. This approach defines exactly which methods a developer has to implement to create a view. However, this approach also restricts the ability to reuse the implementation of UI components.
A well-known example for this problem is the differentiation between views and editors in Eclipse 3.x, which required different interfaces to be implemented. If you want to reuse a view as an editor or vice versa, you had to refactor it. Another example would be the reuse of a view in a modular dialog. Finally, when RCP applications are transferred to another context, e.g. on a mobile device (see RAP mobile / Tabris), the design of the workbench has to be changed to fit smaller screens. Therefore one of the goals of Eclipse 4 is to implement UI components in a modular and independent way. The UI consists of small, independent parts, which are not bound to any framework classes such as editor or view, and can be reused in any context. Finally, the application model itself has no UI toolkit dependencies at all. Therefore, it can also be used for implementing applications in other technologies than SWT, for example in JavaFX as provided by the e(fx)clipse project.
A view without an application model?
To demonstrate the modularity of the application model and the implementation of views, we started in the first part of this tutorial with the creation of an application model without any implementations. Using the e4 tools, you can even visualize the “empty” application model. Before we fill the application model with implementations, we’ll demonstrate the opposite, that is, implementing views using SWT without an existing application model. We’ll develop the modular parts of our application before we know the exact design of the workbench to illustrate Eclipse 4′s modular UI development.
In Eclipse 4, views do not have to implement a given interface. Instead, views define the parameters that the workbench needs to provide. In one of the simplest cases, an SWT view just requires a parent composite, on which the view can be placed. The annotation “@Inject” will be used later on by the Eclipse 4 framework to determine if the parameters of the view should be “injected”. We will go into more detail about dependency injection later in the tutorial.
The following code example shows a very easy “Hello World!” view in SWT.
public class ExampleView {
   @Inject
   public ExampleView(Composite parent) {
      Label label = new Label(parent, SWT.NONE);
      label.setText("Hello World!");
   }
}
Using the application model, this view can be shown later on as part of the workbench in an application. To demonstrate the flexible reusability and testability of such a view, we will first use it without any workbench. The following code example shows how to open the “HelloWorld” view just using SWT. It is worth mentioning that this is a plain Java program. To run this, we only need the relevant SWT libraries. Because of this, the view can be reused anywhere, e.g. a dialog, a wizard or even outside of the Eclipse workbench.
public static void main(String[] args) {
   Display display = new Display();
   Shell shell = new Shell(display);
   shell.setLayout(new FillLayout());
   new ExampleView(shell);
   shell.open();
   while( !shell.isDisposed() ) {
      if( ! display.readAndDispatch() ) {
         display.sleep();
      }
   }
}
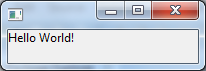
This screenshot shows the running Hello World application started from a plain Java program.
The Reunion
So far we have created and tested an application model and the implementation of a view separately from each other. Now it’s time to bring both parts together. We do this by adding an element (“Part”) in the application model representing the view within the workbench. The part will be linked to the implementation of the view. Using the e4 template application created with the e4 tools (see section on Installation in the Eclipse 4 Tutorial - Part 1), a part can, for example, be created within the existing “PartStack”.
You see in this screenshot that parts are added to the application model as placeholders for views and editors.

To link the part to the implementation of the view, the view’s class has to be selected in the properties of the part under “Class URI”. When you start the application, Eclipse 4 will create a part within the workbench and the linked view implementation will be initialized. That means, the constructor of the view implementation will be called. Parameters, which are required by the view, will be taken from the current context and will be injected into the view. As an example, Eclipse 4 will use the content area of the part as a parent composite for the view and therefore place the view within the part.
Figure : Parts are linked to the implementation of views using the Class URI
Handlers
For our next step, we want to add some behavior to our application. Therefore, we will implement a Handler, which is triggered by a button in the toolbar of the application. Handlers are the components, which define some specific behavior to be triggered. Similar to the implementation of UI components, Eclipse 4 allows a clean separation between the framework and the implementation of a handler, which enables reusability and testability. To demonstrate, we’ll follow a similar workflow to the previous sections, implementing and testing the handler independently from the integration into the application model. We’ll then integrate it in a following step.
Also parallel to how UI components work in Eclipse 4, handlers don’t have to implement a given interface. Instead, they define the required parameters. This reduces the number of required parameters to the minimum needed, making it also easier to test the handler. The following code example shows the implementation of a very basic handler for opening a “Hello World!” dialog. The handler needs only one parameter, a shell, to open the dialog. Using the annotation “@Execute”, the handler tells the Eclipse 4 framework which method to execute. In addition, the annotation has the same effect as “@Inject”. That means that the required parameters of the method execute(), in this case a shell, will be injected by the framework. As the example handler does not have a state, the execute() method can be static.
public class MyHandler {

   @Execute
   public static void execute(Shell shell){
      MessageDialog.openInformation(shell, "", "Hello World!");
   }

}
Handlers in Eclipse 4 are very easy to test, reuse and even chain, as they only require the parameters they really use. The following code example shows a simple Java program which tests the implemented handler.
public static void main(String[] args) {
   Display display = new Display();
   Shell shell = new Shell(display);
   shell.open();
   MyHandler.execute(shell);
   while( !shell.isDisposed() ) {
      if( ! display.readAndDispatch() ) {
         display.sleep();
      }
   }
}
The code example shows a complete Java program again. However, these tests could also be written in plain JUnit. If you imagine a handler implementing some behavior (in contrast to just open a dialog), it makes sense to have a JUnit test for the method marked with @Execute.
To integrate the handler with a button in a toolbar, we need another element in the application model. The easiest way to integrate the handler is using a “Direct ToolItem” (see Figure). The ToolItem is placed in the ToolBar and therefore specifies, that there is another button to be clicked. Analogous to the Part, the implementation of the handler can be bound to the element by setting the Class URI. This specifies, that the implementation of the handler is executed, when a user clicks on the toolbar button. Finally, we need to set a label or icon for the tool item to make it visible in the example application.
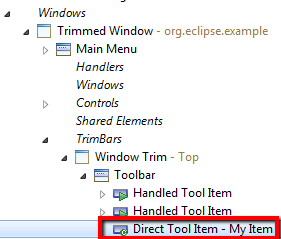 Figure : Creating a Direct ToolItem in the toolbar of the application
Using a “Direct ToolItem” is the fastest way to integrate a handler with an item in the toolbar. However, for more flexibility and better reuse we recommend using commands and handlers. This enables to have alternative implementations of a certain user action and also to use key bindings for triggering handlers.
Commands, Handlers and Items already existed in Eclipse 3.x. They facilitate a separation between a visible item to trigger this action (MenuItem or ToolbarItem) and the implementation of the action (Handler). As a binding in between, Eclipse defines the concept of a Command. All three elements, Handlers, Commands and Items are created as part of the application model. Items are created at the place, they should be displayed to the user, e.g. in a toolbar (as shown in the following screenshot) or in a menu. For both item types (Menu and Toolbar) use handled item, e.g. HandleToolbarItem. Commands are defined on the application level (see also the following screenshot) and are therefore valid for the whole application. Handler can be created on three levels, the application itself, on a window level or for a specific part, only.
As the following diagram shows, items and handlers reference a certain command and are thereby bound to each other. It is possible to bind several items to the same command, e.g. to show an action in a menu and in a toolbar at the same time. It is also possible to bind multiple handlers to the same command providing alternative implementations of an action. However, in this case, only one handler must be active at the same time. The Eclipse 4 Application platform will automatically activate handlers in the current application context. As an example, if a certain part is focussed, its specific handlers will be activated. If you have only one implementation for a handler, you can place it on the application level, if you have alternative implementation for different parts or windows, you place them in those elements respectively.

After all three elements are created, both the handler and the item need to be bound to the command (see the following screenshots. Commands can now be reused within the application, as an example, key bindings can be used to trigger the execution of a command or other items can be bound to it.


 Figure : A handler is bound to its implementation as well as to a command.
Conclusion
Eclipse 4 facilitates a clear separation between the definition of a workbench (i.e. application model) and the implementation of concrete parts of it (e.g. views or handler implementations). Implementations use dependency injection to define which parameters they require. This approach leads to minimal interfaces and implementations that are very easy to test and reuse. This tutorial showed how to create and test views and handlers without having a corresponding element for them in the application model and how to integrate them into a real application afterwards. In the next installment of this tutorial, we describe how to extend and modularize the application model, that is, how to contribute views and handlers from several plug-ins.
This tutorial and all other parts of the series are available as a downloadable PDF or as links below:
Part 1: Introduction to Eclipse 4
Part 2: Application Model and Views
Part 3: Extending existing models
Part 7: Soft migration from Eclipse 3.x
Appendix: Eclipse 3.x vs. Eclipse 4 - Which Platform to use
For more information, contact us:
Jonas Helming and Maximilian Koegel
EclipseSource Munich leads