
Jonas Helming is co-lead for the EclipseSource team and the project lead of the Eclipse EMF Client Platform and the EMFStore project. He works as an Eclipse Consultant …
Eclipse 4 (e4) Tutorial Part 3
In the previous parts of this tutorial series we described how to create an application model and link those elements to implementations. Until now we have only worked with one application model, however, Eclipse applications usually follow a modular design. In this part, we describe how to extend an existing application model with new elements, for example, adding a new entry to a menu. This tutorial and all other parts of the series are now available as a downloadable PDF.
Only one model?
One of the major advantages of Eclipse RCP development is the modular design of applications. The module concept, based on OSGi, enables the independent development of features, as well as their independent deployment. A very good example of such a modular application is the Eclipse IDE, where many additional plugins can be installed. Many of these extensions affect the workbench design of an application, that is, they add additional buttons, menu items and views. In e4, the application model is the central and consistent approach to designing the workbench. However, there needs to be a way to extend the application model from new plugins. Eclipse 3.x uses extensions points for this. Eclipse 4 offers model fragments and model processors. A model fragment is a small application model in itself and defines elements which need to be added to the root application model. Fragments can add anything that can be part of the application model, for example handlers, menu items or even windows.
The following diagrams show an example of such an extension. The application model of the plugin “org.eclipse.example.e4” is extended by a fragment from the plugin “org.eclipse.example.e4.extension”. For every element, in this case a Window, a ToolItem and a Part, you need to define the place, where it gets added in the core model.
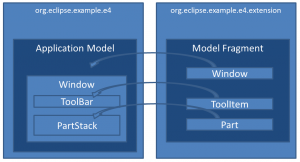
The application model can be extended using fragments.
Processors offer a mechanism to programmatically extend an application model. This allows the application to react to the current state of the model. As an example, you can only add a new button if another contribution is installed or if you can remove existing elements. In this tutorial, we describe both ways of extending an application model, fragments and processors. In both cases, elements of the application model are linked to their implementations as described in the previous chapters of this tutorial. The implementation is usually part of the plugin doing the contribution, as in the previous example “org.eclipse.example.e4.extension”.
Warm-Up
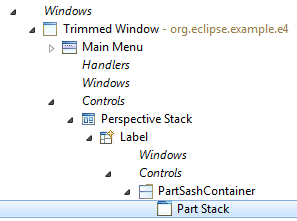
The first step is to create a main plugin and an application model which can be extended. As in the previous parts of this tutorial, we will use the e4 template application, which can be created using a wizard. It is important that elements in the application model which will be extended have a unique id. This id is used to reference elements from the extending fragment. In the template application, both the application and the toolbar already have an id. As we want to add a new part to the existing part stack, the part stack also has to have an id. Therefore, the field “id” has to be set for the part stack in the application model (Application.e4xmi).
The existing part stack needs a unique ID
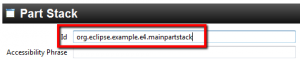
The ID allows referencing of an existing element from an extending fragment
Additionally, we need a second plugin to extend the first one. For this example, this second plugin needs the following dependencies:
- org.eclipse.e4.ui.model.workbench
- org.eclipse.e4.core.di
- javax.inject
- the plugin to be extended
Model Fragment
A model fragment is nothing more than a small application model. It contains elements, which are supposed to be added to another application model.
The most comfortable way of creating a fragment is provided by the “Extract Fragment” wizard of the e4 model editor. It allows you to add elements in the application model at the place you want them to appear at the end, and extract them to an extending fragment afterwards. To try the wizard, add a new Part to the existing PartStack in your application model. Now right click the new Part and select “Extract into a Fragment”. In the following wizard, you can select “New” for the model fragment file and its container. Please note, that it usually does not make sense to place a fragment in the same bundle as the application model, but for modularity reasons in an additional bundle.
Alternatively to using the extract wizard, you can also create a model fragment from scratch. This might be necessary, e.g. if you cannot directly access the application model you want to extend.
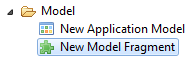
A file containing model fragments can be created using the wizard provided by the e4 tools. Although the editor says “New Model Fragment”, it will actually create a file, which can contain an arbitrary number of model fragments.
The extending plugin is set as a container for the model fragment file. After finishing the wizard, the model fragment file is opened in an editor which works similarly to the editor used to modify an application model.
The next step is to add a model fragment to the model fragment file. A model fragment has to define at which place the main application model is extended. This is done through an Element ID and a feature name. The Element ID defines which element of the main application model is extended, e.g. a tool bar. The feature name defines the containment reference to which the new element is added. For elements such as toolbars, menus, windows, or even the application, the feature is usually defined as “children”. If you are looking for the right containment reference, take a look at the core application model you want to extend. The containment references are typically shown as “folders” (child elements without an icon).
In the following example, a new element is added as a child of the existing toolbar.
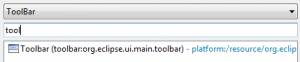
The element ID defines which element is extended

The feature name defines where the new element is added
The fragment now defines the location in the core application model, where elements will be added. As child elements of the new fragment, now application model elements can be created. All elements in a fragment will be added to the specified location in the core application model. As a simple example, we will add a Direct Tool Item as a child of the fragment (see Figure). To make it visible, a label or icon should be set. To trigger some action when the tool item is clicked, it should be linked to a handler. In the example, it is linked to a handler saying “Hello Eclipse!”.
public class MyHandler {
   @Execute
   public void execute(Shell parent) {
      MessageDialog.openInformation(parent, "", "Hello Eclipse!");
   }
}

To connect the Direct Tool Item to the handler, the “Class URI” needs to point to the implementing class, located in the extending plugin. Of course, it is also possible to add more than one element to the core application model. If they are supposed to be added to the same location, they can all be placed within one model fragment. If they need to be added to different locations, you will need several model fragments specifying those locations. However, the model fragments can still be placed in one model fragment file. For example, to add a tool item, a handler and a command, you can add three model fragments to one model fragment file.
In any case, the every model fragment has to be registered via an extension point. This will usually happen automatically, e.g. if you use the “Extract” wizard or the “New model fragment wizard”. There is an optional attribute “apply” for the extension, which controls if model fragments are merged into the core application model. There are three possible values:
- initial: The model fragments is only added to the core application model, if there is no persistent application model, typically, if the application is started the first time. On a second start-up, if the former state of the application model is loaded, the fragment will not be merged again
- notexist: The model fragments is only added to the core application model, if the elements added by the fragment are not already existing in the core application model
- always: The model fragments are always added. Please note, that this might lead to duplicated elements in the core, as elements in the model fragment are added again on every start-up
public class Processor {

   @Execute
   public void execute(MApplication application, EModelService modelService){
      MWindow existingWindow = modelService.find(String “IdOfExistingWindow”, MUIElement application);
      existingWindow.setX(200);
      MTrimmedWindow newWindow =
      modelService.createModelElement(MTrimmedWindow.class);
      newWindow.setWidth(200);
      newWindow.setHeight(existingWindow.getHeight());
      application.getChildren().add(newWindow);
   }
}
Finally, the same as we did for the model fragment, the processor has to be registered via an extension point. The “beforefragment” attribute specifies, if the processors should be executed before or after all model fragments have been merged. In the example, after a restart of the application, the second window should open.
Conclusion
Model fragments and processors allow the extension of an existing application model. This supports the modular design of an application as new features including UI contributions, can be easily added or removed from an existing application. The definition of model fragments works in the same way as the definitions of the application model itself and does not require additional knowledge. The programmatic extension using processors uses a consistent EMF API and offers full flexibility.
In general, model fragments should be preferred over processors. First, they follow the same model-based approach to define elements as done in the core model using the application model editor. Second, model fragments are defined declaratively, so the platform can understand its contents. Thereby, the platform can decide if elements must be merged based on a given directive (always, initial, etc.). To get this behavior with a model processor, it has to implemented manually.
The next chapter of this tutorial will describe dependency injection in Eclipse 4. We will describe how to influence the injected parameters using different annotations, as well as how to trigger the injection manually.
This tutorial and all other parts of the series are available as a downloadable PDF or as links below:
Part 1: Introduction to Eclipse 4
Part 2: Application Model and Views
Part 3: Extending existing models
Part 7: Soft migration from Eclipse 3.x
Appendix: Eclipse 3.x vs. Eclipse 4 - Which Platform to use
For more information, contact us:
Jonas Helming and Maximilian Koegel
EclipseSource Munich leads
Author: Jonas Helming