Jonas Helming, Maximilian Koegel and Philip Langer co-lead EclipseSource. They work as consultants and software engineers for building web-based and desktop-based tools. …
Eclipse 4 (e4) Tutorial Part 4
11 min ReadIn the previous parts of this tutorial series we described how to create an application model, link those elements to implementations and how to extend the application model. This tutorial and all other parts of the series are now available as a downloadable PDF.
In most of the programming examples provided so far, we implicitly used a common concept of Eclipse 4: dependency injection (DI). DI plays a central role in Eclipse 4, reason enough to devote a whole part of this tutorial to it. In this part, we describe:
- How dependency injection works in general
- Which objects can be injected.
- How the Eclipse Context works.
- Which annotations can be used to influence the injection.
Dependency Injection?
In web programming, dependency injection has been a hot topic for some time, with prominent representatives such as Google Guice or Spring. With Eclipse Version 4, Dependency Injection enters into the Eclipse world. It is essentially about how certain objects can access other objects from the outside. An Eclipse example would be the implementation of a view that needs a parent composite, an input object or a service, such as a logger.
To understand the concept and the motivation behind DI, we will use a metaphore, which has nothing to do with programming. If you are already familiar with DI in general, you might skip this section and continue with the next one already focussing on how to use DI in Eclipse.
So again, DI deals with the problem of how to retrieve certain objects while implementing something. A comparable example from the real world would be grocery shopping based on a shopping list. On the shopping list are all the things you need, in programming that would be all objects that you need to retrieve. Now, there are three ways to make the purchase.
Variant one would be to go to the appropriate stores and take the necessary goods from the shelves. In the world of programming this would correspond to the access to singletons. One must, however, know exactly where you can buy the required goods. Additionally, stores can close or relocate, the person using the store might move to another city, not being able to use the store anymore. In all cases, your way of getting goods would not work anymore. Therefore this option is very inflexible and requires detailed knowledge.
The second variant would be to order a pre-made food box that covers the shopping list as well as possible. The box is delivered to your door and you do not care where it comes from. Even if you move, you just need to change your address to still get the same box. However, you might get more or less than you really want. Missing something, you still need to go to the store. Second variant corresponds to the implementation of interfaces that are defined by a framework and thus “filled” by it. You are not that much bound to the framework (to the interface, though), but you need to be happy with the parameter set defined by the framework.
Version three, a hypothetical one, would mean that you just hung a piece of paper on your fridge, describing exactly what is needed. When you returned home, the fridge would be filled with exactly these goods. You get exactly what is needed and you do not have to be concerned about where it comes from. This is not (yet) possible in the real world, but through Dependency Injection it is possible in programming with Eclipse 4. The basic idea is therefore that classes specify for themselves which objects they need from the outside. The framework will then “inject” these objects.
Injected objects can be fields of a class, parameters of a constructor or parameters of a method that is called by the framework. In the simplest case, required objects are marked by the annotation @Inject. There are a number of additional annotations that control the behavior and the timing of the injection. For instance, the annotation @Execute marks a method in a handler which is called during the execution of the handler. The required parameters for this method will be injected:
@ Execute
public void execute (MyObject requiredObject) {
// Here is the actual handler code
}
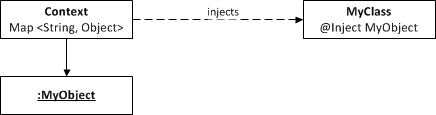
The Eclipse Context
Having objects injected seems intuitive and practical, but leaves open the question where injected objects actually come from and how they are identified. So how does the framework determine which objects to inject at a certain place? In Eclipse 4 there is the so-called Eclipse context. This is a kind of list of objects that are ready for injection. Technically this context is a map of strings and objects. Without further information, an object is saved under its full class name, for example “org.eclipse.swt.Composite”. Now, when an object of a particular type is requested, the appropriate context will be searched. If it contains an object of the required type, this object is then used to call a constructor or a method, or to fill a field.
Dependency Injection using the Eclipse Contexts
However, in Eclipse 4, there is more than one global context – otherwise, it would be very difficult to identify the correct object to inject. In the example of a view that requires a composite as a parent, which composite to inject is ambiguous. Therefore, some elements of the Application Model have their own context during runtime, such as a window, a perspective or a part. These are hierarchically linked. For example, if an object is not found in the context of a part, the context of the perspective, or the window, the workbench and the OSGi context are searched. The OSGi context contains objects that are valid for the entire application, such as services.
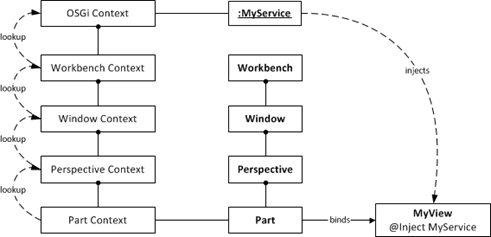
The Eclipse context is hierarchically linked.
Generally, all elements of the Application Context Models can be accessed along the ascending hierarchy. So, for example, in the context of a part, the window in which the part is contained can be injected:
@ Inject
public void myMethod (MWindow window) {
}
Additionally, the context contains some SWT elements associated with the Application Model such as the composite of a part or the shell of the running application. Eclipse 4 services also ensure that certain commonly accessible objects, such as the current selection or the Eclipse Workbench Preferences are available in the context. The root context contains all OSGi services. Last but not least, you can insert your own items into the context.
@Named
If you wanted access to not only a specific type, but to the specific instance of a type, you can specify a name for the injection. This is done via the additional annotation @Named, which is used in combination with @Inject. @Named allows the additional specification of a string that defines the name of the object to be injected. In this case, the context will not search for the type of object to be injected, but for the corresponding string. Specifically, an injection without @Named is just a shortcut, where the type of a parameter is assumed to be the name of the variable to be injected. Conversely, objects which are placed in context with no further indication of a name, are available under the full class path. In the following example @Named therefore has no effect and could be omitted:
@ Inject
@ Named ("org.eclipse.swt.widgets.Composite")
Composite parent;
Eclipse 4 services automatically include some objects in the context under certain IDs. The valid names are found in the interface IServiceConstants. In this manner, for example, the active shell is injected.
@ Inject
@ Named (IServiceConstants.ACTIVE_SHELL)
Shell shell;
Furthermore, it is possible to store custom objects with a name in context. We will describe this in more detail in a following chapter of this tutorial.
@Optional
Of course it is always possible that a context does not contain a matching object that can be injected. In this case, the dependency injection mechanism of Eclipse 4 displays an error. More specifically, an exception is thrown. A class that needs the missing parameter in a constructor, a method or as fields that can not be injected, will not be initialized correctly. However, some parameters are not needed in every case, for example, the active selection of specific services. For these parameters, the annotation @Optional can be used. If an object marked with @Optional is not available in the context, null will be injected. In this case, prior to access to the injected object, it has to be checked, if it is null.
@Active
In certain use cases, it is necessary to access not only a specific type of an element from the application model, but the currently active item. With the annotation @Active, the currently active element is used for the injection, for example, to access the active part.
@Inject
public void save (@Active MPart part) {
partService.save (part);
}
Injecting Objects
In the simplest case, the injection is triggered via the @Inject annotation. It can be placed prior to methods, before the constructor or class fields. If you mark a method or constructor with @Inject, all their parameters are injected. Without further information with @Named, the lookup for the right object will be according to the corresponding type of the parameter or field. There are a number of additional annotations, which control the exact time of the injection, but they behave in principle the same as @ Inject. We will describe the additional annotations in another part of this tutorial.
A crucial role is played by the order of injection. When a class is instantiated, for example, a view, the constructor and its parameters are injected first. Immediately following, the relevant fields are injected. As a consequence, fields can not be accessed in the constructor. Parameters of methods are injected when these methods are called by the framework. All methods marked with @Inject are also called to initialize the object after the constructor and the fields. If the injected object changes in context, it is re-injected. Methods are therefore called again, when the injected values change.
Constructors
Constructors should include parameters that are essential for the existence of an object. Any unnecessary parameter limits the testability and as well, the reusability of an object. Particularly the object initializations should be done in separate methods that are called after the constructor. A typical example of dependency injection in the constructor is the injection of the Parent composite of a view, as has been described previously in this tutorial. Since views are initialized in the context of a part of the application model, the specification of the type composite in this case is clear and no additional annotations are required.
@ Inject
public void MyView (Composite parent) {
//Implement the View placed on the Parent
}
Fields
After the constructor of a class, the class’ fields are injected. A typical application is the injection of services that will be available globally in the class. An example of this is the Selection Service to set the current selection of a view. As services usually exist only once per application, as in this case, the indication of the type is sufficient.
@ Inject
ESelectionService service;
...
service.setSelection (mySelection);
Injected fields must not be marked as final, as they can potentially be re-injected. Final fields must be explicitly set through the constructor and its injection.
Methods
After the constructor and the fields, while initializing a class, all annotated methods (with @Inject) are sequentially called. This also applies to methods that have no parameters. If one of the injected parameters of a method changes afterwards in the context, the method will be called again with the new parameters. A good example of an injection in methods is the current selection, on which you often want to respond in a view or in a handler. In this case, however, specifying the type of the parameter is not enough, the parameter must also be marked with the annotation @Named. The following example also uses @Optional because, for example, when the application is started no selection will be in the context. In the following example, the injection is repeated every time and the method is called again when the selection changes.
@ Inject
public void setSelection (@ Named (IServiceConstants.ACTIVE_SELECTION) @ Optional MyObject myObject) {
//Process Selection
}
Conclusion
Dependency injection reduces dependencies on singletons and framework interfaces. Objects define exactly which parameters or services they use. This also makes testing comparativelyeasy. The use of additional annotations allows more precise specification of objects to be injected, for example, marking certain parameters as optional.
A next part of the series is dedicated to even more details about dependency injection. We will cover additional annotations such as @PreDestory and @PostConstruct. With these, you can instruct the framework, at which time certain methods should be invoked without creating a direct dependency on particular framework classes.
This tutorial and all other parts of the series are available as a downloadable PDF or as links below:
Part 1: Introduction to Eclipse 4
Part 2: Application Model and Views
Part 3: Extending existing models
Part 7: Soft migration from Eclipse 3.x
Appendix: Eclipse 3.x vs. Eclipse 4 – Which Platform to use
For more information, contact us:
Jonas Helming and Maximilian Koegel
EclipseSource Munich leads