Jonas Helming, Maximilian Koegel and Philip Langer co-lead EclipseSource. They work as consultants and software engineers for building web-based and desktop-based tools. …
JSON Forms - Day 6 - Custom Renderers
JSON Forms is a framework to efficiently build form-based web UIs. These UIs are targeted at entering, modifying and viewing data and are usually embedded within an application. JSONForms eliminates the need to write HTML templates and Javascript for manual data-binding to create customizable forms by leveraging the capabilities of JSON and JSON schema as well as by providing a simple and declarative way of describing forms. Forms are then rendered within a UI framework – currently based on ReactJS and Redux. If you would like to know more about JSON Forms the JSON Forms homepage is a good starting point.
In this blog series, we wish to introduce the framework based on a real-world example application, a task tracker called “Make It happen”. On day 1 we described the overall requirements, from day 2 to 5, we have created a fully working form for the entity “Task”. If you would like to follow this blog series please follow us on twitter, where we will announce every new blog post regarding JSON Forms.
So far, on the previous days, we have created a fully functional form rendered in JSON Forms by simply using two schemata: a JSON Schema to define the underlying data and a UI Schema to specify the UI. JSON Forms provides a rendering component, which translates this two schemas into a Material-UI based form, including data binding, validation, rule-based visibility and so on. While this is very efficient, you may wonder what you should do if the form rendered by JSON Forms does not exactly look like what you expected. Let us have a look at the form we have so far:
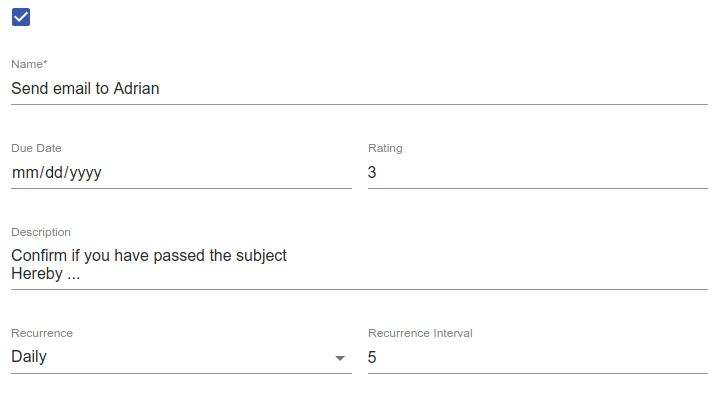
While the generic structure and the layout look pretty good, we might want to aesthetically improve the rating control since itis just a plain number field. A rating would better be expressed by a control like this:
Such an improvement can be addressed by either customizing an existing renderer or by adding a new custom renderer to JSON Forms. This use case is actually not special at all, it is anticipated and fully supported.
In JSON Forms a renderer is only responsible for displaying one particular UI element, like a control or a horizontal layout. JSON Forms ships with default renderers for all UI schema elements. The default renderers are meant as a default and therefore, it is very likely that you will add new renderers and extend existing ones.
The good news is that you still do not have to implement the complete form manually. Rather, you just need to add some code for the customized part. That means you can iteratively extend the framework with custom renderers, while the complete form remains fully functional. Let us have a quick look at the architecture of the JSON Forms rendering component. In fact there is not only one renderer, there is at least one renderer per concept of the UI schema. Renderers are responsible for translating the information of the UI schema and the data schema into a running web-based UI.
All renderers are registered at a redux store. For every renderer, there is a “Tester”, which decides, whether a certain renderer should be responsible for rendering a certain UI element. This can depend on the type of the UI schema element (e.g. all controls), on the type of the referenced data property (e.g. a renderer for all String properties), or even on the name of the data property (e.g. only the property “rating”).
This architecture allows you to register renders in a very flexible way. If there are no custom renderers, the default renderers will be used.
We don’t go into detail about implementing the custom renderer here, since we have a dedicated tutorial on how to do this. If you follow the tutorial and finish it, the rendered form will look like this:
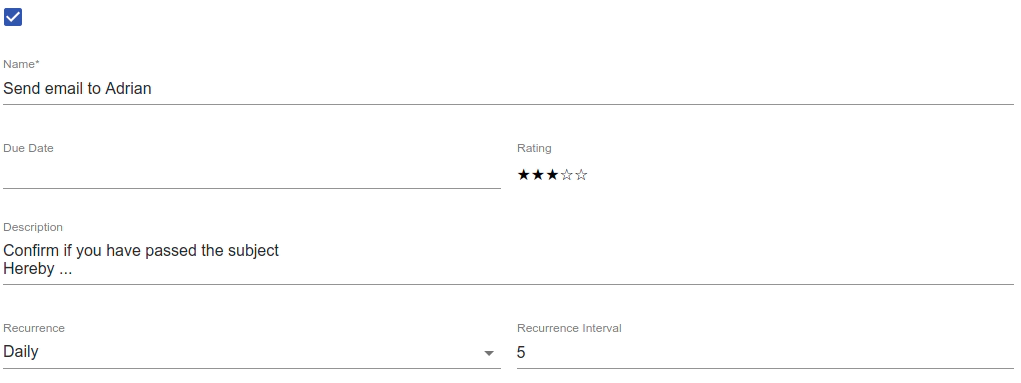
Please note that the data schema and the UI schema did not have to be adapted at all. JSON Forms facilitates a strict separation between the definition of a form and its rendering. That enables you to not only adapt the look and feel of your UI, but also render the same UI schema in different ways.
If you are interested in implementing your own renderer or if you miss any feature in JSON Forms, please open an issue or contact us directly. If you are interested in trying out JSON Forms, please refer to the Getting Started tutorial. This tutorial explains how to set up JSON Forms in your project as well as how you can try out the first steps on your own. If you would like to follow this blog series, please follow us on Twitter. We will announce every new blog post on JSON Forms there.
List of all available days to date: