Serial Communication in Java with Raspberry Pi and RXTX
Serial communication is one of the ancient technologies in computing that is still relevant today. Its origins date back to the 1960’s when serial communication was used between teletypewriters and modems. Today, serial interfaces can be found inside myriads of embedded systems where they transfer data between different components. A serial interface is also a common way to connect a PC to an embedded system. Application scenarios include firmware update, logging/debugging, data streaming and many more. In an earlier post I introduced the Raspberry Pi as a great platform for tinkering. This post provides a short introduction in UART (Universal Asynchronous Receiver Transmitter), the basic form of serial interface. Some examples illustrate how you can set up serial connections with your Pi and how to implement them in your Java applications by using the RXTX library.
History
One of the first applications for serial data communication was the connection between teletypewriters and modems. The teletypewriter sent out each key press as a character to a modem which then transmitted it further as serial bits via a telephone line. This legacy remains in the name of serial interfaces on Unix systems: Teletypewriter => TTY => /dev/ttyS0 or /dev/ttyUSB0 as the device name on Unix based systems. Teletypewriters used a specific bit representation for each character known as the Baudot code. It is named after its inventor Jean-Maurice-Émile Baudot (1845 - 1903), a french telegraph engineer. The symbol rate of serial links is still measured today in Baud.
Recent PC models usually don’t have a serial port (RS-232) any more. These ports have been replaced by USB (Universal Serial Bus) to connect peripherals to a PC. Nevertheless there is a solution available in the form of a USB to UART bridge. Such adaptors come in the form of a small PCB (Printed Circuit Board) or a completely integrated USB cable. This cables are often referred to as FTDI cable, named after the FTDI chip used for the USB to UART conversion.
Hardware
A serial link over UART consists of two connections for the transfer of single bits. Each connection transmits bits in only one direction from the TX (transmit) pin of one end point to the RX (receive) pin of the other end point. Both connections can be used at the same time (full duplex), in alternating order (half duplex) or stand-alone (simplex). On both ends, UART uses a shift register to translate between the serial bits on the link and a data byte in the endpoint. UART also defines further signals for flow control but these are not mandatory and are sometimes omitted in simple applications. In the following examples the flow control signals are not used.
 Now, let’s get our hands on some real UART hardware. As an example we will connect a Raspberry Pi to a Linux PC via two kinds of serial link.
- A plain FTDI USB adaptor: PC <-USB cable-> FTDI PCB <-simple wires-> Raspberry Pi
- A transparent wireless serial link. Each end of the link consists of an open hardware modem with an integrated FTDI chip: PC <-USB cable-> modem 1 <-433MHz wireless link-> modem 2 <-simple wires-> Raspberry Pi
Method 1: Plain FTDI
 The most simple connection to the serial port of the Raspberry Pi is made through an FTDI adaptor. Only three pins have to be connected: RX, TX and ground (GND). The range of such a connection is limited by the length of the USB cable. It is robust and easy to set up. Just connect the RX pin of the Raspi to the pin labeled TX on the FTDI PCB, the TX pin of the Raspi to the RX pin on the FTDI PCB, and the GND pins as depicted on the image to the right.
Method 2: Transparent wireless serial connection
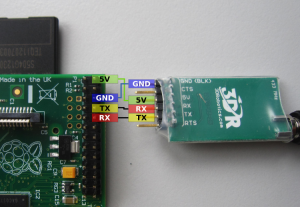 A more sophisticated way to connect to the Raspi’s UART is to use 3DR Radio Telemetry Kit. It provides a transparent wireless UART connection and is as easy to set up as the plain FTDI cable. Its advantages are flexibility and a much higher range than the usual wireless connections like WLAN and Bluetooth. As the modem on the side of the Raspberry Pi needs to be powered, we have to connect the 5V pin in addition to the pins used in Method 1.
Software
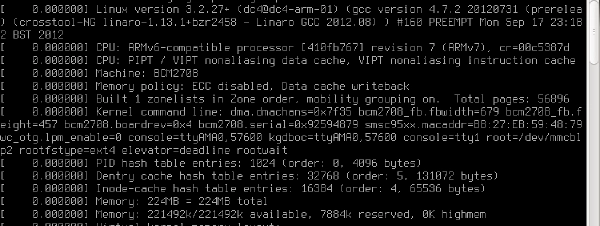
Before you can write your own software to use the serial connection to the Raspberry Pi, let’s prepare and check if everything works as expected by using some standard tools. On the Linux PC you can use GtkTerm (apt-get install gtkterm) as a simple terminal to watch the kernel debug messages sent by the Raspberry Pi while it is booting.
- Connect the PC with your Raspi as explained in Method 1.
- Start gtkterm and configure the serial port:
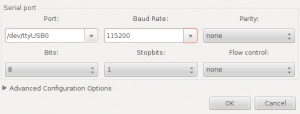
- Now start the Raspberry Pi. You should see something like this:
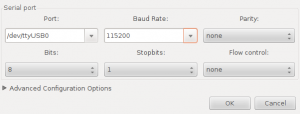

The modems used for the transparent wireless serial connection are configured to 57600 baud by default. You can either reconfigure the wireless modems by using AT-commands or switch the Raspberry Pi to 57600 baud. For the latter edit the following two files on the Pi: In /boot/cmdline.txt change all occurrences of 115200 to 57600. In /etc/inittab search for the lines #Spawn a getty on Raspberry Pi serial line T0:23:respawn:/sbin/getty -L ttyAMA0 115200 vt100 and replace 115200 with 57600. You also have to switch the port settings in GtkTerm to 57600. After a restart, the Raspberry Pi should talk to you via the wireless serial link.
Java and RXTX
Instead of using a terminal program, writing your own application provides much more flexibility when using the serial connection. The RXTX library is just the right tool if you want to use the Java language.
You can install RXTX on your Debian/Ubuntu PC like this: $ sudo apt-get install librxtx-java
The following example application forwards all input from standard input to the serial port and vice versa. It is a slightly modified version of a similar example from the RXTX wiki. If you start the example in your favourite graphical terminal, you can even use it to log into the Raspberry Pi and use the command line!
import java.io.IOException;
import java.io.InputStream;
import java.io.OutputStream;

public class TwoWaySerialComm {

  void connect( String portName ) throws Exception {
    CommPortIdentifier portIdentifier = CommPortIdentifier
        .getPortIdentifier( portName );
    if( portIdentifier.isCurrentlyOwned() ) {
      System.out.println( "Error: Port is currently in use" );
    } else {
      int timeout = 2000;
      CommPort commPort = portIdentifier.open( this.getClass().getName(), timeout );

      if( commPort instanceof SerialPort ) {
        SerialPort serialPort = ( SerialPort )commPort;
        serialPort.setSerialPortParams( 57600,
                                        SerialPort.DATABITS_8,
                                        SerialPort.STOPBITS_1,
                                        SerialPort.PARITY_NONE );

        InputStream in = serialPort.getInputStream();
        OutputStream out = serialPort.getOutputStream();

        ( new Thread( new SerialReader( in ) ) ).start();
        ( new Thread( new SerialWriter( out ) ) ).start();

      } else {
        System.out.println( "Error: Only serial ports are handled by this example." );
      }
    }
  }

  public static class SerialReader implements Runnable {

    InputStream in;

    public SerialReader( InputStream in ) {
      this.in = in;
    }

    public void run() {
      byte[] buffer = new byte[ 1024 ];
      int len = -1;
      try {
        while( ( len = this.in.read( buffer ) ) > -1 ) {
          System.out.print( new String( buffer, 0, len ) );
        }
      } catch( IOException e ) {
        e.printStackTrace();
      }
    }
  }

  public static class SerialWriter implements Runnable {

    OutputStream out;

    public SerialWriter( OutputStream out ) {
      this.out = out;
    }

    public void run() {
      try {
        int c = 0;
        while( ( c = System.in.read() ) > -1 ) {
          this.out.write( c );
        }
      } catch( IOException e ) {
        e.printStackTrace();
      }
    }
  }

  public static void main( String[] args ) {
    try {
      ( new TwoWaySerialComm() ).connect( "/dev/ttyUSB0" );
    } catch( Exception e ) {
      e.printStackTrace();
    }
  }
}
Compile and run the example like this: $ javac -cp /usr/share/java/RXTXcomm.jar:. TwoWaySerialComm.java $ java -Djava.library.path=/usr/lib/jni -cp /usr/share/java/RXTXcomm.jar:. TwoWaySerialComm For further background on RXTX, there is a nice chapter in the Wiki book on “Serial Programming”.
Conclusion
Serial communication over UART is still a widely used technology. The Raspberry Pi is a nice example of the typical use case for this kind of communication where a PC exchanges data with an embedded system for debugging purposes. The RXTX library enables access to serial interfaces in Java applications. It allows the implementation of arbitrary serial protocols and can be used at both ends of the serial link. This post demonstrated a simple example to read output from the Raspberry Pi and send commands to it. Stay tuned to learn how to use RXTX on the Raspberry Pi itself and how to use serial communication with the Pi from within Android.
