Jonas Helming, Maximilian Koegel and Philip Langer co-lead EclipseSource, specializing in consulting and engineering innovative, customized tools and IDEs, with a strong …
How to customize with EMF Forms
18 min ReadEMF Forms provides a form-based and highly customizable UI based on a given data model. The layout of the form-based UI can be described in a simple view model. This tutorial describes how to customize EMF Forms, e.g., by adding new controls or by changing the default behavior. This tutorial is based on the “Make It Happen!” example model. If you want to get started with EMF Forms and learn about the example model, please refer to this tutorial.
This tutorial is based on EMF Forms and EMF Client Platform versions 1.6.x, the major changes of the rendering architecture in version 1.6.0 are described in this blog post. please find the 1.5.x version in this tutorial.
Customize and Replace Renderers
EMF Forms provides default renderers for all view model elements, such as Vertical Layout, Group or Separator. Additionally, it provides control renderers for all basic attribute types, such as a Text Field renderer for a String attribute. Therefore, and without any adaptation, EMF Forms is capable of rendering any EObject from scratch. However, you might want to adapt the way the renderer translates the view model to the concrete UI. This could mean you want to add a custom control for a certain attribute or attribute type or adapt an existing one. The following screenshots show a possible adaptation of the existing default control for String attributes. The customization adds a new button next to the text field allowing you to send an email. This example control would only be registered for the attribute EMail. This example will be described in more detail in the following sections.
EMF Forms also allows you to replace or adapt the renderer of any container view model element to change the way the UI is structured and how the layout is created. The following screenshots show an adaptation of the renderer for the view model element Group. The default renderer uses a SWT group. The custom renderer uses a PGroup instead. This example will be described in more detail in the following sections, too.
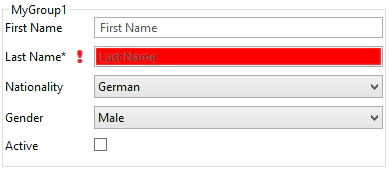
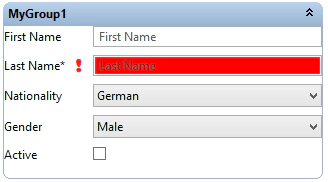
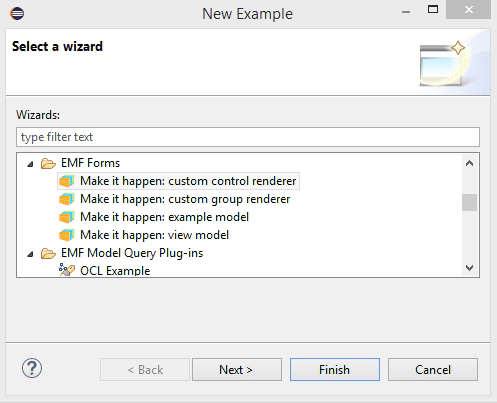
Before we describe the implementation of these two example renderers, we will describe how to register renderers in general and how to determine the elements for which a custom renderer is used (next section). The following sections describe the concrete implementations of the Email attribute and the PGroup renderer. Please note, that you can also have a look at those fully working examples in your IDE (New => Example => EMF Forms => Make it happen: custom xxx renderer).
⇒ Find out more about Developer Support and Training or contact us.
⇒ Further Documentation for EMF Forms
Registering renderers
While rendering a form-based UI, EMF Forms uses a registry to determine the right renderer for any element of the view model. By default, this registry contains all renderers that ship with EMF Forms. To replace or adapt a renderer, you need to register it in this registry, More precisely, you register a component, which can construct a renderer and tells the registry when to use it. The registry uses priorities to choose between different renderers which would be capable of rendering a certain element. So to replace an existing renderer, you need to set a higher priority for it.
Renderers are registered using OSGi Services. The recommended way is by providing a service extending org.eclipse.emfforms.spi.swt.core.di.EMFFormsDIRendererService. The EMFFormsDIRendererService defines two methods. The isApplicable method is called in order to determine the priority of the added renderer and therefore answer the question of when the custom renderer is actually used. The second method is getRendererClass, which must return a class that inherits from “org.eclipse.emf.ecp.view.spi.swt.AbstractSWTRenderer”. This is the actual implementation of the renderer. The renderer class itself uses Dependency Injection in its constructor, so all required parameters (e.g. services) can be injected by the framework. Therefore, the constructor of the renderer needs to be marked with the annotation @Inject. Required parameters are typically EMF Forms services providing certain features to be used in the renderers. See here for an overview of the EMF Forms services.
The following example shows the registration of a renderers that will be applied for all elements of the type VGroup. It will therefore replace the default group renderer completely. In the second example, we describe, how to register a renderer for a specific attribute, only. Subsequently, we describe the implementation of the renderers themselves, meaning the code, which creates the actual UI. Please have a look at the “make it happen” examples, which can be imported into your workspace, to see a complete example of a registered renderer (New => Example => EMF Forms => Make it happen: custom xxx renderer).
The first component, a subclass of EMFFormsDIRendererService is responsible for telling the framework, when a renderer is used and to return the class implementing the renderer.
public class PGroupRendererService implements EMFFormsDIRendererService {
@Override
public double isApplicable(VElement vElement, ViewModelContext viewModelContext) {
if (!VGroup.class.isInstance(vElement)) {
return NOT_APPLICABLE;
}
return 10;
}
@Override
public Class<? extends AbstractSWTRenderer> getRendererClass() {
return PGroupRenderer.class;
}
}
This service must be registered as an OSGi service. The recommended way is to use declarative service for this, (i.e. create a component.xml). The component.xml for the example renderer service would look like this:
<?xml version="1.0" encoding="UTF-8"?>
<scr:component xmlns:scr="https://www.osgi.org/xmlns/scr/v1.1.0" name="org.eclipse.emf.ecp.makeithappen.view.group.rendererservice">
   <implementation class="org.eclipse.emf.ecp.makeithappen.view.group.swt.pgroup.PGroupRendererService"/>
   <service>
      <provide interface="org.eclipse.emfforms.spi.swt.core.di.EMFFormsDIRendererService"/>
   </service>
</scr:component>
There are use cases where you may want to define in more detail when a custom renderer is applied, (e.g. only for certain attributes). The following example shows the registration of a renderer service for the custom renderer that should be applied for the Email attribute from the “make it happen” example model. The renderer service checks whether the View Model Element to be rendered is a control and if the attribute to be shown is the Email attribute of the entity User. To retrieve the domain attribute, the EMF Forms databinding is used. Those services are registered as OSGi services, and can therefore be retrieved as such using declarative service injection. In the example, a second service, the ReporingService is used to log any kind of errors.
The following code example shows the implementation of the EMFFormsDIRendererService:
public class EmailControlSWTRendererService implements EMFFormsDIRendererService {
private EMFFormsDatabinding databindingService;
private ReportService reportService;
/**
* Called by the initializer to set the EMFFormsDatabinding.
*
* @param databindingService The EMFFormsDatabinding
*/
protected void setEMFFormsDatabinding(EMFFormsDatabinding databindingService) {
this.databindingService = databindingService;
}
/**
* Called by the initializer to set the ReportService.
*
* @param reportService The ReportService
*/
protected void setReportService(ReportService reportService) {
this.reportService = reportService;
}
@Override
public double isApplicable(VElement vElement, ViewModelContext viewModelContext) {
if (!VControl.class.isInstance(vElement)) {
return NOT_APPLICABLE;
}
final VControl control = (VControl) vElement;
IValueProperty valueProperty;
try {
valueProperty = databindingService.getValueProperty(control.getDomainModelReference(),
viewModelContext.getDomainModel());
} catch (final DatabindingFailedException ex) {
reportService.report(new DatabindingFailedReport(ex));
return NOT_APPLICABLE;
}
final EStructuralFeature eStructuralFeature = EStructuralFeature.class.cast(valueProperty.getValueType());
if (TaskPackage.eINSTANCE.getUser_Email().equals(eStructuralFeature)) {
return 10;
}
return NOT_APPLICABLE;
}
@Override
public Class<? extends AbstractSWTRenderer> getRendererClass() {
return EmailControlRenderer.class;
}
}
This service must again be registered as an OSGi service. This time, the component.xml also specifies the two references services and their binding methods:
<?xml version="1.0" encoding="UTF-8"?>
<scr:component xmlns:scr="https://www.osgi.org/xmlns/scr/v1.1.0" name="org.eclipse.emf.ecp.makeithappen.view.email.rendererservice">
   <implementation class="org.eclipse.emf.ecp.makeithappen.ui.emailcontrol.EmailControlSWTRendererService"/>
   <service>
      <provide interface="org.eclipse.emfforms.spi.swt.core.di.EMFFormsDIRendererService"/>
   </service>
   <reference bind="setEMFFormsDatabinding" cardinality="1..1" interface="org.eclipse.emfforms.spi.core.services.databinding.EMFFormsDatabinding" name="EMFFormsDatabinding" policy="static"/>
   <reference bind="setReportService" cardinality="1..1" interface="org.eclipse.emfforms.spi.common.report.ReportService" name="ReportService" policy="static"/>
</scr:component>
Once a renderers is registered correctly, the actual rendering code has to be written. The following two sections show the two example renderers in detail.
Custom Control Renderer (Email)
For the implementation of the custom renderer for the Email attribute, we inherit from the existing TextControlSWTRenderer, as it already implements a text field bound to the Email attribute. The following code example creates a two-column layout to add space for the button. It calls the super class to create the text field and adds a button next to it. The existing renderer needs a couple of EMF Forms services in its constructor. All those services can be injected, we therefore just need to forward them to the super class.
public class EmailControlRenderer extends TextControlSWTRenderer {
@Inject
  public EmailControlRenderer(VControl vElement, ViewModelContext viewContext,
    ReportService reportService,
    EMFFormsDatabinding emfFormsDatabinding, EMFFormsLabelProvider emfFormsLabelProvider,
    VTViewTemplateProvider vtViewTemplateProvider, EMFFormsEditSupport emfFormsEditSupport) {
    super(vElement, viewContext, reportService, emfFormsDatabinding, emfFormsLabelProvider, vtViewTemplateProvider,
      emfFormsEditSupport);
  }
  @Override
  protected Control createSWTControl(Composite parent) {
    final Composite main = new Composite(parent, SWT.NONE);
    GridLayoutFactory.fillDefaults().numColumns(2).applyTo(main);
    GridDataFactory.fillDefaults().grab(true, false)
      .align(SWT.FILL, SWT.BEGINNING).applyTo(main);
    final Control control = super.createSWTControl(main);
    final Button button = new Button(main, SWT.PUSH);
    button.setText("Send Mail"); //$NON-NLS-1$
    button.addSelectionListener(new SelectionAdapter() {
      @Override
      public void widgetSelected(SelectionEvent e) {
        try {
          Desktop.getDesktop().mail(
            URI.create("mailto:" //$NON-NLS-1$
              + getModelValue().getValue()));
        } catch (final IOException e1) {
          // ignore failure to open mailto
        } catch (final DatabindingFailedException ex) {
          getReportService().report(new DatabindingFailedReport(ex));
        }
      }
    });
    return control;
  }
}
Once this renderer is added to the run configuration of an application, the respective Email attribute will be rendered like this:
Custom Layout Renderer (Group)
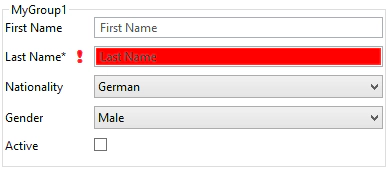
The implementation of the alternative group renderer is even simpler. As the group element is a container we inherit from ContainerSWTRenderer. It just creates a PGroup and sets the name of this group to the name specified in the view model. Finally, it returns the group. The EMF Forms rendering framework will automatically fill the group by using other renderers for the children of the group (if there are any).
public class PGroupRenderer extends ContainerSWTRenderer {
@Inject
  public PGroupRenderer(VGroup vElement, ViewModelContext viewContext, ReportService reportService,
    EMFFormsRendererFactory factory, EMFFormsDatabinding emfFormsDatabinding) {
    super(vElement, viewContext, reportService, factory, emfFormsDatabinding);
  }
@Override
  protected Composite getComposite(Composite parent) {
    parent.setBackgroundMode(SWT.INHERIT_FORCE);
    PGroup group = new PGroup(parent, SWT.SMOOTH);
    if (getVElement().getName() != null) {
      group.setText(getVElement().getName());
    }
    return group;
  }
@Override
  protected Collection getChildren() {
    return getVElement().getChildren();
  }
  @Override
  protected String getCustomVariant() {
    return "PGroup";
  }
}
Once this renderer is added to the run configuration of an application, every group in the view model will be rendered like this:
EMF Forms Services
For the implementation of renderers, certain features are frequently required, (e.g. creating databindings, calling other renderers or logging messages). All those common features are provided by services, which can be accessed from within the renderers (using dependency injection). In the following sections, we describe those services more in detail.
ReportService
The ReportService allows to log events and errors. The ReportService collects the reports and delegates them to ReportServiceConsumers. There can be multiple consumers. If you want your reports to be handled differently than other reports, you can provide your own ReportServiceConsumer and filter for reports of your type. There is a default report that can always be used, the AbstractReport.
Usage Example
public class MyReportServiceConsumer implements ReportServiceConsumer {
  @Override
  public void reported(AbstractReport reportEntity) {
    if (MyReport.class.isInstance(reportEntity)) {
      //do whatever with the report. eg open a dialog
MessageDialog.openError(
      Display.getDefault().getActiveShell(), "Error", //$NON-NLS-1$
      reportEntity.getMessage());
    }
  }
}
DatabindingService
The DatabindingService provides methods to retrieve Eclipse-Databinding objects like IObservableValue and IValueProperty from VDomainModelReferences and the root object of the rendered view.
The extracted service can be easily replaced without changing the renderer. Furthermore we can reuse the same service for different UI-technologies as there are implementations of the Eclipse-Databinding for JFace, JavaFX and many more.
Usage Example
EMFFormsDatabinding databinding;
DataBindingContext dataBindingContext;
VDomainModelReference dmr=vControl.getDomainModelReference();
Text textControl=new Text(parent, SWT.SINGLE);
final IObservableValue value = SWTObservables.observeText(text, SWT.FocusOut);
IObservableValue modelValue=databinding.getObservableValue(dmr,viewModelContext.getDomainModel());
final Binding binding = dataBindingContext.bindValue(value, modelValue, null, null);
}
LabelService
The LabelService provides methods to retrieve the label texts and description texts as Eclipse-Databinding objects based on the VDomainModelReference of the current VControl and the root object of the rendered view.
The main advantage to using Eclipse-Databinding over manually setting the values on the label is the possibility to dynamically switch languages in the background without the renderer having to do the work.
Usage Example
EMFFormsLabelProvider labelProvider;
DataBindingContext viewModelDBC=new EMFDataBindingContext();
VDomainModelReference dmr=vControl.getDomainModelReference();
Label label = new Label(parent, SWT.NONE);
final EObject rootObject = viewModelContext.getDomainModel();
IObservableValue textObservable = SWTObservables.observeText(label);
IObservableValue displayNameObservable = labelProvider.getDisplayName(dmr, rootObject);
viewModelDBC.bindValue(textObservable, displayNameObservable, null, null);
LocaleService
The LocaleService provides a method to retrieve the current locale. Furthermore it provides methods to add and remove locale change listeners.
Usage Example
EMFFormsLocaleProvider localeProvider;
Locale locale=localeProvider.getLocale();
LocalizationService
The LocalizationService provides methods to retrieve localized strings based on a bundle and a key.
Usage Example
EMFFormsLocalizationService localizationService;
String myKeyValue=localizationService.getString(getClass(), “my_key”);
EMFFormsRendererFactory
The renderer factory allows you to retrieve a renderer based on the VElement and the ViewModelContext.
Usage Example
EMFFormsRendererFactory rendererFactory;
VElement child = myViewModelElement.getChild();
AbstractSWTRenderer renderer = rendererFactory.getRendererInstance(child, getViewModelContext());
Template Models
In the last section, we described how to adapt and replace existing renderers. However, there are some small required adaptations that are frequently necessary in projects. An example of such a adaptation is the background color of a control or the font of a label. These properties can be configured without the implementation of a custom renderer, or more precisely, the parameters can be set with the existing renderers of EMF Forms. In the view model itself, the setting of renderer parameters is done in a simple model called “Template Model”. There is a clear separation between the template model and the view model. View models describe the logic structure of the UI and are independent from the rendering. Template models set concrete values for the rendering, e.g., font sizes or colors.Template models are therefore very similar to CSS styles.
To create a template model, select “New => EMF Forms => Template Model”. Like view models, template models are typically contained in separate bundles. They are also registered via the extension point “org.eclipse.emf.ecp.view.template”. If you use the “New” wizard, the new template model will automatically be registered in your plugin.xml.
Template models consist of an arbitrary number of styles. Right click the root node in a template model to create new styles.
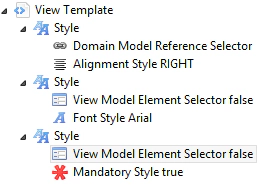
Like CSS, a style always consists of a selector and a number of style properties. The selector determines for which elements in the UI the style is applicable. There are currently two supported types of selectors in EMF Forms. A “View Model Element Selector” defines a certain view model element; the style should be applied to, e.g., “Control”, “Group” or “Label”. Additionally, the selector can rely on the properties of a view model element, e.g., it can apply only for read-only view model elements. The second selector, “Domain Model Reference Selector”, binds a style to a specific attribute of the domain model, e.g., the firstName attribute of the class User. Right click on a style to create the desired selector and open it in the details view to set its properties.
After defining the selector, an arbitrary number of style properties can be added to a style. All of them will apply to the elements determined by the selector. Right click on a style to see an overview of available style properties and to create them. Open them in the detailed view to set their detailed properties. For example, the style property “Alignment” allows to select the alignment of controls.

The following screenshot shows the result of a styled UI. The first text control has the “alignment right”, the third has a different “Mandatory maker” and the label has adapted font, size and color.
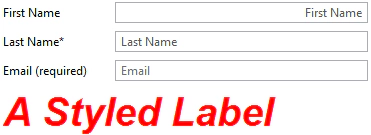
Please note that currently not all renders support the template model and further not all UI relevant properties are styleable. However, the template model of EMF Forms can easily be extended by new styles and concepts that fit your specific requirements. Professional support, training and sponsored development is available for this. Please contact us if you want to learn more about training and ways to customize and enhance EMF Forms.
⇒ Find out more about Developer Support and Training or contact us.
⇒ Further Documentation for EMF Forms
Implement a Reference Service
If EObjects allow the referencing of other EObjects, these references can be rendered by EMF Forms just like any simple attribute can be. The framework provides default reference controls for single and multi references. However, there is a difference when editing simple values and references – reference controls need to know about other elements that can potentially be added as references. Therefore, EMF Forms needs to know about the context of the EObject that is currently displayed in a form. In a simple case, the context of an EObject could be a file, so all objects in the file could be referenced. However, there could potentially be other contexts, too. If EMF Forms is embedded into the EMF Client Platform, the context could be the project containing an object. To offer this flexibility, EMF Forms defines an interface called ReferenceService (org.eclipse.emf.ecp.edit.spi.ReferenceService). It defines all methods that are required by the reference controls of EMF Forms. You will need to provide this service only if you have those methods in a form. As shown in the following diagram, there is a default implementation of ReferenceService, which connects EMF Forms to the project concept of the EMF Client Platform. However, you can provide any kind of implementation you want, e.g., retrieving objects from a database, a file or from memory.
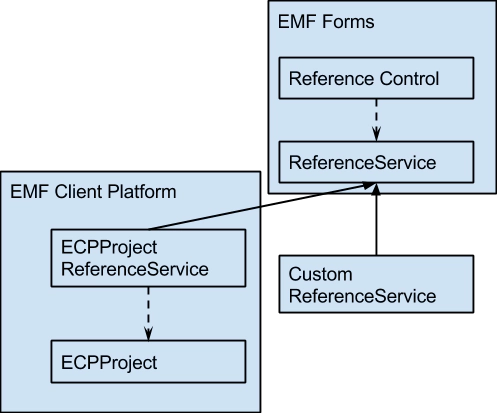
To provide a custom reference service, you just need to implement the interface (org.eclipse.emf.ecp.edit.spi.ReferenceService). There are two ways of providing the service to the framework. First, you can register the implementation using the following extension point:
point="org.eclipse.emf.ecp.view.context.viewServices">
   <viewService
         class="MyReferenceService">
   </viewService>
This way, EMF Forms will pick the service up by default for all forms. If you want to provide a specific reference service for certain forms, you can also pass the reference service to the renderer when rendering a form. The reference service (and all other view services) must be wrapped into a view model context in this case:
MyReferenceService myReferenceService=new MyReferenceService();
ViewModelContext viewModelContext=ViewModelContextFactory.createViewModelContext(view, domainObject, myServiceReference);
ECPSWTView ecpView=ECPSWTViewRenderer.INSTANCE.render(parent, viewModelContext);
Additional Customizations
EMF Forms provides many other ways to customize. For example, renderers can be adapted and replaced and the existing view model can easily be extended by new elements and concepts that fit your specific requirements. Professional support and training is available for this. Please contact us if you want to learn more about training and ways to customize and enhance EMF Forms.
⇒ Find out more about Developer Support and Training or contact us.
⇒ Further Documentation for EMF Forms
Localization
This feature is available since version 1.6.x
EMFForms uses two different kinds of Strings that need to be localized. On one hand there are the usual Strings in dialogs, labels and the like. On the other hand there are view model elements, such as Label or Group, which contain Strings that are displayed in the UI, e.g. the group name.
EMF Forms supports dynamic locale switching during runtime. This means that the locale can be switched at runtime on previously rendered forms. EMF Forms will take care to update all required UI elements accordingly.
To enable dynamic locale switching, EMF Forms does not rely on the standard NLS mechanism. Instead, it uses Java ResourceBundles and the OSGi Localization. In the following we describe how localization is supported in EMF Forms. This affects all Strings which are part of the view model as well as all Strings, which are used by the renderers (e.g. Strings on Buttons)
First, we describe, how you can translate existing Strings and add new ones, second, how to reference Strings within your view models, and third, how to use translated Strings programmatically from within a renderer.
Add translations and new Strings
EMF Forms uses the standard OSGi localization property files. The default location of the localized message strings is defined by OSGi to be in the OSGI-INF folder within its l10n subfolder. The properties file must be named bundle.properties. To identify the localized version of the bundle properties its name must be postfixed with the corresponding locale, e.g. bundle_de.properties for the german locale or bundle_en_US.properties for the US English version.
Property files are simple key value pairs. The keys are later referenced from within the view model or from within a renderer.
Example:
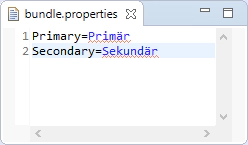
The property files must be placed in the same bundle as the view model or the renderer accessing it.
You can also override the default location within a bundle by adding this line to you Manifest.MF:
Bundle-Localisation: path/to/my/properties/file
Thus by adding “Bundle-Localisation: myLocalisation/myFile” to your Manifest you have to provide a myFile.properties in the folder myLocalisation.
Localization of View Models
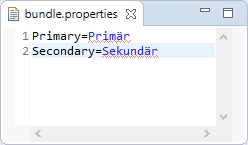
The localization of view models works like the localization of your manifest file. All strings that should be localizable must be prefixed with %, e.g. %personalInfoGroup. This refers to a key from within your bundle.property file (see last section)
The following examples shows a group with an internationalized name:
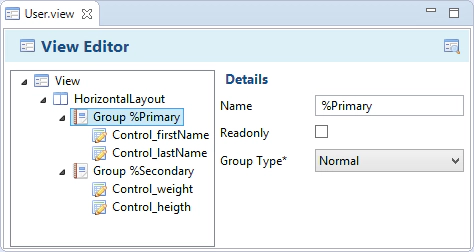
This is the corresponding bundle properties.
And this is the rendered result.

Localization from within renderers
Some Strings are not part of the view model, but directly and programmatically created by the renderers. Please note, that the renderers often also use Strings from the domain model, e.g. the label is retrieved from the EMF edit bundle. Those Strings can be internationalized using the EMF translation mechanism. An example for a programmatically added String would be the label of a button created by the renderer.
To ease the localization in EMF Forms from within renderers, we provide a service and a util class for localization: EMFFormsLocalizationService and LocalizationServiceHelper which offer two methods:
- String getString(Bundle bundle, String key): Retrieve the localized String for the given key in the given bundle.
- String getString(Class clazz, String key): Retrieve the localized String for the given key in the bundle identified by the given class.
The bundle used in both methods must contain the respective bundle.property file. If the bundle.property file is in the same bundle as the renderer, the following code example would set the text of a button to a localized String:
Button button;
String myButtonValue=LocalizationServiceHelper.getString(getClass(),”myButtonKey”);
button.setText(myButtonValue);
LocaleService
In order to support dynamic locale switching we provide the EMFFormsLocaleProvider. This Service offers a method of retrieving the current Locale. Furthermore, the EMFFormsLocaleProvider provides the possibility to add and remove an EMFFormsLocaleChangeListener.
The EMFFormsLocaleChangeListener is notified by the EMFFormsLocaleProvider and thus the listener can access the necessary localized string again.
final Button button;
EMFFormsLocaleProvider localeProvider;
String myButtonValue=LocalizationServiceHelper.getString(getClass(),”myButtonKey”);
button.setText(myButtonValue);
localeProvider.addEMFFormsLocaleChangeListener(new EMFFormsLocaleChangeListener(){
/**
   * {@inheritDoc}
   * @see EMFFormsLocaleChangeListener#notifyLocaleChange()
   */
  @Override
  public void notifyLocaleChange() {
    String myButtonValue= LocalizationServiceHelper.getString(getClass(),”myButtonKey”);
button.setText(myButtonValue);
  }
}
Technical Background
The localization itself is done by the LocalizationViewModelService which expects a LocalizationAdapter to be available on the View model to be localized.
By default the ExtensionXMIViewModelProvider adds a special LocalizationAdapter to every View model it loads. This LocalizationAdapter expects that the localized strings of the View model can be found in the corresponding OSGi localization properties.
If you provide a View Model by your own means (e.g. by implementing a ViewModelProvider), you can simply add a LocalizationAdapter to the View element manually. The LocalizationAdapter defines a method #localize(String) which expects a key and returns the localized value. As an example please see ViewModelFileExtensionsManager#init().
⇒ Find out more about Developer Support and Training or contact us.
⇒ Further Documentation for EMF Forms