Jonas Helming, Maximilian Koegel and Philip Langer co-lead EclipseSource, specializing in consulting and engineering innovative, customized tools and IDEs, with a strong …
Eclipse 4 (e4) Tutorial Part 6
5 min ReadIn the previous parts of this tutorial series, we described how to create an application model, link those elements to implementations, how to extend the application model, details about dependency injection and how to use behavior annotations. This tutorial and all other parts of the series are now available as a downloadable PDF.
In the last two parts of this tutorial, we described a lot of details about dependency injection. However, dependency injection is only a technique; the major goal is to get access to certain objects you want to use in a class. As we learned in part 4 of the tutorial, one type of objects you can retrieve using dependency injection are services. Services play a very central role in Eclipse 4. They provide framework features such as managing a selection or opening a perspective. In this part of the tutorial, we described the three most important Eclipse 4 services: the selection service (ESelectionService), the model service (EModelService) and the part service (EPartService). Using these services also serves as a blueprint for how to use any other services in Eclipse 4, too.
Why Services?
One of the key strengths of a framework such as Eclipse has always been the possibility of reusing of a lot of framework functionality. That means Eclipse as a framework already implements a lot of features typically required in applications. Therefore, developers don’t have to reinvent the wheel and can focus on implementing specific and valuable parts of an application. In Eclipse 3.x, a lot of these framework features were provided in the workbench API and in the use of singletons. For example, it was possible to retrieve the current selection of an application using this line of code:
PlatformUI.getWorkbench().getActiveWorkbenchWindow().getSelectionService().getSelection();
This approach had several drawbacks. Since we described the issues in more detail in part 5 of this tutorial, here we will recap only the three major problems:
- You need to know exactly where in the workbench API a certain method can be accessed. There is no real separation of concerns, so you basically need to know the complete workbench API. This high level of complexity has always been a problem, especially for beginners.
- It is very difficult to create a mock for a certain object of the workbench, which is required for testing.
- It is difficult, sometimes even impossible, to replace an existing implementation with an own one if you want to adapt or extend the default behavior of the framework.
Those are the main reasons why Eclipse 4 has chosen a different concept of providing framework functionality. Instead of providing one big API, framework features have been split into a number of services. Every Eclipse 4 service has a specific focus, e.g., managing the selection or dealing with parts and perspectives. All services can be accessed using dependency injection. The following line of code injects the Eclipse 4 selection service as a field:
@Inject
ESelectionService selectionService;
See parts 4 and 6 for more details about dependency injection.
To be fair, the idea of using services is nothing new and nothing specific to Eclipse 4. However, Eclipse 4 has really adapted the concept of a service-oriented architecture. This provides mitigations to the above mentioned problems:
- As services can be injected, you only need to know which service you want to use, more precisely its Java interface, not where it comes from. This is far simpler since you can search for something you want to do, e.g., “managing a selection” and you will very likely find the selection service. Additionally, you only have to deal with the API of services you want to use, so there is a good separation of concerns.
- One focus while developing the services for Eclipse 4 was to create an easy to use and cleaner API than 3.x. The 3.x API has grown over the years and the gathered experience was used to design the API for Eclipse 4.
- Services can be replaced, even during runtime. That allows to create mock implementations for testing, as well as replacing existing services with custom implementations.
However, not all 3.x functionality has been transformed into Eclipse 4 services. The platform team has obviously focused on the most important things. Some features of Eclipse 3.x don’t even have to be provided explicitly for Eclipse 4, since things such as the application model already provide them or at least make it much easier to implement them. In this tutorial, we focus on the most important services of Eclipse 4. The list is obviously not complete; we plan to add more in the future. If you would like a certain service to be described in more detail, please feel free to get in contact with us.
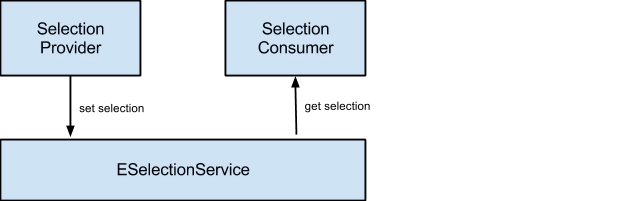
Selection Service (ESelectionService)
The selection service is responsible for managing the active selection of an application. The selection of an application is typically an object a user can select from a view, e.g., a file for a file browser or an e-mail in an e-mail application. There are two different users of the selection service. Selection providers are elements that set the active selection. Selection providers are typically UI elements that allow the user to select an element, e.g., a tree viewer. The selection is then forwarded to the selection service. Selection consumers are interested in the element currently selected in an application. For example, the enabling of a handler can be dependent on the current selection. Thus, the enabling of the handler “Export File” could only be enabled if the current selection is a file.
This tutorial and all other parts of the series are available as a downloadable PDF or as links below:
Part 1: Introduction to Eclipse 4
Part 2: Application Model and Views
Part 3: Extending existing models
Part 7: Soft migration from Eclipse 3.x
Appendix: Eclipse 3.x vs. Eclipse 4 – Which Platform to use
For more information, contact us:
Jonas Helming and Maximilian Koegel
EclipseSource Munich leads
Author: Jonas Helming