Web Application Bundles
4 min ReadThis tutorial shows how to develop Web Application Bundles (WAB) with RAP[1] 2.0 and Virgo[2].
The first part guides you through the setup of your Eclipse IDE and Virgo Server 3.6.x (aka Sky). The second part is a short walkthrough on how to create a Hello World Web Application Bundle (WAB) with RAP.
Setup for the Eclipse IDE including Virgo Tools to develop with the RAP Widget Toolkit 2.0
Three out of five available Virgo deliverables[3] support Web Application Bundles, namely Nano “Web”, Jetty Server and Server for Apache Tomcat. If you are interested what particular mix of features each deliverable provides, please have a look at the feature summary.
We will use the Virgo Jetty Server (VJS) in this tutorial which is available from the Virgo Releases page and the RAP 2.0 Release Build[4].
Install VJS to a location of your choice. This location will be referenced as ${VIRGO_HOME} during the next step. Extract the following RAP widget toolkit bundle,
org.eclipse.rap.rwt_2.0.0.20130205-1612.jar
from the downloaded zip archive and copy it into ${VIRGO_HOME}/repository/usr.
Now that the Virgo/RAP runtime is prepared it’s a good time to setup your Eclipse / Virgo tooling[5]. It’s as simple as installing the Eclipse Virgo Tools:
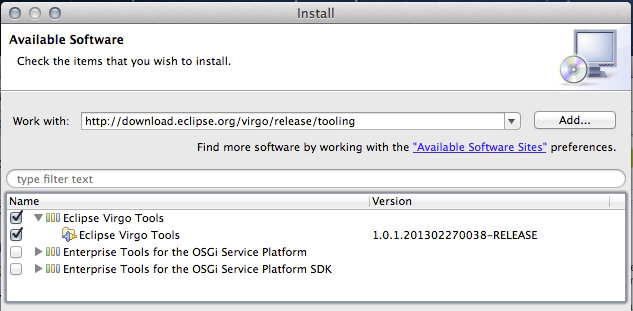
Then, you can follow the tutorial step by step to get the demo up and running on your own computer. This tutorial uses an “Eclipse IDE for Java EE Developers” from the current Eclipse Juno release – together with the recommended “Eclipse Virgo Tools” update site (https://download.eclipse.org/virgo/release/tooling).
Open the “Servers” view,
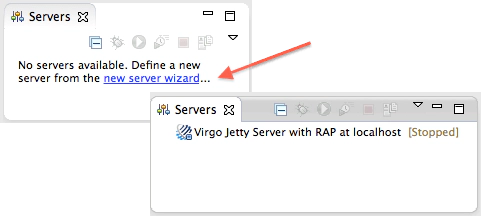
and add a new EclipseRT -> Virgo Runtime pointing to the Virgo Jetty Server prepared in the section above.
Develop the RAP powered Web Application Bundle
Now that the Virgo Jetty Server and the Eclipse IDE are ready we can jump directly to creating a Hello World Web Application Bundle.
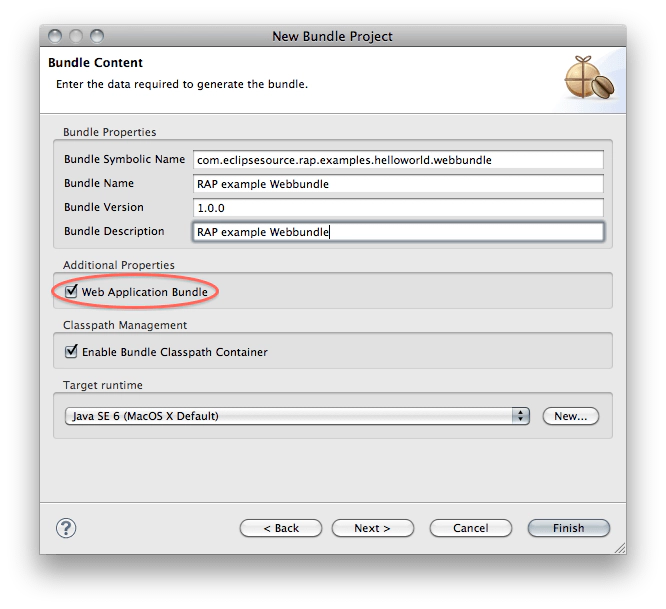
Create a new OSGi web bundle project with the New Bundle Project wizard as shown in the screenshots below. Don’t forget to check the additional property “Web Application Bundle”.
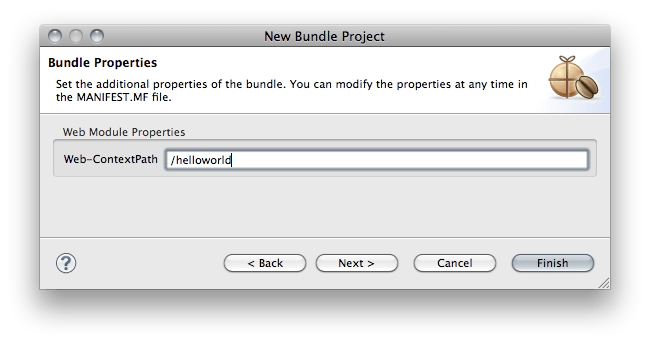
And, select a WebContextPath for the application:
Now find your Server in the Servers view and open the context menu to “Add and Remove…” the created bundle project or simply ‘drag and drop’ the project onto your freshly created server definition.
[ Using RAP or Virgo in an industrial setting? Our technology subscriptions secure your investment for years to come. | More on RAP from our blog: RAP technology overview ]
A final small step and we can start programming the actual RAP demo application. Make RWT known to your bundle by adding it as a dependency to META-INF/MANIFEST.MF as shown in the screenshot below. For those unfamiliar with this flavor of the MENIFEST.MF editor please make sure to use Import Bundle not Import Package.

Now it’s time for some Java hacking. Let’s create a hello world application within the package com.eclipsesource.virgo.examples.rap.webbundle,
public class HelloWorld implements EntryPoint {
  private String buttonText = "+1";
  public void setButtonText(String buttonText) {
    this.buttonText = buttonText;
  }
  public int createUI() {
    Display display = new Display();
    Shell mainShell = new Shell(display, SWT.TITLE);
    mainShell.setText("RAP Hello World!");
    mainShell.setMaximized(true);
    mainShell.setLayout(new FillLayout());
    Composite parent = new Composite(mainShell, SWT.BORDER);
    parent.setLayout(new GridLayout());
    Button button = new Button(parent, SWT.PUSH);
    button.setLayoutData(new GridData(SWT.CENTER, SWT.CENTER, true, false));
    button.setText(buttonText);
    final Label label = new Label(parent, SWT.NONE);
    label.setLayoutData(new GridData(SWT.CENTER, SWT.CENTER, true, false));
    label.setText("No event yet.");
    button.addSelectionListener(new SelectionAdapter() {
      int counter = 0;
      @Override
      public void widgetSelected(SelectionEvent e) {
        super.widgetSelected(e);
        label.setText("Clicked" + " [" + ++counter + "]");
      }
    });
    mainShell.layout();
    mainShell.open();
    return 0;
  }
}
and a basic configuration:
public class HelloWorldConfiguration implements ApplicationConfiguration {
  @Override
  public void configure(Application application) {
    Map properties = new HashMap();
    properties.put(WebClient.PAGE_TITLE, "Hello world");
    application.addEntryPoint("/hello", HelloWorld.class, properties);
  }
}
The demo application creates a button with a label. This label is incremented every time you press the button. The configuration should be self explanatory. We expect to see the demo application to be registered at the web context path “/hello” in a browser with the title “Hello World” To make this happen we simply need to register our HelloWorldConfiguration.
There are many ways to do this. In this tutorial we add the configuration to the WEB-INF/web.xml
org.eclipse.rap.applicationConfiguration
  com.eclipsesource.virgo.examples.rap.webbundle.HelloWorldConfiguration
  org.eclipse.rap.rwt.engine.RWTServletContextListener
  rwtServlet
  org.eclipse.rap.rwt.engine.RWTServlet
  rwtServlet
  /hello
If your server is already running, saving this file will automatically trigger a redeployment of the demo bundle. Check the result at
https://localhost:8080/helloworld/hello
… Congratulations! You successfully deployed your RAP application as a Web Application Bundle on Virgo!
For the impatient there is a web bundle project available on GitHUB[6].
—