Jonas Helming, Maximilian Koegel and Philip Langer co-lead EclipseSource, specializing in consulting and engineering innovative, customized tools and IDEs, with a strong …
How to create/develop an Eclipse Theia IDE extension
November 21, 2019 | 9 min ReadIn this article, we provide an overview on how to extend the Eclipse Theia IDE with custom extensions. We will show how to create a Theia extension, how it is structured and how to develop it by adding your own features. Please note that there are two ways of extending the Eclipse Theia IDE, one being extensions, the other one being plugins. This article is focussed on extensions, please see this article for a comparison of Theia plugins and extensions.
Getting started with Eclipse Theia extensions
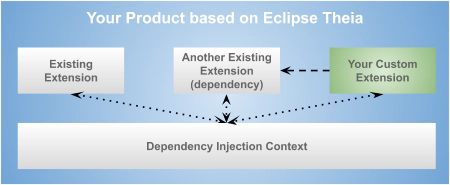
Before we dive into technical details, let’s have a conceptual look at how extensions work in Theia. In fact, everything in Theia is actually an extension. This includes all existing features, that are provided by the framework, e.g. the git support, but it also includes the custom extensions you eventually create yourself.
To create an executable tool or IDE based on Theia, you need to select the extensions, which will be part of it. This means, you define a product based on Theia, which specifies a list of extensions it consists of. There are two main motivators to add an extension to your custom product:
- To add a feature to the product (either an existing implemented one by the framework or a new feature implemented by you)
- An extension implementing a feature requires another extension to work, i.e. it has a dependency on another extension.

While extensions are loosely coupled, there is some communication required between them. As an example, one core extension of Theia creates the main menu bar in the Theia IDE. Other extensions potentially want to contribute to those menus and therefore need to “talk to the first extension”. For this purpose, Theia uses a dependency injection context (Inversify.js). In a nutshell, this works like a global bulletin board. Extensions can “place” things into the context, e.g. a MenuManager. Other extensions can pick elements from the context and use them, e.g. your custom extension could retrieve the MenuManager and call a function to add a menu item.
If you want to know more details on this, please see this article on how dependency injection with Inversify.js is used in Theia.
So with this conceptual overview, let us look at a concrete “hello world” example extension in the next section.
A hello world extension for the Eclipse Theia IDE
A very good way to get started with your own custom extension is to use the “hello world” example provided by the Theia project. It allows you to create a simple example extension using Yeoman. To create the example, install the Yeoman template and instantiate it via:
npm install -g yo generator-theia-extension
yo theia-extension hello-world-extension
This will mainly create two things in the respective folder: first, the example extension itself and second an example Theia product, which includes the example extension plus a few default Theia extensions. This example product can directly be launched and used to check your extension as part of it.
In the following two sections, we will describe the two parts in more detail. Before we dive into the example extension, we will explain how it is embedded into a Theia product and therefore, how it can be launched.
The example product(s)
In fact, the hello world example will create two products, one to run in the browser and one to run as a desktop application based on electron (see here for more details about this capability of the Theia IDE). As those two example products conceptually work in a similar way, let us focus on the browser app. This is located in the directory “browser-app” and can be directly executed via the following command (Please see this article with more details on how to launch the Eclipse Theia IDE.)
yarn theia start
Once you have opened the started instance in your browser, you will get a basic Theia product which has a hello world entry in the “edit” menu (see screenshot below). This menu item and the corresponding action has been provided by the generated extension.

The contents, i.e. the extensions the example product consists of, are defined in its package.json. In this case, the product contains a couple of basic Theia extensions and of course the generated example (see listing below). Please see this article with more details on how to add extensions to the Theia IDE.
"dependencies": {
    "@theia/core": "latest",
    "@theia/filesystem": "latest",
    ...
    "extension": "0.0.0"
  }
Long story short, the example product allows you to launch your extension as part of a simple and default Theia IDE. So let us have a look at the actual extension in the next section.
The example Theia extension
The generated extension can be found in the directory with the same name as you named the extension itself (by default “extension”). An extension is technically a node package, it contains a package.json in its root folder. For that reason the product described in the last section can just include it in its dependencies.
A Theia extension consist of three important pieces:
- The package.json, which additionally to its regular role in Node.js, such as its name and dependencies, further contains some Theia-specific metadata
- One or more “modules”, which wire your extensions to the Theia framework and other extensions
- The implementation of any features that are provided by your extension
In the following three sections, we will have a close look at those three parts.
The package.json of a Theia extension
The package.json contains two Theia-specific entries, which are highlighted in the listing below. The first one is the keyword “theia-extension”, which marks the node package as a Theia extension. Theia will run through all packages on start-up and process those that are marked as an extension. The second is a list of “theiaExtensions”, enumerating TypeScript files that act as an entry point in the extension project. Those files - called “modules” - are the entry points of your extension. More precisely, modules wire the extension with existing extensions provided by Theia, i.e. the platform.
"keywords": [
    "theia-extension"
  ],
…
,
  "theiaExtensions": [
    {
      "frontend": "lib/browser/extension-frontend-module"
    }
  ]
Please note that extensions can define multiple modules. Further, you need to specify whether the module extends the frontend or the backend of Theia. The example extension defines exactly one frontend module: “extension-frontend-module”, let us look at this in more detail.
Theia extension modules
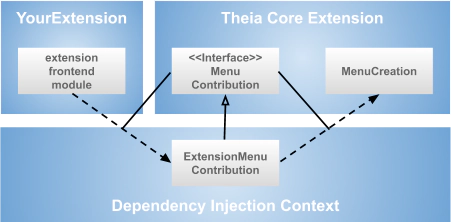
The responsibility of a Theia extension module is to wire the extension features with the underlying framework and/or other extensions. In fact, as the underlying framework also just consists of extensions, these two cases are actually the same. To achieve communication between extensions, Theia uses dependency injection. From a high level point of view, you can think of this mechanism as a global bulletin board. Any extension can place or retrieve items from this board. As an example, an extension could place a “menu contribution” on the board, expressing that it wants to add a menu item to a specific menu. The Theia-internal extension, which is responsible for creating the menu at runtime can browse the board, pick up all contributed menu items and render the menu accordingly. The technical term for this “board” using dependency injection is a “context”. To be able to retrieve the correct objects from within the context, they are registered under a specific “key”, which is conceptually a TypeScript interface (technically a “symbol”). The diagram below shows the registration of a contribution along the menu contribution example. The “extension-frontend-module” registers an object “ExtensionMenuContribution” in the context using the interface “MenuContribution” as a key. The Theia core extension picks up those menu contributions up, also using the interface as a key.

Let us look at how this “wiring” looks like in code. If you open the “extension-frontend-module” of the example extension, you will see the registration of two contributions, a CommandContribution and a MenuContribution. The syntax for the registration is defined by Inversify,js, please see his article with more details about dependency injection in Eclipse Theia.
As you can see in the code listing, the registration, points to two extension specific classes, the “ExtensionCommandContribution” and the “ExtensionMenuContribution”. These do actually implement the desired behavior, in the example, a “hello world” action. We will describe in detail in the following section.
Theia extension contributions
The implementation of contributions is use case specific and usually specified by the contribution interface, e.g. “MenuContribution”. The code listing below shows an example of implementation of this menu contribution. It implements the specified function “registerMenus” and uses the “MenuModelRegistry” to add the “Hello World” menu item along with a command id. This command provides the actual behavior, its registration is described below.
The second contribution (see listing below) registers a command which contains the actual behavior, i.e. saying “hello world”. The Theia core extension will now pick up both contributions from the dependency injection context and create a menu item which triggers the execute function of the command.
Please note, that registering a command, also makes it implicitly available via the command bar (via F1) using the specified label:

The hello world extension is a very simple example, but even for more complex contributions, the underlying concept remains the same. Please note that you do not have to “inline” the feature implementation as done in the example, but you can also call any other class or service. In this way you can separate the contributions classes, which are Theia specific from your generic feature implementation.
Conclusion
In this article, we provide a high-level overview of how to develop extensions for the Eclipse Theia IDE. The extension mechanism of Theia is based on dependency injection using Inversify.js. It is worth noting again, that all existing Theia extensions, even the core ones use the exact same mechanism for communication and wiring. There is no conceptual difference between custom and existing extensions. Due to this architecture, extensibility and adaptability are very well supported in Eclipse Theia. While other platforms, such as VS Code or desktop Eclipse define an explicit and limited API for extenders, Theia allows you to “touch” everything that is available in its core.
Power usually comes with responsibility. You can very easily “destroy” any Theia product from within an extension. If you do not “trust” or know your extenders, you might be interested in using the plugin API of Theia as an alternative (see here for a comparison of Eclipse Theia extensions and plugins)
Please bear in mind, when creating Theia extensions you have to understand its core architecture, there is no API specifically designed and tailored for you as for plugins. In turn, there is good guidance provided by looking at the platform itself and the specified contribution interfaces. If you are interested in more concrete examples for extensions, please follow us on Twitter, we will publish the next parts of this article series soon.
Finally, if you want to extend the Eclipse Theia IDE and need assistance or guidance with the decision between plugins and extensions, please have a look at our consulting and support offerings for Eclipse Theia, for web-based tools or tools in general and please get in contact with us!