Jonas Helming, Maximilian Koegel and Philip Langer co-lead EclipseSource, specializing in consulting and engineering innovative, customized tools and IDEs, with a strong …
How to use Eclipse Theia as an IDE
October 4, 2019 | 7 min ReadThis article provides an overview on how you get started with Eclipse Theia and how to use it as an IDE. In case you wonder what Eclipse Theia is, please see this blog post for an introduction and the frequently asked questions about Eclipse Theia. After we have described several options on how to launch Theia in the previous article, in this article we continue with the next logical question, which is:
How to use Eclipse Theia as a tool for software development?
Even though Eclipse Theia is very simple to be used, there are a lot of features to be explored. In this article, we focus on highlighting the most important things to know about Theia and on answering the most frequent questions for a quick start as a user with Theia. Please note that we focus on generic extensions of Theia, such as the terminal, the SCM/versioning support and the debug view. Depending on which extensions of which product based on Theia you use, you might have a variety of additional views and features in your Theia instance.
The Basics
If you have used any IDE before, you will get the basics of any Theia-based tool very quickly. If you are familiar with Visual Studio Code, you will immediately see the similarities (see this comparison, “VS Code vs. Eclipse Theia”).
In contrast to the Eclipse IDE, Theia follows a “workspace = folder” concept. That means, if you open a specific location via “File=>Open Workspace”, you are looking at the contents of that folder directly, very similarly to VS Code. Consequently, there is no such thing as “Import project from git”. Please note that the workspace location is typically a location on the server you run Theia on. If you host Theia on a remote server, you must get your files there. The typical way would be to clone a git repository, however, there is also an “upload files” option to directly upload files from your client machine.
On the left side you find a quick bar to open most important views, most importantly the “Explorer View” to browse the contents of your current workspace. Another frequently used view is the “SCM” view, which supports you in staging and committing modified files.
Other views, such as an outline, a problems view and a terminal can be opened with the respective menu entry in the main menu “View”. Please note, that you can drag tabs around to adapt your window layout.
If you are familiar with the Eclipse IDE, you will likely consider the UI is much less “crowded”, but probably also miss some features. This is due to the focus on “Commands” and on CLI (Command Line Interface, a.k.a. using the terminal). We will describe those two features in more detail in the following sections.
Commands
You might get confused by the fact that many features are not directly available in the user interface (via menus or toolbars). As an example, the SCM view does not allow to clone a repository. However, many additional features are available as “Commands” in Eclipse Theia. This allows executing them without using a mouse, somehow comparable to “Quick Access” in the Eclipse IDE or the Commands Palette in VS Code. By pressing “F1” in Theia, you open a text field on top of your Theia instance allowing you to type a command. Content assist allows you to find commands quickly, as an example, shown in the following screenshot, you can clone a git repository this way.
Some commands will lead you into a minimal text-based wizard, allowing you to enter additional parameters, such as the URL to clone in the example above:

When using Theia as a tool, keep the commands feature in mind. If you get used to it, it will accelerate your workflows, because your hands do not have to leave the keyboard and due to a text search, you will likely find the right command very quickly. Many Theia commands trigger terminal commands in the background. In case a specific command (e.g. git init) is not directly supported as a Theia command, you can of course also use the underlying terminal directly as described in the next section.
Terminal
Using CLI to control developer tools is a huge trend. One core advantage is that you can use almost every tool, as long as you have access to a terminal. Consequently, Theia provides you with an integrated terminal, which allow to access the underlying system. Please note, that this is the system that Theia is running in, so if Theia is hosted remotely, you are operating on the server (e.g. in a container). It is probably needless to describe what you can do with this terminal, it is anything from running maven, using npm or any other tool. Please note, that the terminal is opened using a seperate main menu, it is not listed under “Views”.
Language Support
Last but not least, let us have a look at the core of every IDE, the code editor. This component of Theia is based on the Monaco editor, the same is used in VS Code. Therefore, if you are familiar with VS Code, you will immediately feel “at home”. If you are used to a desktop-based tool, you might be surprised how well supported coding in the browser already is!
A full description of all the features available in the code editor of Eclipse Theia would go beyond the scope of this article, but let us focus on three essential ones: syntax highlighting, auto completion and error markers.
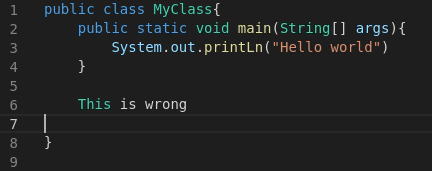
Syntax highlighting is the capability to highlight know terms with a specific color. This feature is actually provided locally by the Monaco editor. It is based on the extension of an opened file and will work out of the box. So, even without any additional Java tooling, a *.java file would look like this in Eclipse theia:

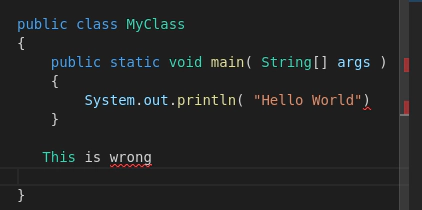
However, the editor is obviously not capable yet of understanding the language, it does not highlight the missing semicolon and the misplaced string below the method. To enable this, you need a language server for the respective language to be used (in this case Java). The Monaco editor will then connect to this language server via the language server protocol (LSP) to enable more features, such as error marking and auto completion. If we enable a language server for Java and reopen the example above, it shows errors like this:

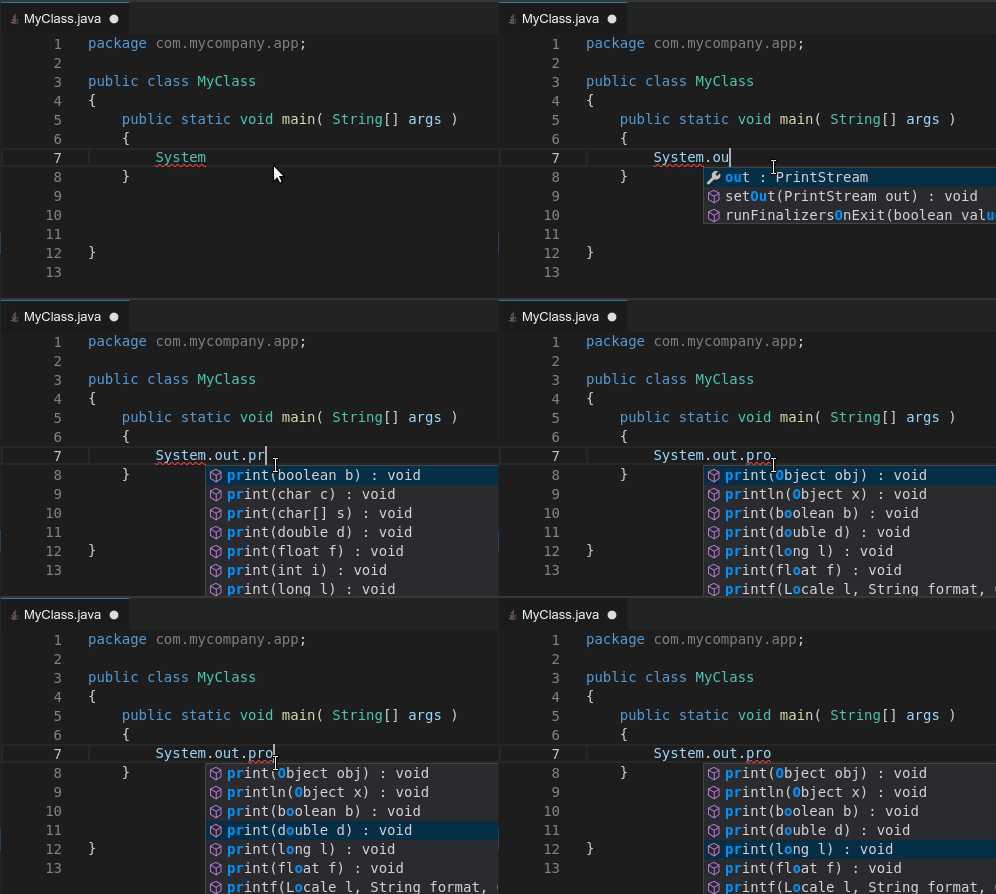
Furthermore, the editor will provide auto completion, i.e. make suggestions depending on the current context. Please note, that those features require a valid Java Project to be set up, we will describe more details about how to use Java in Eclipse Theia in a follow up article.

Besides the features described above, the code editor offers more features to be discovered, e.g. “organize imports”, “format” or some refactorings. These available features however depend on the installed language tooling (i.e. the language server). Browsing the right click menu and of course the list of commands (press F1) will allow you to explore them.
Conclusion and more
This article only touches the surface of the available features in Eclipse Theia, focusing on the most important ones when getting started or trying it out. There is much more to be discovered about the base extensions, and even more about available optional extensions and plugins that you can add to your Eclipse Theia instance. We will highlight some more extensions/plugins in detail in follow up articles, e.g. details about the git support and about the Java tooling in Eclipse Theia. Finally, keep in mind that Eclipse Theia itself is not a product, but a plattform, which allows to build tools and IDEs on top of it. One example of such a “product” is the Theia Blueprint. If you are interested in using Eclipse Theia to create your own tool or to migrate an existing tool to the cloud, have a look at our service offering around Eclipse Theia, for web-based tools or tools in general and please get in contact with us!
Finally, if you are interested in a quick guide on how to use Eclipse Theia, how to customize and extend it, please follow us on Twitter, we will publish the next parts of this article series soon.