Ian is an Eclipse committer and EclipseSource Distinguished Engineer with a passion for developer productivity.
He leads the J2V8 project and has served on several …
I have started writing about my experiences with Kubernetes and the PicoCluster. The PicoCluster is a set of inexpensive boards (10 Rock64 boards in my case), housed in a single cluster with a network adapter, fan and power supply. They have been pre-configured with Ubuntu and Kubernetes. The cluster is in my basement, plugged directly into my router.
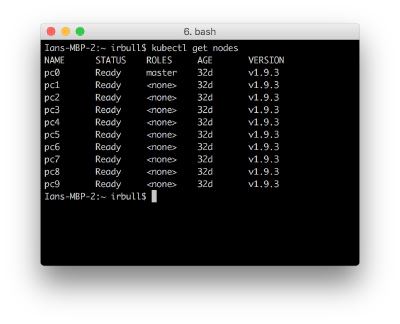
With this setup, I have a 10 node cluster configured with a single master and 9 worker nodes.
Kubernetes is controlled by the command line tool kubectl. While kubectl can be installed on the cluster itself, it often makes sense to install it on your own machine, or an operator’s machine to control the cluster. This allows you to deploy applications, check the status and perform other management tasks right from your local machine.
The Kubernetes documentation describes how to install kubectl on a number of different platforms. On MacOS, I used: brew install kubernetes-cli.
The Kubernetes command line tool can control several different clusters. The command kubectl config use-context can be used to set the current context, indicating which cluster to control. The configurations for kubectl are stored in ~/.kube/config. You can configure your development machine to talk to you PicoCluster by adding the following sections:
- cluster:
   certificate-authority-data:
   server: https://10.1.10.240:6443
   name: picocluster
- context:
   cluster: picocluster
   user: kubernetes-admin
   name: picocluster
- name: kubernetes-admin
   user:
    client-certificate-data:
    client-key-data:
The server section is the URL to your API Server running on your cluster. In the case of the PicoCluster, it’s on the master node (pc0) running on port 6443. The authority-data, user-certificate-data and user-client-key-data can be found in the admin.conf file found in /etc/kubernetes on the master node of your cluster. These keys will authenticate your workstation to talk to the Kubernetes API server. With this configuration, you can now set the default context to indicate which cluster to use by issuing: kubectl config use-context picocluster. You can begin issuing commands to your cluster from your workstation.
Auto-completion can be enabled to assist with kubectl. This allows you to tab-complete kubectl commands (or get a list of available commands from a particular state). To enable this, first install bash completion
brew install bash-completion
and add [ -f /usr/local/etc/bash_completion ] && . /usr/local/etc/bash_completion to your .bash_profile. I was then able to start a new shell and immediately use autocompletion with my kubectl installation.
With this setup, I was now able to start using the Kubernetes Command Line from my development machine and control my 10 node Kubernetes cluster. For more Kubernetes Tips & Tricks, follow me on Twitter.

Ian is an Eclipse committer and EclipseSource Distinguished Engineer with a passion for developer productivity.
He leads the J2V8 project and has served on several …