Jonas Helming, Maximilian Koegel and Philip Langer co-lead EclipseSource. They work as consultants and software engineers for building web-based and desktop-based tools. …
EMF Support for Che - Day 4: Building Che
In this blog series, we share our experiences extending Eclipse Che to add EMF support.. The first post covers our goals. In previous posts, we describe how to add support for code generation and create a custom stack, which provides the framework for code generation out of the box.
So far, we have not yet written any code to extend Che. We have used the concept of Che workspaces, which are Docker containers, to deploy additional tools (in our case the code generator). As the browser IDE allows to execute any command on the workspace runtime, we did not have to implement something to extend it so far.
However, there are requirements, where enhancing the workspace is not sufficient. This is typically the case when you enhance the UI of the browser IDE with new features or you add new APIs into agents running within workspaces.
In this post, we will describe how to make a minor enhancement to the browser IDE with a simple “hello world” example. It is a good first step to introduce the general process for extending Che. We will do more complex extensions in future blog posts.
We at EclipseSource have many years of experience in building extensions for the Eclipse IDE and in building Eclipse-based applications. So before we go into detail, let us summarize our experience in developing extensions for Che from a viewpoint of a desktop Eclipse IDE developer. We focus on the most obvious similarities and differences.
The similarity: Eclipse Che has an inherently extensible and flexible architecture. This is mainly due to a central pattern: Service-Orientation. There are several ways how this pattern is used for extensibility:
- Che provides services to build up almost anything in the UI. As an example, there is a service to register the actions which are shown in the various menus. As another example, there is a service to register file extensions (defining icons and default editors). These services can be layered into complex UI objectives such as creating a perspective with different menus, panels, and layouts.
- Che provides services to access resources (e.g. the source files) and the workspace runtime (e.g. to trigger commands). By using these existing features, it is fairly simple to add new features on top.
- The Che server is mainly a collection of RESTful services. By adding custom REST services to the server, you can easily enhance it. Thus custom services can then be consumed by custom extensions in the browser IDE.
- Finally, Che defines service interfaces, which can be implemented by an extension to provide new things. As an example, you can implement a service, which implements the behavior to create a custom project type.
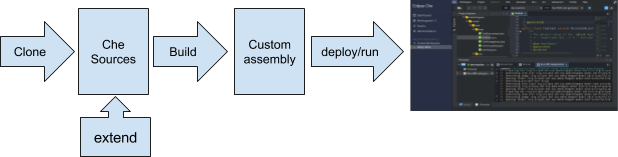
The difference: There is currently no runtime plugin mechanism for the Che browser IDE comparable to what you are used to from the classic Eclipse IDE (a.k.a update sites/p2 repositories). This means, to extend Che, you need to build your custom version of it which contains your extensions and then deploy the full assembly somewhere. Technically, “plugins” in Che are maven modules, that you add to the global build during compile time. There is no runtime extensibility of the browser IDE. So, isn’t this a step backwards compared to the classic Eclipse IDE? There are different answers to this question, depending on the point of view:
- No, because Che supports extensibility at runtime based on its workspace concept. If you miss any tool or runtime component, you can simply deploy it into your workspace and easily share it with co-workers. As an example, we enabled the EMF code generation only by extending the workspace at runtime (see this post). In the classic Eclipse IDE, everybody had to install the same things again (at least when not using Oomph).
- Partially, as you cannot extend neither the browser IDE, nor the Che server at runtime, but only the workspace. However, Che has a different deployment scenario. As it is a client-server application, the idea is to do the set-up once in a central way and then share it for a group of developers, which require the same set of tools. This enables a very fast setup for developers on a project (pretty much like Oomph for classic Eclipse). It even enables to use different IDEs, which access the same workspace. However, it means more work for the author and maintainer of extensions, but a simpler life/set-up for the developers.
- Yes, we miss OSGi, extension points and p2 repositories! Although OSGi and p2 have been criticized in the past, they are a very powerful combination to build up modular and extensible applications. This in combination with the great tooling provided by Eclipse made it possible to efficiently develop, install, update and deploy extensions to the IDE. This was probably one of the core factors to create such a huge ecosystem of tools.
So at the end, it really depends on the scenario and your design objectives. It is worth mentioning, that there is a general trend (also followed by Che) to move UI related parts of the IDE into server-side abstractions, so that they become independent. The language server protocol is a good example for this. In this scenario, an IDE only has to support to interpret the abstractions, e.g. the LSP. Therefore, client-site extensibility may become less important.
Anyways, let us get started with building Che locally.
First, you need install all the prerequisites to build and run Che. We already mentioned that you will need Docker, but there are a number of tools and environment settings needed for building Che.
There are two ways to get started. We recommend to start headless, first, and follow the guide how to clone and build Che. As a second step, in case you want to use an IDE, we recommend the Che workspace setup guide for an extensive overview.
We recommend to take the time to read the provided documentation carefully, as it contains useful information and lots of useful hints how to develop for Che. You should pay special attention to the “Super Dev Mode”, which allows hot code replacement for GWT applications and therefore drastically reduces the turnaround time when working on the browser IDE.
There is also an option to build Che within a preconfigured Docker environment which will spare you the trouble of setting it up yourself. Finally, the building Che will take some time to complete even if you have a fast machine. Therefore, we recommend to take a close look at the options, which are described in detail on github.
The build process will result into a number of artifacts, also called assemblies in Che terminology. You can find them within the “assembly” subdirectory. You can match the assemblies to the logical components of the Che architecture by comparing the directory with the architecture schema.
After the build completed you can start Che on your local machine. The simplest way to do that is to navigate to the assembly/assembly-main/target/[che-version]/[che-version] directory and execute “bin/che.sh start”. A number of long messages should confirm the successful start of the services and point you to open localhost:8080 in your browser. If everything went well you will be greeted by the Che dashboard.
So now that we can build check locally, let us do a very simple change to verify the build process. An example for such a simple change would be to add a project template to the browser IDE. Project templates can be instantiated by any user of the IDE. As we are working on EMF support, it would be useful to have an example EMF project as a template. We have already manually imported such a template from a Git repository in the second part of this blog series, which we will now add as a fixed template to our custom assembly.
Project templates are basically pointers to existing Git repositories. This enables to easily maintain the templates without re-distributing the IDE itself. The sample templates are maintained in the following file:
ide/che-core-ide-templates/src/main/resources/samples.json
Let us add following snippet to this file:
{
   "name": "emfforms-makeithappen-blank",
   "displayName": "emfforms-makeithappen-blank",
   "path": "/",
   "description": "EMFForms, make it happen!",
   "projectType": "java",
   "mixins": [],
   "attributes": {
     "language": [
       "java"
     ]
   },
   "modules": [],
   "problems": [],
   "source": {
     "type": "git",
     "location": "https://github.com/eclipsesource/emfforms-makeithappen-blank",
     "parameters": {}
   },
   "commands": [],
   "links": [],
   "category": "Samples",
   "tags": [
     "maven",
     "java"
   ]
 }
Afterwards we need to stop the currently running che instance by executing “bin/che.sh stop”, rebuild Che and afterwards start it again using “bin/che.sh start”.
As a result, the new project template will be available among the existing ones:
Of course, this was a very simple change, it did not even involve any coding. However, we are now prepared to do more complex changes and start coding. Please note, that in our example, we changed a configuration file of Che to add our custom project template. Those kind of extensions are usually done by invoking services, which allow to extend the base configuration of Che (in our case add a new project template). We will get back to this cleaner solution later in this series.
When starting to code extensions for Che, those are typically placed in separated maven modules (i.e. plugins). This is conceptually pretty much like developing plugins for classic Eclipse. That means, the custom code will be separated from the core of Che. We will describe this more in detail in the next blog post of this series. As an example, we will create plugin, which registers a custom file type for “.ecore” including a custom icon.
So stay tuned!
If you are interested in learning more about the prototype for EMF support, if you want to contribute or sponsor its further development, or if you want support for creating your own extension for Che, please feel free to contact us.

Co-Author
Mat Hansen
List of all available days to date: