Jonas Helming, Maximilian Koegel and Philip Langer co-lead EclipseSource, specializing in consulting and engineering innovative, customized tools and IDEs, with a strong …
EMF Support for Che - Day 2: Generating code
February 23, 2017 | 5 min ReadIn this blog series, we share our experience with extending Eclipse Che and describe how we have built initial EMF support for the Eclipse Che IDE. Please see the first post in this series for an overview of our goals. In the last blog post, we described how to create a custom workspace containing a template modeling project. This template provides a fully configured model. Before looking at any editing support or the creation of custom models, we first have a look at generating code from that template project. This is one of the most crucial requirements of our project, as we want to reuse the existing EMF code generator. So is it possible to reuse this existing Eclipse framework feature in Che?
Let’s have a quick look on how the EMF code generator can be triggered. The default way would be to use the UI in the Eclipse IDE. Furthermore, EMF provides a Java API to run the code generation. This sounds appealing, as the Che server component is also written in Java.So we could implement a wrapper service for the Che server, which is triggered by the browser IDE and call the API of EMF to generate the code. But wait, EMF is designed to run in an OSGi runtime environment. Additionally, it uses extension points (at least the package registry). It is actually possible to call the code generator of EMF with plain Java, but we would need to wire things manually. Setting up the classpath without OSGi looks like a nightmare in this scenario. Another disadvantage of that approach is that we would have to deploy the EMF libraries along with our server, which makes an update cumbersome.
Luckily, there is a much simpler way of integrating the existing code generator. The Eclipse Desktop IDE provides a headless application to be executed on the command line. With the following call you can generate the code for the make it happen example.
$ /eclipse/eclipse \
-noSplash \ # do not show the eclipse splash screen
-data /path/to/data/dir \ # the path to be our current project
-application org.eclipse.emf.codegen.ecore.Generator \ # the application id to execute
-model \ # generate EMF model classes
-edit \ # generate EMF edit bundle
/path/to/modelname.genmodel # the path to the genmodel file
So how do we integrate this with Che? The good news is that we can simply deploy Eclipse into a workspace. Workspaces in Che are not only directories hosting code, they also act as a docker container and maycontain tools. So if we install an Eclipse Modeling Tools Edition into our modeling workspace, we should be able to generate code using the EMF Application on the command line.
First we need to get an Eclipse installation into our Che workspace container. As a Che workspace container is based on a Linux image we can use the shell to download and extract the latest Eclipse Modelling Tools. The download link can be fetched from the official downloads page on eclipse.org (copy the link for Linux 32/64 bit). To access the container shell just click on the “Terminal” tab at the bottom of the screen. The actual shell commands are listed below.
sudo su # gain super user privileges (become root)
cd / # switch to the root directory
wget ${Download Link} -o eclipse.tar.gz # download eclipse
tar xfv eclipse.tar.gz # extract the downloaded tar.gz file
Afterwards you can trigger the EMF code generator by typing the following command.
$ /eclipse/eclipse \
-noSplash \
-data /projects/makeithappen \
-application org.eclipse.emf.codegen.ecore.Generator \
-model \
-edit \
/projects/makeithappen/org.eclipse.emf.ecp.makeithappen.model/model/task.genmodel
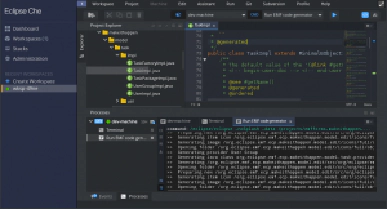
The following screenshot shows the code generation log on the console. We can then open the generated code using the IDE. That means we have re-used the existing code generator of EMF in Che, just by typing in one line on the console!
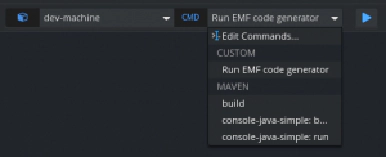
Now that we can trigger the code generator on the command line, let’s make that more convenient for the user. Instead of typing in a complex command, we want to enable the code generation in one click. Therefore, Che allows us to define a “custom command”. To do so, click on the command drop-down in the top right corner of the IDE and select “Edit Commands”.
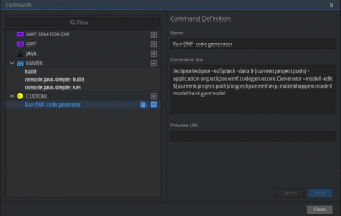
Then click on the “+” button next to the “Custom” section and fill in the form on the right side (see screenshot). As you can see, the command uses a Che variable for the current project path. However, the last segment of the path to the genmodel is still static.
Now we can generate the code for the template project with one click. We are reusing the existing EMF code generator. So far, we did not have to write a single line of code. However, there are multiple open issues and things that need to be improved. As an example, we can only trigger the code generation on a fixed project, we still work with a fixed template and we cannot really modify our model (except in plain XML). All those extension will require us to implement extensions for the Che browser IDE and the Che server, which we will begin later in this blog series. In the next part, we will look at creating a custom stack to make the adaptations of this part reproducible. The goal is to have the downloaded Eclipse instance (for the code generation) and the custom command available from scratch. So stay tuned!
If you are interested in learning more about the prototype for EMF support, if you want to contribute or sponsor its further development, or if you want support for creating your own extension for Che, please get in contact with us.

Co-Author
Mat Hansen
List of all available days to date:


