Jonas Helming, Maximilian Koegel and Philip Langer co-lead EclipseSource, specializing in consulting and engineering innovative, customized tools and IDEs, with a strong …
JSON Forms - Make-It-Happen Blog Series - Pilot
December 21, 2016 | 5 min ReadJSON Forms is a framework to efficiently build form-based web UIs. These UIs are targeted at entering, modifying and viewing data and are usually embedded within an application. JSONForms eliminates the need to write HTML templates and Javascript for manual data-binding to create customizable forms by leveraging the capabilities of JSON and JSON schema as well as by providing a simple and declarative way of describing forms. Forms are then rendered within a UI framework – currently based on ReactJS and Redux. If you would like to know more about JSON Forms the JSON Forms homepage is a good starting point.
In this blog series, we would like to introduce the framework based on a real-world example application called “Make It happen”. Step by Step, we will add new features to that example application and demonstrate, how JSON Forms eases the development for you. For a better overview, the development steps are organized in days, although we do not expect that it takes anywhere near a full work day to complete the individual steps :-). This series will provide an overview of all features and explain how they work. If you want to follow along you can find the accompanying code at github.
If you would like to follow this blog series please follow us on Twitter. We will announce every new blog post on JSON Forms there.
Before we get started, let us explain the big picture on “Day 0”
Day 0 - Basic Requirements
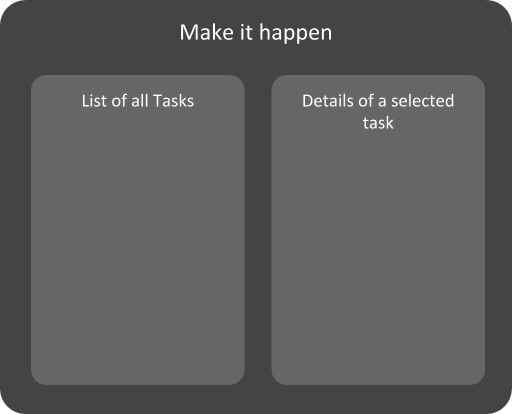
The example application we want to implement is a simple task tracker called “Make it Happen”. We have chosen this example as it is easy to understand, simple, but still provides the opportunity to show the core features of JSON Forms. Therefore, we will try to focus the requirements of the example application on demonstration purposes rather than real world concerns. In our example application, we want to be able to create, view, and modify one entity: tasks. Tasks have properties such as a name, description, due date, and so on. The UI we would like to create contains a general view of all tasks, as well as a detailed view showing the details of one task. We will leave aside cross-cutting concerns such as authentication and authorization. Let us envision a basic UI capable of fulfilling these requirements. The UI shall show a list of all tasks, once you select a task, it should display the details on the right side (as shown in the following mock).

But enough about requirements for now, we will detail them iteratively while we demonstrate the implementation of the respective UI. So let us start the development with day 1 and create some simple forms.
Day 1 - A Simple Form
This article describes how to define simple forms with JSON Forms including explanatory examples. For a quick start with three steps only, please see the getting started guide.
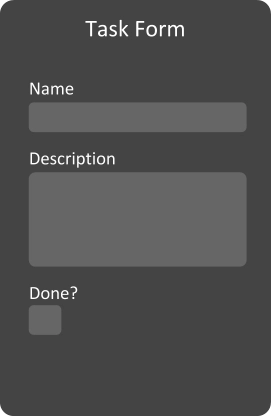
We will start to implement the described UI bottom-up. The first elements will be the detail view, for showing the details of an individual task. These views will display controls for all properties of the task entity. Based on the specific properties, corresponding controls should be used, e.g. a text field for a string property, a drop-down box for an enum, or a date picker for selecting a date. To keep it simple, we will just add three basic properties in the first iteration as shown in the following mock-up. We will enhance the forms in a later iteration, demonstrating how JSON Forms performs on an evolution of the data schema. In the first iteration, we will add the properties:
- “Name” (String) - mandatory
- “Description” (String)
- “Done” (Boolean)
The “Name” property is a mandatory one, so there should be a validation message, if the user fails to enter something here.

Even for such a simple form, all three controls would have to be manually developed and data-bound. This includes additional features, such as input validation. JSON Forms directly utilizes a data schema based on the JSON schema standard. Therefore, we must only describe which properties a task consists of. Defining a data schema is very useful even when one is not using JSON Forms, for example, it can be used to validate the data.
The following data schema (a.k.a. JSON Schema) defines the task entity:
{
  "type": "object",
  "properties": {
    "name": {
      "type": "string",
      "minLength": 1
    },
    "description": {
      "type": "string"
    },
    "done": {
      "type": "boolean"
    }
  },
  "required": ["name"]
}
With the listed schemata as an input, JSON Forms can already render a fully functional form-based UI, including data binding and validation.
The complete code for day 1 can be found on github.
The final result is a web page (shown in the screenshot below), which already shows a fully functional form-based UI.

Data we enter in this form is already bound to the underlying data object. JSON Forms automatically renders the correct control for each data type. For the enumeration, a drop down would show the valid values. Additionally, the form will automatically validate the data we enter. As an example, we have specified in the data schema that the name of a user is mandatory, therefore, JSON Forms will shows us an error marker, if we do not enter a value for the name property.
This form is already a good starting point, however, there are obviously some customization requirements. As an example, we might want to change the order of controls, their label, and the layout which they are shown in. Additionally, the description field shall be rendered as multi-line. All this is possible with JSON Forms, and will be described on day 2 of this series.
If you are interested in trying out JSON Forms, please refer to the Getting-Started tutorial. It explains how to set up JSON Forms in your project and how you can try the first steps out yourself. If you would like to follow this blog series, please follow us on Twitter. We will announce every new blog post on JSON Forms there.
We hope to see you soon for the next day!
List of all available days to date: