Tabris.js Examples - Drawing on the Canvas
April 15, 2015 | 4 min ReadTo create a rich interactive UI, the predefined widgets of your platform and corresponding toolkit are often not enough. You want to draw something yourself. Tabris.js provides just that - the Canvas widget for your own drawings.
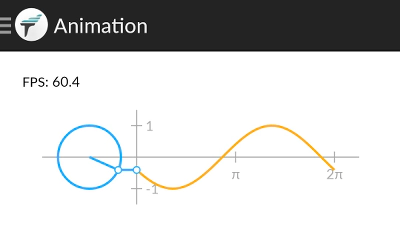
The Canvas is totally empty by default. To draw on it, you use a Context object with numerous drawing functions. These range from simple geometric shapes like rectangles, circles and polygons to Bézier curves. You can also change the appearance of the lines (Stroke) and areas (Fill) of the drawing. The complete list of drawing functions supported in Tabris.js can be found in the documentation. The drawing API provided by the context adheres to the web standard of CanvasRenderingContext2D, so you can find the detailed documentation for each individual function at the Mozilla Developer Network. Let’s take a look at the Canvas example we provide as part of Tabris.js. When you open it in your Tabris.js Developer App you will see this on the first page: 
The following sections explain the basic concepts of the Canvas widget, using some slightly simplified code snippets.
Create the Canvas
Before you can draw on the canvas, you have to do two things:
- Create the
Canvaswidget - Get the (Rendering-)
Contextof the Canvas
As the context requires width and height, the easiest way is to provide static values. The width and height provided to the getContext() function can be chosen independently of the Canvas’ size. If you want the context to be the same size as your layouted canvas, the following code snippet illustrates how to do that. After you created the Canvas widget just wait to get the context (ctx) until the Canvas has been layouted for the first time. The snippet attaches a listener to the “change:bounds” event.
var ctx;
tabris.create("Canvas", {
  layoutData: {left: 0, top: 0, right: 0, bottom: 0}
}).on("change:bounds", function(canvas, bounds) {
  ctx = tabris.getContext(canvas, bounds.width, bounds.height);
}).appendTo(page);
Draw to the Canvas
Now that we have a context we can use it to draw on the canvas. The following snippet draws a line, a rectangle and a circle.
// draws the line
ctx.beginPath();
ctx.moveTo(20, 20);
ctx.lineTo(bounds.width - 40, bounds.height - 40);
ctx.stroke();

// draws the rectangle at the edge of the canvas
ctx.strokeRect( 0, 0, bounds.width, bounds.height );

// draws a circle at the center of the canvas
ctx.beginPath();
ctx.arc(bounds.width / 2, bounds.height / 2, 40, 0, 2 * Math.PI);
ctx.stroke();
To explore more sophisticated drawing operations, please browse the documentation at the Mozilla Developer Network.
In the Canvas example that comes with the Tabris.js Developer App the axis, circles and sine graph are drawn in a similar way. You can take a closer look at the different draw…() methods in the source of the example.
Animated drawings
To bring some movement into your drawings you can animate them by quickly drawing a series of consecutive images. Typically you would generate such images with a method that is called in a loop. It computes the different phases of your animation based on a counter or the current time. A simple animation loop could look like this:
function animate() {
  draw();
  setTimeout(animate, 0);
}
The function animate() first calls a draw() and then schedules another call of animate. The timeout parameter of 0ms makes Tabris.js call animate() again in the next render cycle of the device. The implementation of draw() typically clears the canvas first and then draws a new frame. You can take a look at the draw() implementation of the animated Canvas example to get an idea how we created the moving sine graph. More information on Canvas animation can be found in the Basic animations chapter in the Canvas Tutorial. If you’d like to check out the full Canvas example on your device, you need the Tabris.js Developer App:
[

The Developer App is connected to the Scratchpad on the Tabris.js website so you can easily play with the code yourself.
Here’s the list of “Tabris.js Examples” posts we’ve published so far:
- Tabris.js Examples – Hello World!
- Tabris.js Examples – User Input
- Tabris.js Examples – Local Storage
- Tabris.js Examples – Images
- Tabris.js Examples – Parallax Scrolling
- Tabris.js Examples – Animations
- Tabris.js Examples – Drawing on the Canvas
- Tabris.js Examples – Network Access
Stay in the loop! Follow @tabrisjs on Twitter.