Server-Side Apps with Tabris - the programming model
In my last post I gave you an overview of server-side apps and how they relate to Tabris (previously RAP Mobile). In this post I want to dive into some technical details. I’ll assume that you are a Java programmer and that you are familiar with servlets and tomcat. Not necessary but really helpful is some knowledge of OSGi.
So, let’s get started. To create Tabris Applications you’ll write Java Code only. This of course means you will have some dependencies. The basic dependencies that result from using Tabris are two open source jar files. One is the widget toolkit which includes the SWT API for writing UIs and some other server stuff. The widget toolkit is part of the Eclipse RAP project and is called RWT (RAP Widget Toolkit) and it’s jar file is named org.eclipse.rap.rwt_VERSION.QUALIFIER.jar. The second jar file is the Tabris jar itself. It’s called com.eclipsesource.rap.mobile_VERSION.QUALIFIER.jar and contains additional API and other mobile-related stuff. Of course these two jars have dependencies too. These are javax.servlet, org.json and a few others. They are included in the Tabris target (see the target definition file in the examples) and can also be consumed manually or via Maven.
Once you have set up your Java Project and dependencies (you can use this template) the first thing you’ll need to write is an ApplicationConfiguration. It can look like this:
public class Configuration implements ApplicationConfiguration {

  public void configure( Application application ) {
    TabrisClientInstaller.install( application );
    application.addEntryPoint( "/my-app", MyEntryPoint.class, null );
  }
}
You may notice that the really interesting stuff happens in the configure method. This method will be called by the framework and is used to configure your environment. You’ll use the configure method most often to add EntryPoints. An EntryPoint marks the entry point of your UI code and can look like the following MyEntryPoint. (If you want to go into more depth on the UI Code, take a look at the SWT resources and the examples.)
public class MyEntryPoint implements EntryPoint {

  public int createUI() {
    Display display = new Display();
    Shell shell = new Shell( display, SWT.NO_TRIM );
    shell.setLayout( new GridLayout( 1, false ) );

    Button button = new Button( shell, SWT.PUSH );
    button.setLayoutData( new GridData( SWT.BEGINNING, SWT.CENTER, false, false ) );
    button.setText( "Hello World" );

    shell.open();
    return 0;
  }
}
In the configure method of the ApplicationConfiguration you need to connect the entry point to a path, e.g. “/my-app”. This will make your application available using this URL https://SERVER:PORT/my-app. Next, you need to hook your ApplicationConfiguration Implementation to the framework.
At this point you need to make a choice between two Tabris operating modes. The easiest mode to use is Tabris together with plain servlet technology. For this variant you’ll write a web.xml to hook the framework to your application, similar to the example below:
org.eclipse.rwt.Configurator
my.Configurator

org.eclipse.rwt.engine.RWTServletContextListener

    rwtServlet
    org.eclipse.rwt.engine.RWTServlet

    rwtServlet
    /*
The more advanced operating mode is to use it together with OSGi, which I prefer because I like modularity much. But this requires that you have basic knowledge about OSGi and the service model. Hooking the ApplicationConfiguration in this scenario is pretty straight forward. All you have to do is register your implementation as an OSGi service and starting one more bundle called org.eclipse.rap.rwt.osgi. In an activator it can look like this:
public class Activator implements BundleActivator {

  private ServiceRegistration registration;

 public void start(BundleContext bundleContext) throws Exception {
   Configuration configuration = new Configuration();
   registration = bundleContext.registerService( ApplicationConfiguration.class.getName(),
                                                 configuration,
                                                 null );
 }

 public void stop(BundleContext bundleContext) throws Exception {
  registration.unregister();
 }

}
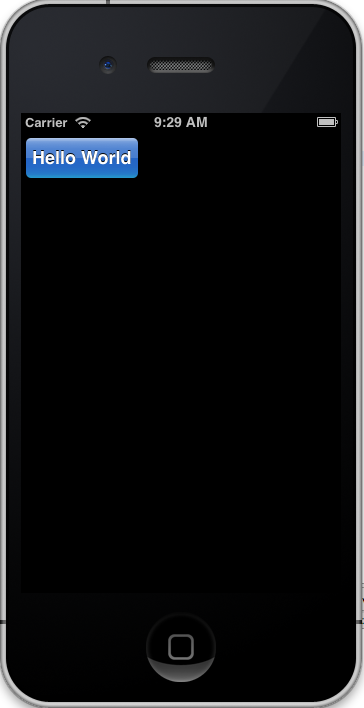
Now you can simply launch your OSGi framework - but, don’t forget the HttpService (it is in the org.eclipse.osgi.services bundle). And now, the fun part. Point your mobile client to the url of your server and enjoy the mobile UI which should look like the advanced one below! :)
If you haven’t tested the clients already, don’t hesitate to request them here. We have also created some examples which can be found at github. In upcoming posts, we’ll provide a more detailed tutorial for both operating modes.