Ian is an Eclipse committer and EclipseSource Distinguished Engineer with a passion for developer productivity.
He leads the J2V8 project and has served on several …
It’s always a great idea to use a Source Control Management (SCM) system – even when you are working on personal projects, without any collaborators. However, once you start to work with others and multiple streams / branches start to emerge, you need an SCM system that can handle a variety of different merge cases. In this article I will describe a few different ways you can merge two branches using Eclipse Git (EGit).
In this article I will assume we have the following simple git repository:
Figure 1: Simple git repository
A UI and Core bug have each been fixed in the master branch. Also, security was added to the application. In the new_idea branch, an alternate approach to the UI and Core bugs were tried. The security feature does not exist in this branch. The EGit history view would show this repository as follows:

Figure 2: Initial history view
Now, assuming you have chosen alternate approach to the Core and UI bugs, there are at least four (4) different ways to merge. (If you have other ideas on how to merge these branches, please leave a comment).
For those of you new to git, the most intuitive way to merge these branches is to use the merge tool. You checkout the master branch and merge the new_idea branch. Since the same functionality was implemented in two different ways, you are almost guaranteed to have merge conflicts.

Figure 3: Merge conflicts
Once you have resolved these conflicts, you must explicitly add the merged files to the git index (Team->Add) and then commit your changes. The more seasoned git users will probably suggested that you rebase your new_idea branch on top of the commit C first (I didn’t do this).

Figure 4: Merged history view
Once you have successfully resolved the merge conflicts, added the affected file to the git index and committed, your history view should look something like Figure 4.
You can also cherry pick commits. For example, if you only want the alternate UI fix (commit G), but not the alternate core fix (commit F), you can cherry pick commit G.
Since git is a directed acyclic graph of commits with pointers (or references) to the tip of the branches, you can manipulate this graph. If you checkout the master branch and then issue a hard reset to the new_idea branch (in the history view, right click on the new_idea branch and selected Reset->Hard), the master branch will now point to the tip of the new_idea branch. You have essentially tried two different ways to implement the same functionality, and when finished, you choose the second approach. However, you will not only lose the UI and Core fixes, but you will also lose the new security feature that you added (commit C, D and E). In this case, it’s important that you rebase your new_idea branch off commit C first.

Figure 5: Reset your master branch
Once completed, your history view should look something like Figure 5. Note: you should never attempt to reset branches like this if you’ve shared your repository. If anybody else has worked on the master branch, you will cause them (and likely you) a lot of headaches. This should only be used on private repositories, before you push.
A similar approach to #2, you can forcefully remove commits. Since you tried two different ways to address the same bugs, you can now delete the unwanted attempts. If you have your master branch checked out, you can reset the branch to point to Commit C (Add Security). This will effectively remove Commits D and E from your history. Now you can merge (without conflicts) the new_idea branch.

Figure 6: Rewrite history
Once completed, your history view should look something like Figure 6. Note: you should never re-write history once you’ve shared a repository. Similar to #2, this will cause you, and any collaborators, a great deal of stress. Another problem with this approach is that you are hiding what you really did. If you ever wish to reexamine the original attempts to fix the UI and Core, you can’t.
The best approach to this merge problem (IMHO), is to communicate to git exactly what you want to do. In this case you fixed a few problems, were not happy with your solution, so you fixed them a different way. In git speak, you committed D and E, you now want to revert D and E and merge commits F and G instead. Unlike the rewriting history, this will actually create new commits to represent the reverted changes. The original attempts are recorded in the SCM along with the the fact that you reverted them.
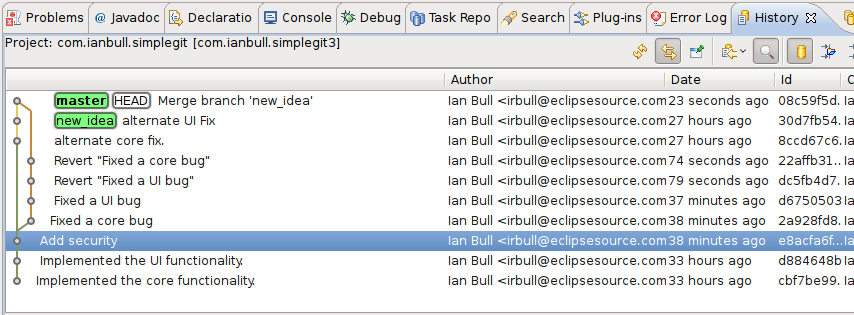
Figure 7: Reverting commits
Reverting a commit is as easy as selecting it in the history view, and choosing Revert Commit from the context menu. You can now use the merge tool with ease. Once completed, your history view should look something like Figure 7. Because you haven’t removed any commits, this approach is safe even if you’ve shared your repository.
What do other think? Do you have different ideas for merging branches with conflicting changes?
Remember, don’t fight your tools, just git ’er done.

Ian is an Eclipse committer and EclipseSource Distinguished Engineer with a passion for developer productivity.
He leads the J2V8 project and has served on several …