Performance Testing RAP on the Cloud
October 22, 2008 | 10 min ReadA recurring question in the RAP community is, “How good is the performance of my RAP application”? Now you can measure it for yourself on the Amazon cloud. In this tutorial I will show you how to set up your own load testing for a RAP application deployed on Amazon’s rent-by-the-hour servers, also know as the Amazon Elastic Compute Cloud (EC2) infrastructure. We will setup a server inside EC2 with a ready-to-run RAP application and use JMeter to simulate concurrent users.
Creating an Amazon Web Services Account
To access the Amazon Compute Cloud (EC2) you must create an Amazon Web Service account first. The EC2 sign-up requires you to provide your credit card details, so that so that Amazon can charge you a small fee for the time you use their services. To sign-up go to the EC2 homepage and click on “Sign up for Amazon EC2”.
Setting up EC2
In order to interact with EC2 we are going to use the AWS tooling provided by the g-Eclipse project. The g-Eclipse project, originally developed to support grid computing, provides tools to interface with Amazon Web Services.
The latest g-Eclipse milestone build can be found here (latest release: gEclipse 1.0M10) or grab gEclipse from Yoxos On Demand. If you need an in depth “Getting Started” guide on setting up g-Eclipse, you can find it in the Eclipse Help (Help > Help Contents > g-Eclipse User Guide > Getting Started).
Once you have g-Eclipse installed, switch to the “g-Eclipse User” perspective (Window > Open Perspective… > Other > g-Eclipse (User)).
Now you need to associate a “Grid Project” with your AWS account: Create a new Grid Project via the New Project wizard (File > New > Grid Project). Enter a project name (“EC2Grid”) and hit “Next”.
On the second page of the wizard choose “Edit VOs…” to open the “VO-Declarations” preference page. This will allow you to create a Virtual Organization (i.e. your AWS account credentials) and attach those to your Grid Project. Define a new AWS Virtual Organization (Add… > AWS VO) and provide a name (eg. AWS VO) and your AWS Access Id (which is found under “Your Account > AWS Access Identifiers” in the top right menu on the Amazon website). Choose “Finish” to create the Virtual Organization and return to the Wizard. The “VO Selection Page” should show your newly created virtual organization. There should be a check mark next to it. Choose “Finish” to create your Grid Project.
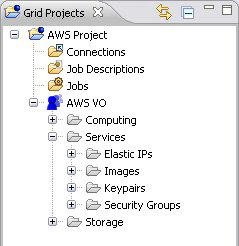
Inside the “g-Eclipse User” perspective you can find the “Grid Projects” View. This view is your gateway to the Amazon EC2 infrastructure. The setup project should look like the image to the right.
Running a RAP enabled EC2 Instance
In order to test our RAP application, we will need to fire up an Amazon Machine Image (AMI). This is a binary Linux image that has been preconfigured for certain tasks. In our use case we want to launch an Image capable of running RAP applications. To make things easiert, we already provide a pre-configured Image containing Java, Tomcat and RAP.
Before we can launch the Image we need to set up secure access to it.
Setting up a Security Group
A security group is required so that specific network ports on a running EC2 instance can be made accessible. By the way, an instance is a virtual server in the cloud.
To create a security group, expand the ‘AWS VO’ and ‘Services’ folders. Select the ‘Securit Group’ folder and choose “Create Security Group“ from the context menu. Enter a suitable name (e.g. “rap server”) and an optional description and click “Finish”.
The first time you do this, you will see the “Authentication Token” dialog. In this dialog you will be asked to authenticate yourself, by entering the Secret Access Key that matches the Access Key in your virtual organization. This is similar to entering a password – the Access Key is your usedid and the Secret Acess Key your password.. You can find the secret key under “Your Account > AWS Access Identifiers” on the Amazon website. Select “Finish” after entering the key.
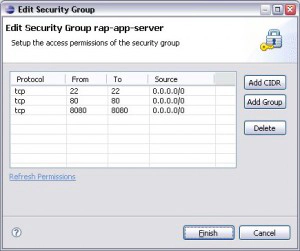
Once the group has been created, you have to collapse and expand the Security Groups branch in order to see your new security group. Right click on the entry and choose “Edit Security Group”. This starts a wizard where you can specify which ports and protocols you want to open on a running Instance. This is similar to configuring a firewall. Use the “Add CIDR” button to add individual rules.
Typical ports to open for our scenario are 22 (ssh), and 80/8080 (webserver/tomcat). You can of course, add other ports depending on your application’s needs.
Creating a Private Key
Next, we need to prepare a private key. This key will allow us to log-in to a running instance, without entering a password. To create the keypair right-click on “Services > Keypairs” and select “Create Keypair”. The wizard will allow you to name the keypair and set a storage location for the private key file. A common place for this private key file is /ssh.
Then we need to make this private key file available to g-Eclipse. Go to Eclipse Preferences (Window > Preferences) and under “General > Network Connections > SSH2” add our private key to the list of “Private Keys”. This will allow us to log into the running EC2 instance via the build in the SSH terminal.
Launching the RAP EC2 Instance
We have now covered the security setup and are ready to launch our server instance. Go to the “Services > Images > All Images” folder and find the AMI with the id “ami-d59276bc”. Right click on it and from the context menu select “Launch AMI”. This will bring up the launch configuration dialog. In this dialog you can configure the parameters for launching your custom EC2 instance.
Most of the configuration parameters are already filled in for you but some require your attention. Luckily you can fill-out most fields by clicking on “Populate from EC2” in the lower right corner of the dialog. Now the only things you need to provide are:
1. The private key (In the ‘Key:’ drop-down, select the key you created earlier) 2. The security group (Edit > Move “rap server” from ‘available’ to ‘selected’ > Ok)
You can use the default settings for all other items. Some settings might be of interest though. For example you might want to choose the type of hardware your instance runs on (Instance Type).
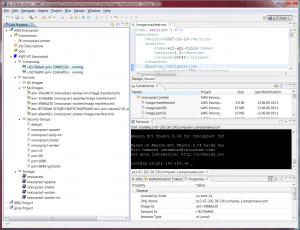
After making your final adjustments, click “Run”, which laun ches the instance on the EC2 infrastructure. Important: after this point you are being charged an hourly fee for each running instance. Remember to terminate your instances when you no longer need them (see below). You can monitor the state of your running instances by expanding the “Computing” branch. (Contracting then expanding the tree will refresh).
Because we’ve provided a private key when we launched the instance, it is possible to open a passwordless ssh session on that instance. Expand the ‘Computing’ node, select your instance and choose “Open SSH terminal…” from the context menu. In the dialog that follows, we enter the user name “root” and and click “Finish”. This opens the terminal view with a logged-in shell on that instance.
Accessing the RAP Instance
We now have the instance running and are logged in via SSH. Where is the RAP application? By default the EC2 instance runs the RAP workbench demo application. This generic application is a good starting point for learning about the various features of the RAP platform.
To access the application in a browser, select the running EC2 instance under the “Computing” node and open the “Properties” view (Window > Show View > Properties). The row “DNS Name” contains the publicly accessible domain name of your instance. Copy this entry to your browser and append the path “/demo/rap” to it. The entire URL should look something like https://ec2-12-234-56-78.compute-1.amazonaws.com/demo/rap.
Alternatively, you can open the tomcat manager application with the path “/manager/html” and use the login credentials admin/nimda.
On the server side you can find the tomcat application server under “/opt/tomcat/”. You can find the packaged demo application under “/opt/tomcat/webapps/demo.war”. The demo application is based on a recent integration build (RAP 1.1.1, 20080714).
Running JMeter Performance Tests
With the RAP demo application up and running we can now apply some load to it. The tool we are using for this task is Apache JMeter. It simulates concurrent users accessing the same web resource. You can download JMeter here. As of this writing the latest version is JMeter 2.3.2. Extract the download and launch JMeter by running “/bin/jmeter.(bat|sh)” (needs Java).
To get you started with your own performance tests we have created an example test plan, which mimics a typical user on the RAP demo application. You can download the zipped test plan here.
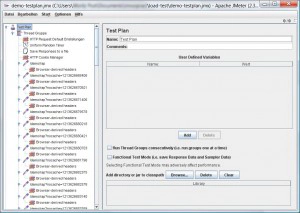
Unzip the file and choose “File > Open” from the JMeter menu to open “demo-testplan.jmx”. From the tree on the left choose the node “HTTP Request Default Settings”. This node will allow you to specify the target of your load test. You will need to replace the “Server Name or IP” with the DNS name of our currently running instance.
We are now ready to launch the performance test. Choose “Run > Start” in the application menu. You will see the thread count increasing in the upper right corner of the JMeter window. Also you will see how the number of sessions increases for the demo application when using the tomcat manager application.
Test Procedure
The test is setup to create 200 threads over a ramp up period of 400 seconds, which means a new thread is spawned every 2 seconds. Each thread executes around 80 clicks on the RAP demo application with an average delay of 7,5 seconds between each click. After the series of clicks is executed the thread starts a new session on the tomcat server and repeats the click cycle.
To see the average time need to answer each request select the node “Summary Report” in the tree. You can also check the responsiveness of your RAP application yourself, by using your application in your webbrowser while the performance test is running.
You can change the test parameters in two ways. You can edit the ramp up/number of threads parameter under “Thread Group” or change the delay between clicks under “Uniform Random Timer”. The “RAP Load Testing” page on the Eclipes Wiki has a few more tips for fine tuning your performance tests.
Advanced Performance Testing [optional]
In order to execute long running tests, the test client can be on the EC2 cloud as well. To do this we created another AMI with the id “ami-ec927685”. It contains a ready-to-run installation of the JMeter client which can be invoked in headless mode. JMeter is installed under “/opt/jmeter”. To start a long running test the invocation should look like “/opt/jmeter/bin/jmeter -n -t /opt/testplans/demo-testplan.jmx -l /mnt/demo-testplan.jtl”. It is also possible to use the “nohup” directive to detach the process from the current shell.
Since the server address of the targeted RAP application is dynamic, the correct DNS name needs to be inserted in the test plan under “/opt/testplans/demo-testplan.jmx” (line 33). Also the JMeter application needs to have access to the ports 32767-65535, which should be defined in an appropriate security group.
IMPORTANT: Terminating the RAP Instance
Be sure to terminate the running instance as soon as your tests are complete. Remember: you are paying for your instance by the hour! To shutdown the server instance select the “Terminate Instance” action from the context menu of a running instance. This will initiate the shutdown procedure which takes approximately 30 seconds.
Summary
In this short article we have seen how to run performance tests against a RAP application on the Amazon Cloud Computing infrastructure. We have created the necessary AWS accounts and activated the EC2 functionality. We obtained the g-Eclipse application to interact with the cloud infrastructure and performed the setup required for security groups and private keys. After launching the RAP demo application server, we logged in via SSH and accessed the application via a browser. With the application up and running we used JMeter to apply some load onto the RAP application.
And how does your rap application perform?
Leave a comment and let us know what you think.


