Jonas Helming, Maximilian Koegel and Philip Langer co-lead EclipseSource. They work as consultants and software engineers for building web-based and desktop-based tools. …
Your first Application based on Eclipse
21 min ReadFAQ
Eclipse is a mature and powerful platform, more precisely a collection of open source technologies and frameworks. When used right, it can enormously speed up your development project and significantly reduce costs – for the initial implementations as well as for the ongoing maintenance.
However, Eclipse is also known to add new and sometimes complex concepts to the standard Java world, which might not be known from the start. This can lead to some frustration, non-optimal architectural decisions and therefore some unnecessary additional effort.
From our experience in various Eclipse-based projects, we observe a number of frequently recurring questions and issues. In article, we will highlight the most important issues to consider and pitfalls to avoid. This is not a detailed tutorial, showing step by step instructions.The goal of this article is to give an overview of the frequently asked questions and create an awareness for the most common issues. We will provide some blueprint solutions, guidelines, and initial pointers for where to get more information and how to address them in detail. If you miss a questions in this article, please get in contact with us, we might add new sections based on your feedback.
What are OSGi, Bundle, Plugins and Features?
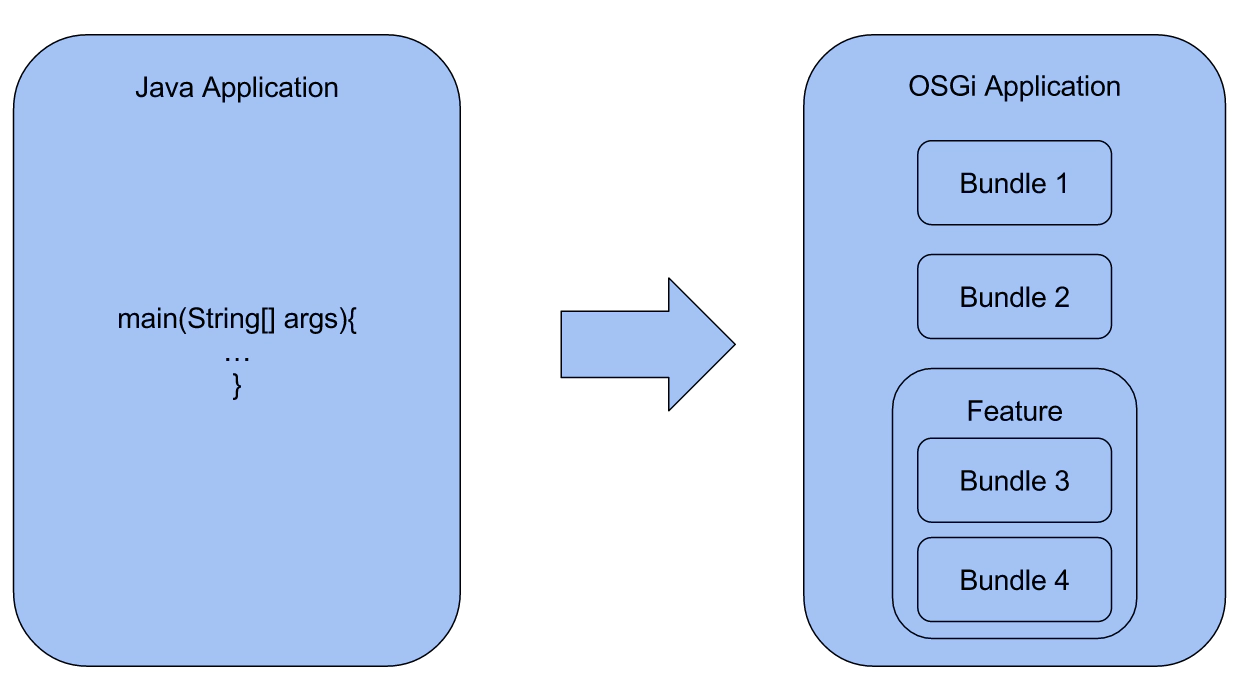
From the bottom to the top, Eclipse is based completely on these concepts, so let us give a short introduction to them. OSGi (Open Service Gateway initiative) is a standard for a Java-based module system which fundamentally changes the way applications are developed. In pure and traditional Java applications, you have one main method. All classes you want to use are put on the classpath and you have access to all of them. Of course, you can extend Java applications by adding Jars to its class path, but the built-in support for modularity and extensibility during runtime is pretty limited. As an example, you cannot restrict the access to certain packages within a jar, you cannot explicitly define an API and therefore, you cannot force a decoupling between different components. OSGi introduces the concept of a bundle, which is one single module of your application. Every bundle defines some packages, which can be accessed by other bundles. All “internal” bundles are hidden for callers. Therefore OSGi enables you to decouple components, we will cover this more in detail later. Every OSGi application can consist of an arbitrary number of bundles and it is even possible to add new bundles to an application that has already been deployed and therefore extend them by new functionalities.
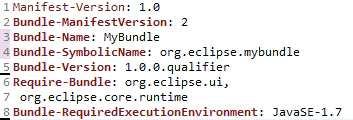
While the main goal of OSGi is modularity, it provides many more features. Most of them, like dependency management or package visibility are follow-up requirements of the modular way and OSGi application are built. We will cover more detailed questions about OSGi later. Technically, an OSGi bundle is either a Jar file or an unpacked Jar file (directory). The only difference to a plain Jar is the existence of a file called “MANIFEST.MF” located in a folder “META-INF”. It contains all additional meta-information about a bundle, which is processed by the OSGi runtime. This is mainly: an ID, a version, the dependencies (including a minimum Java version), and packages a bundle is providing to other bundles as API (we will explain this more in detail later). The following screenshot shows the textual content of a MANIFEST.MF file, if you open it in your Eclipse IDE, you will need a form-based editor support to configure it.
The Eclipse IDE itself is an OSGi application, that is why it is possible to install new plugins into it. This directly leads to the next common question:
What is the difference between a bundle and a plugin?
or (sorry for the SEO! 🙂
What is the difference between a plugin and a bundle?
This questions leads back in the ancient times of Eclipse. The first two major release streams of Eclipse (1.x and 2.x) were not based on OSGi. Instead, Eclipse implemented its own and custom module system, which allowed you to add “plugins” to an existing application. This changed when Eclipse switched to OSGi with version 3.0 in 2005. The original plugin concept was discarded, the only concept that remained were extension points. However, the term “plugin” was not really gone, as it was used commonly. Therefore, “plugin” and “bundle” today actually means the same thing. There is one differentiation, which is often used: A plugin is something, which extends the Eclipse IDE, while a bundle is part of a general purpose application. However, you cannot really rely on all people are using the definition this way. By the way, the switch from the custom plugin architecture to OSGi is the reason why today there are two artefacts in typical Eclipse “plugins”, the “MANIFEST.MF” as defined by OSGi and the “plugin.xml”, which was the former artifact to define all plugin information such as dependencies. Today, the “plugin.xml” only contains extension points, all other information has moved to the “MANIFEST.MF”. The tooling of Eclipse, which support the development with OSGi artefacts is also still called “Plugin Development Environment” (PDE). PDE mainly uses the term plugin instead of bundle, so if you want to create a new bundle in the Eclipse IDE, you select “New” => “Plugin project”.
To conclude the first section, there is one additional artefact missing, a “feature”.
Features are a way to organize bundles by grouping them. In a typical Eclipse application, you deal with up to 1000 bundles, it would be hard to manage on that level of granularity. Therefore, bundles are grouped into features which provide a consistent set of functionalities. Features can be further grouped again into other features. As an example there are top-level features for the different IDE packages you can download at Eclipse. They contain then other features such as “Git Support” or “Java Development Tools”.
RCP Application vs. Tool vs. IDE Plugin?
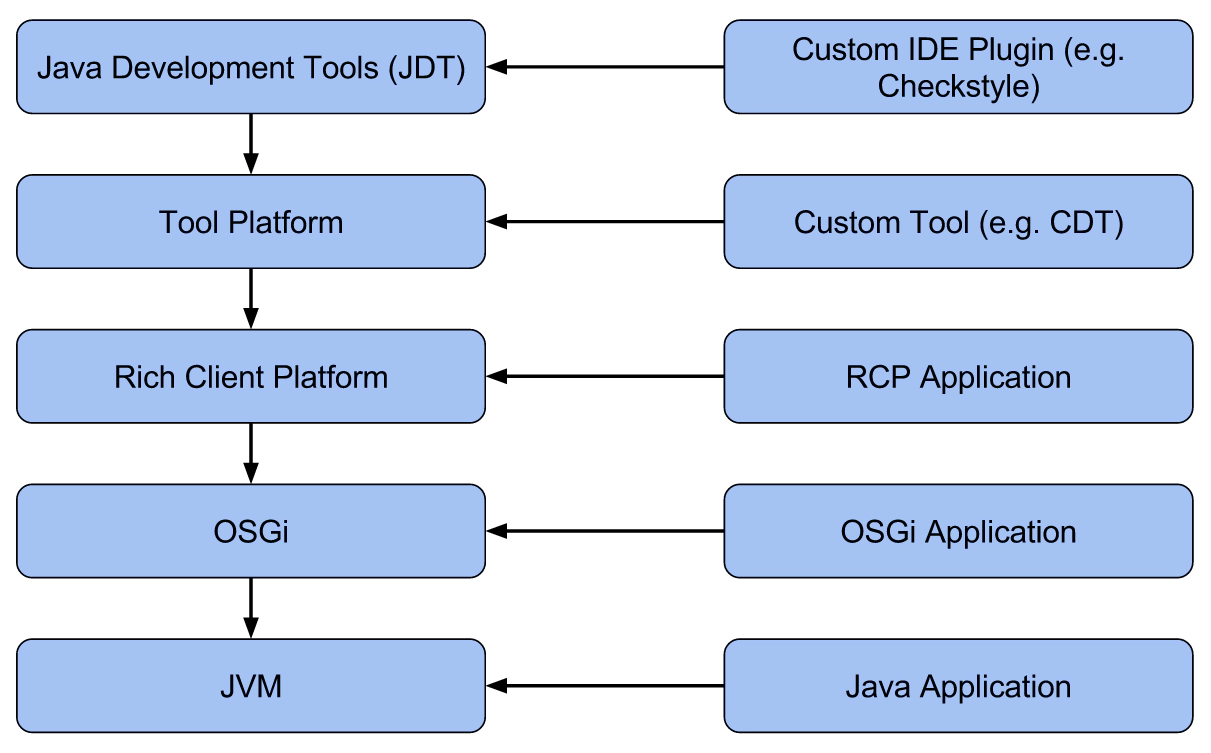
One of the major source for confusion in the Eclipse world are the various use cases. In turn, it is also one of the key strengths, but it is important to have an initial overview. Like the collision between the terms “plugin” and “bundle”, this confusion originates again in the history of Eclipse. Originally, Eclipse was built as a tool platform, as a framework to build various development tools upon. The first, most famous and probably most powerful tool was the Eclipse Java IDE, also called Java Development Tools (JDT). From the beginning, Eclipse was an extensible platform, in fact JDT is just an extension to the pure tool platform. JDT can also be extended by additional features that are called a plugins for the IDE.
Other tools besides JDT were built on the Eclipse tool platform, as well, e.g. the “C development tools” (CDT). Many companies adopted the platform for their own custom tools. Sometimes they reuse some features from other tools, such as JDT, sometimes they just reuse general tool platform features such as version control integration (e.g. Git).
However, over the years, people started to build application based on Eclipse, which had nothing to do with tools anymore, but instead were general purpose applications. In the beginning this was hard to do, because you needed to “hide” all the tool related stuff. With version 3.0, Eclipse did a reorganization and refactoring to split framework parts, which are tool related from parts, which could be used in any kind of application. The second part was called “Rich Client Platform”. Therefore, another use case for using the Eclipse platform was officially supported, that is to build so called Rich Client Platform Applications. These applications depend on the RCP feature, not the tool platform. Finally, with version 3.0, Eclipse also switched to OSGi and implemented a runtime for the standard. So, as a last possibility, you can also build a pure OSGi application without using RCP. This is typically done for server applications or in the embedded area. The following diagram shows an overview of the different use case for Eclipse as well as a dependency graph of the available components.
What is a target platform?
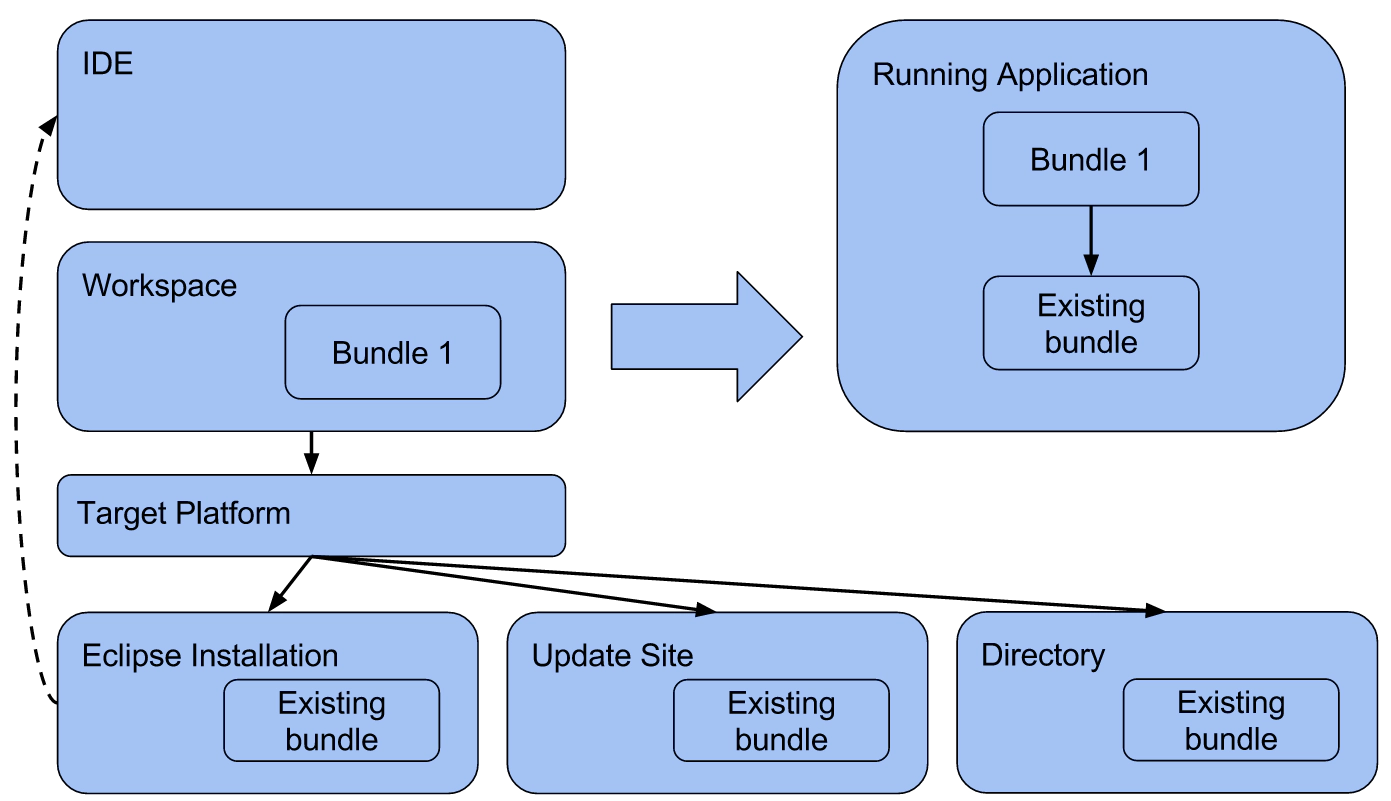
Every Eclipse Application project, no matter if it is an IDE plugin, a tool, or an RCP application uses a target platform. However, many projects never care about it, although it is an essential part of the development environment. If we look at an Eclipse-based application project, you typically use the Eclipse IDE to develop a number of custom bundles. These are located as sources in your workspace (see following diagram). The bundles have typically some dependencies to other bundles, which you have not developed yourself, e.g. Eclipse framework components. To compile your custom bundles, those additional bundles are required. That is why these bundles are called “target bundles”. Furthermore, when you start or deploy your application, those bundles have to be deployed as well. So there needs to be a location to retrieve those “target bundles” from. This location is called “Target Platform” as is defined with a “Target Definition”.
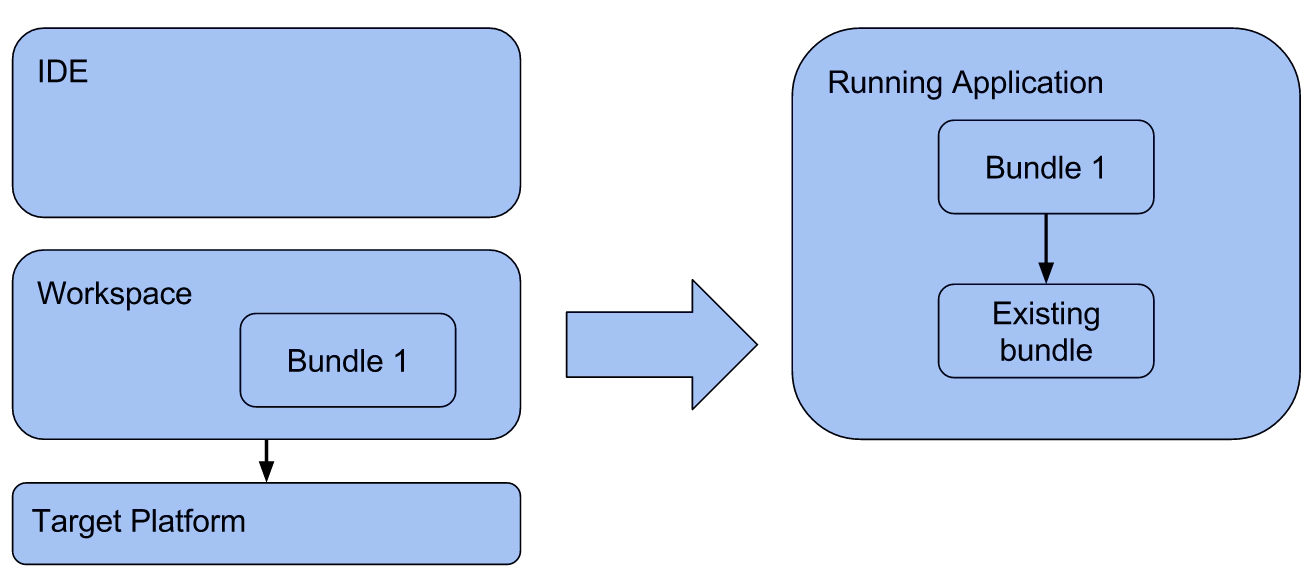
A target definition is basically a collection of locations, where bundles can be retrieved from (see the following diagram). All those locations sum up to the target platform. The simplest type of location is a plain directory containing the target bundles. However, a target definition is usually shared among several developers, so a directory might not be the optimal choice. The second type of location is an update site, that is, a location reachable over HTTP containing the bundles. The update site can be hosted internally, or the official update sites at eclipse.org can be used. Finally, the third type of location is an Eclipse installation. This type is very similar to the directory type, it points to the installation directory of an existing Eclipse IDE installation and retrieves the bundles from it. As the Eclipse IDE contains a lot of the commonly used Eclipse frameworks, this is a good starting point, especially if you develop a plugin for the IDE. However, as for directories, this option is not optimal for sharing with other developers as they need to download or access the Eclipse instance you use as a target.
So, you might wonder, why you never had to think about target platforms before and why you can compile, start and deploy your bundles without even defining one. The reason is the Eclipse IDE ships with a default target platform. This is of type “Eclipse Installation” and points to the running IDE itself. That is the IDE you use for development as all Eclipse IDEs contain the most common Eclipse frameworks. Therefore this default does not require any downloads or initial setup to get started with Eclipse development. However, the default does have shortcomings. First, you always have to use the exact same version of IDE as target. If you develop an application based on Eclipse, you might not always immediately want to update to the latest version of the platform. If you use your IDE as a target, you are stuck with an older version for it. Another reason is that you have to ensure, all developers have exactly the same IDE installed including all additional plugins. Otherwise, builds from within the IDE are not reproducible. Finally, if you want to setup a build server, you would alos need to synchronize it with your IDE. So the recommendation is not to use the running IDE as a target platform, but define the target explicitly. Such a configuration can be done with a target definition file. This enables you to manage your IDE independently from the target of your application. So, you can always use the latest version for the IDE, which usually contains improvements for the development. If you want to improve the way you setup your IDE and synchronize its configuration with the whole team, you should have a look at Oomph.
How to manage dependencies?
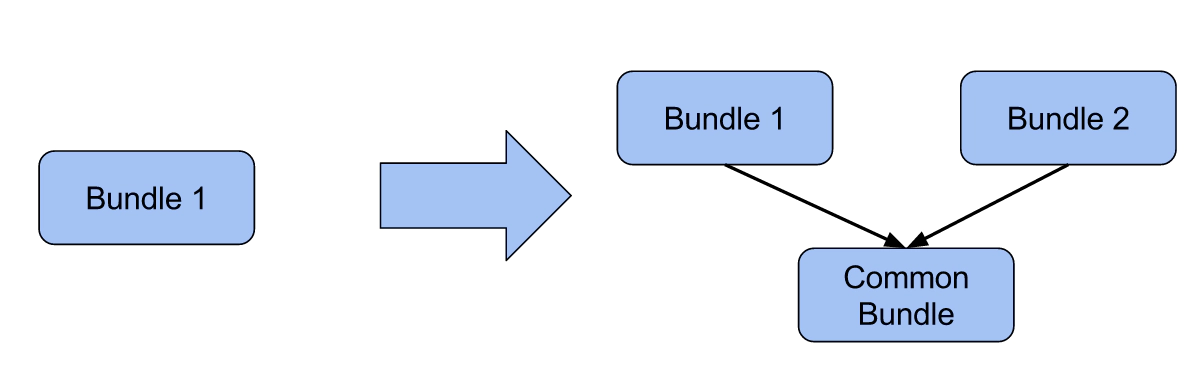
As we described before, OSGi enables you to split an application into an arbitrary number of bundles. Those can then be combined into an application. This provides a lot of flexibility when creating your own application based on bundle that you develop yourself and on bundles, which you reuse from other projects including open source components. However, when modularizing an application, there are requirements for expressing and managing dependencies between bundles. Let us assume a simple example, where you start your project with a monolithic component (bundle 1) implementing some functionality. Now you want to add another feature. To create a modular application, you decide to implement the new feature in a separate bundle (bundle 2). However, in the first bundle, you already implemented some common functionality, which you now want to reuse in the second bundle. As you do not need everything in bundle 1, you decide to move only the common bit of code into a “common bundle”. Now, bundle 1 and bundle 2 use this common bundle and therefore they have a dependency on it. This means, you cannot deploy bundle 1 and 2 without the common bundle.
During runtime, OSGi will resolve and bind the dependencies for you. However, you need to express dependencies in a formal way to enable this. There are two different ways of expressing dependencies in OSGi, both are managed in the MANIFEST.MF file of an OSGi bundle. If you open a MANIFEST.MF file in your Eclipse IDE, you can configure both types of dependencies on the tab “Dependencies”. More details about the editor can be found in this guide.
- Bundle-based: This type of dependency is managed in the left list “Required bundles”. If you add a bundle to this list, you express that your bundle has a dependency on the other bundle including all its packages.
- Package-based: This type of dependency is managed in the right list “Imported packages”. If you add a Java package to this list, you express that your bundle has a dependency on this package, only. Therefore, “package imports” are more fine-grained than “required bundles”. You also do not need to specify, which bundle will provide the package. Import packages are therefore robust against a package being moved between bundles.
There are different opinions, which of the two type of dependencies is better, we will not open this discussion here. In a nutshell, “import packages” are more flexible, more loosely coupled, and more fine-grained, but also more effort, as you need to be more specific. Therefore, “import packages” should be preferred.
How to deal with versions in OSGi?
When talking about dependencies, there comes another important topic, that is the versions of a bundle. Imagine a bundle 1 having a dependency to bundle 2, so it uses some API. Now, when bundle 2 evolves, it might break its API, so bundle 1 would no longer be compatible. To deal with this problem, OSGi enables two things:
- Every bundle has a version, which provides information about the compatibility of its API
- Dependencies to bundles can be specified with a version range
An OSGi version number consists of 4 parts separated by a dot: E.g. 1.1.2.20151102. More details about their meaning can be found in this blog post. In a nutshell: A major version jump, e.g. from 1.2.0 to 2.0.0 means, that the API has been changed in an incompatible way, all minor or service releases guarantee backwards compatibility. Minor release, e.g. from 1.1.0 to 1.2.0 add new functionality, so the API can be extended. If you specify a dependency to a bundle, you can set a minimum required version and a maximum (which is typically excluded). The minimum version should be the version with which you start to use a bundle. As an example, if you start to use bundle 2 from bundle 1, and bundle 2 has a current version 1.1.0, this should be your lower bound (inclusive). You cannot be sure that your bundle 1 is compatible with version 1.0.0 of bundle 2, as you might use API, which has been added in the 1.1.0 release. The upper bound should be 2.0.0 (exclusive) as this is the next major release, which does not guarantee compatibility anymore. Version ranges can be set in the MANIFEST.MF editor, right click a dependency and select “properties”.

How to setup an API?
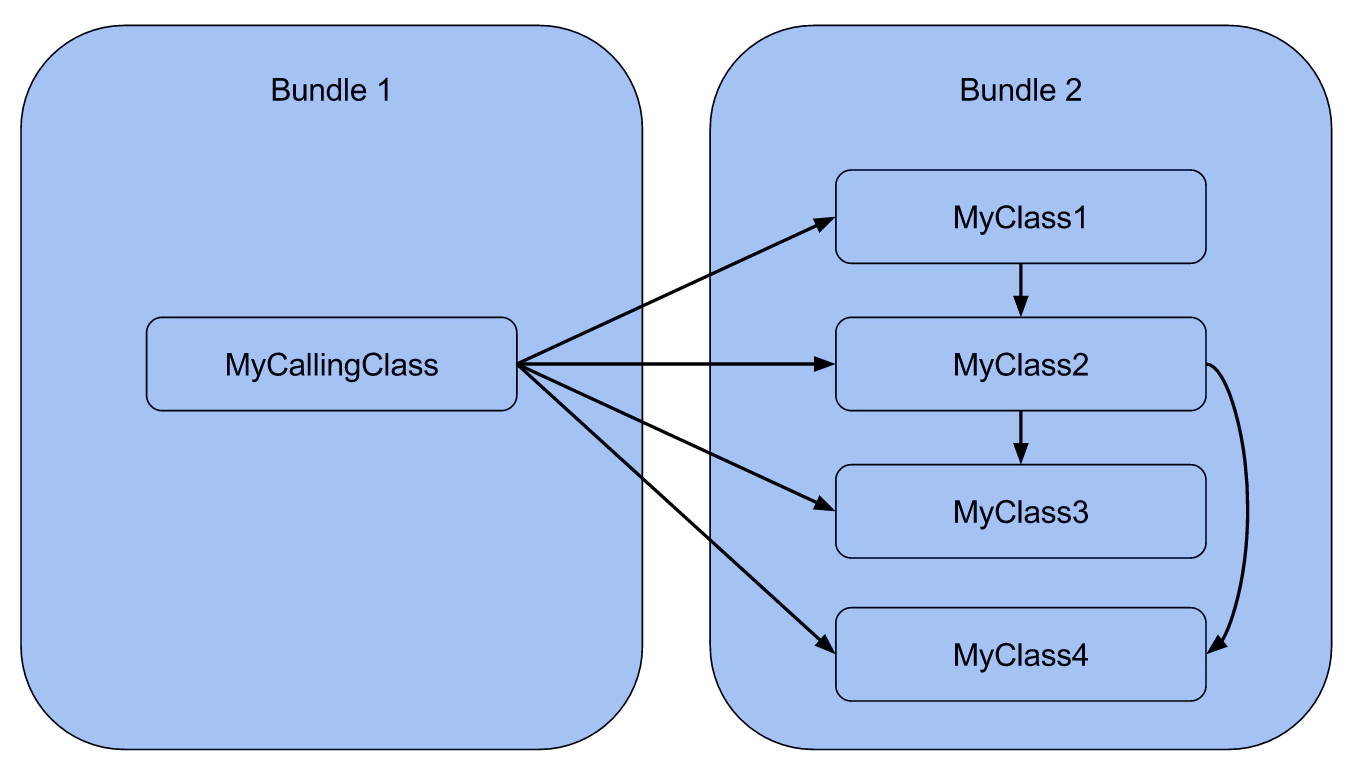
Many of the questions in this article so far were related to OSGi, bundles and the supported modularity. There is one missing piece, which is a key concept for achieving true modularity, that is defining APIs. OSGi enables you to split code among bundles, define dependencies between them, and deploy them independently. However, without APIs, this will not provide much benefit. The following diagram shows a simple example of two bundles, where bundle 1 accesses classes in bundle 2. In fact, bundle 1 accesses all classes of bundle 2. If you now think about some benefits, you want to achieve with modularity, they are not really supported in this case. As an example, replacing bundle 2 would require you to implement all classes. Additionally, there is no capsulation, every change in bundle 2 can potentially affect bundle 1.
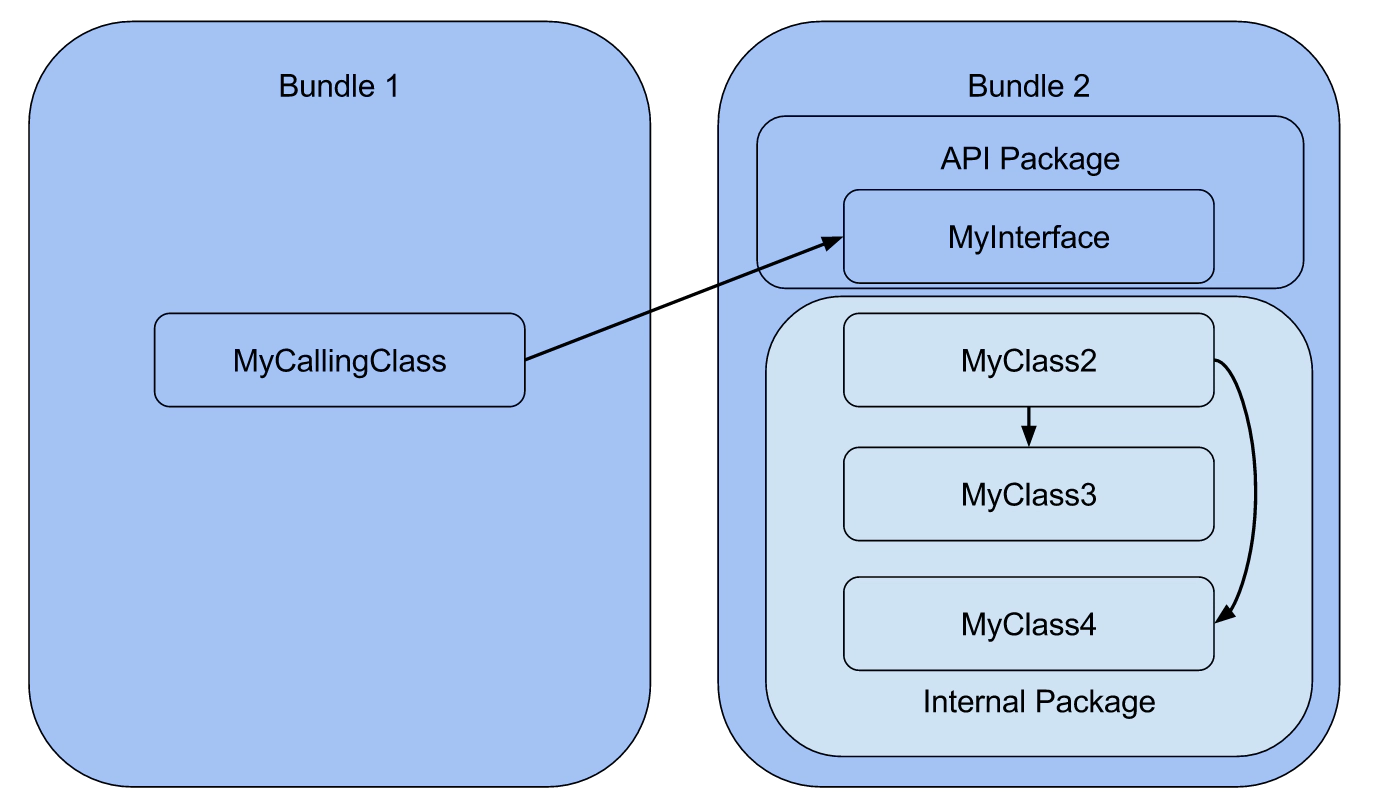
You will achieve true modularity and benefit from it, if you decouple bundles as much as possible, which is done by defining APIs. OSGi explicitly supports this. In the MANIFEST.MF file of every bundle, you must explicitly specify which packages of a bundle can be accessed by other bundles (exported packages) and which cannot. See here for more details. Exported packages define the API of a bundle. Therefor, the default should be to wait to import any package until you need to define an API for other bundles. API packages contain the Java interfaces and classes the API of a bundle consists of. Typically, you should prefer interfaces in APIs, this avoids dependencies to concrete implementations. As shown in the following diagram, other bundles only access the API and not any internal classes. The internal implementations can be evolved and even replaced. As long as the API stays compatible, you do not have to adapt bundles, which use it. Defining APIs allows you to decouple bundles and therefore is the key to benefit from modularity.
There are two additional conventions about package visibility in the Eclipse ecosystem. First, internal packages, meaning all packages which are not API, typically contain the key word “internal”. The second convention is to export internal packages, by “hiding” them. If you do not add a package to the list of exported packages, it is not accessible for other bundles. Frameworks, which are used by anonymous users, typically want to technically allow accessing of internal classes. They should still communicate that a certain package is not meant to be accessed, because it is API. This can be done by marking packages with “x-internal”. The PDE MANIFEST.MF editor supports this with an additional option on package exports. The following screenshot shows two packages, the first one is API, the second one is internal. To hide it, the option “hidden from all plugins except” should be selected on the right site. Hidden packages can be technically accessed, but any callers will get a “discouraged access” warning. Thereby, developers know, that they are using internals, which they should avoid.
How to split bundles?
We have described before, that OSGi enables modularity for Java applications. It enables you to split a system into bundles (i.e. modules), which can be deployed independently from each other. If you start to develop your own bundles, you will need to decide pretty soon, how you split your code and the features you develop among bundles. OSGI and the bundle concept provide the technical foundation for modularity, but choosing the right level of modularity is an architectural decision. We need to lower your expectations for this section, creating a good level of modularity is not a generic issue that can be answered in a few sentence. Instead, it it very much depending on your system, project, and domain. However, there are some generic patterns and best practises, which we want to describe in the following section. Some of them are pretty obvious, but it helps to keep them in mind when thinking about the bundle structure. Also it helps to keep the typical goals for modularity in mind, which are in a nutshell:
- Bundle can be developed, evolved and tested independently, which reduces complexity and improves the maintainability.
- Bundles can be replaced independently if the system is evolving. As an example, if the UI of an application is redeveloped, only UI related bundles have to replaced
- Bundle can be shared and reused (internally or from open source projects)
- Bundles can extend existing applications (plugin mechanism)
- Different sets of bundle can be combined for creating different variations of an application
Based on those goals, we suggest the following list of pattern and best practises to modularize your code among bundles:
- Feature-based: A typical complex application consists of several different sets of functions. As you might want to develop, reuse and deploy them independently, it makes sense to develop different features in separate bundles.
- Split UI and core: Many features consist of a core part, providing some head-less business logic and some UI components which allow the user to trigger something and see the result. It pays off to split both parts of a feature and especially keep the non-ui related parts separate. As an example the business logic can then be reused, even if a new UI is developed or if the functionality should be available on a server without any UI.
- Dependency-based: This is the more generic pattern for splitting UI and core bundles. It means that you look at the dependencies you need to implement certain functionalities within your bundles. If a bundle contains two features, which require very different additional technologies to realize the features, you may consider a split. Splitting UI and core components is one subtype of this pattern. However, there are many other occurrences, too. As an example, if one class in your bundle works with files, while the other works with databases, you could split the bundle into a file and into one db bundle. If you later on switch to another database or you want to deploy a version of your application without database support, those use cases are much better supported.
- Keep entities separate: The entities of an application (objects holding the data) are typically accessed by most other bundles and play a central role. They are also often reused and evolved over a long time. Therefore it pays of to keep entities separate from any business logic or UI concerns and follow a classic MVC pattern.
- Use Cases for exchanging/extending things or optional features? Sometimes, you already know some concrete requirements you need to fulfil, e.g. you know that a certain functionality should be extensible or optional. In this cases, it is typically pretty obvious to split bundles in a way to support the required use cases.
- Use Cases for reusing things? You should review things you implement to see if they could potentially be reused by other products or projects in the future. If this can be foreseen, the features which could be reused should be placed in separate bundles. As you may have noticed, all the described patterns are pretty generic. At the end it requires some experience to get to the right level of modularity. However, if you define good APIs and thereby decouple components, it is possible to move things around without to much adaptation effort. Another useful thing to do is to define features, which group your bundles. This enables you to keep everything organized, even if the number of bundles grow in your project.
How to set-up a build?
There are different build technologies to setup a build for an Eclipse application. We recommend Maven Tycho, it is also the standard build technology defined in the Common Build Infrastructure (CBI). Tycho is a plugin for maven, which enables two things:
- Building Eclipse-specific artefacts, such as bundles or features
- It uses the informations stored in MANIFEST.MF files, e.g. the dependencies.
This is an important detail, Maven has its own way of specifying dependencies (in pom.xml). Tycho enables a “Manifest first” approach, so you do not need to duplicate the information of the Manifest file in the pom.xml.
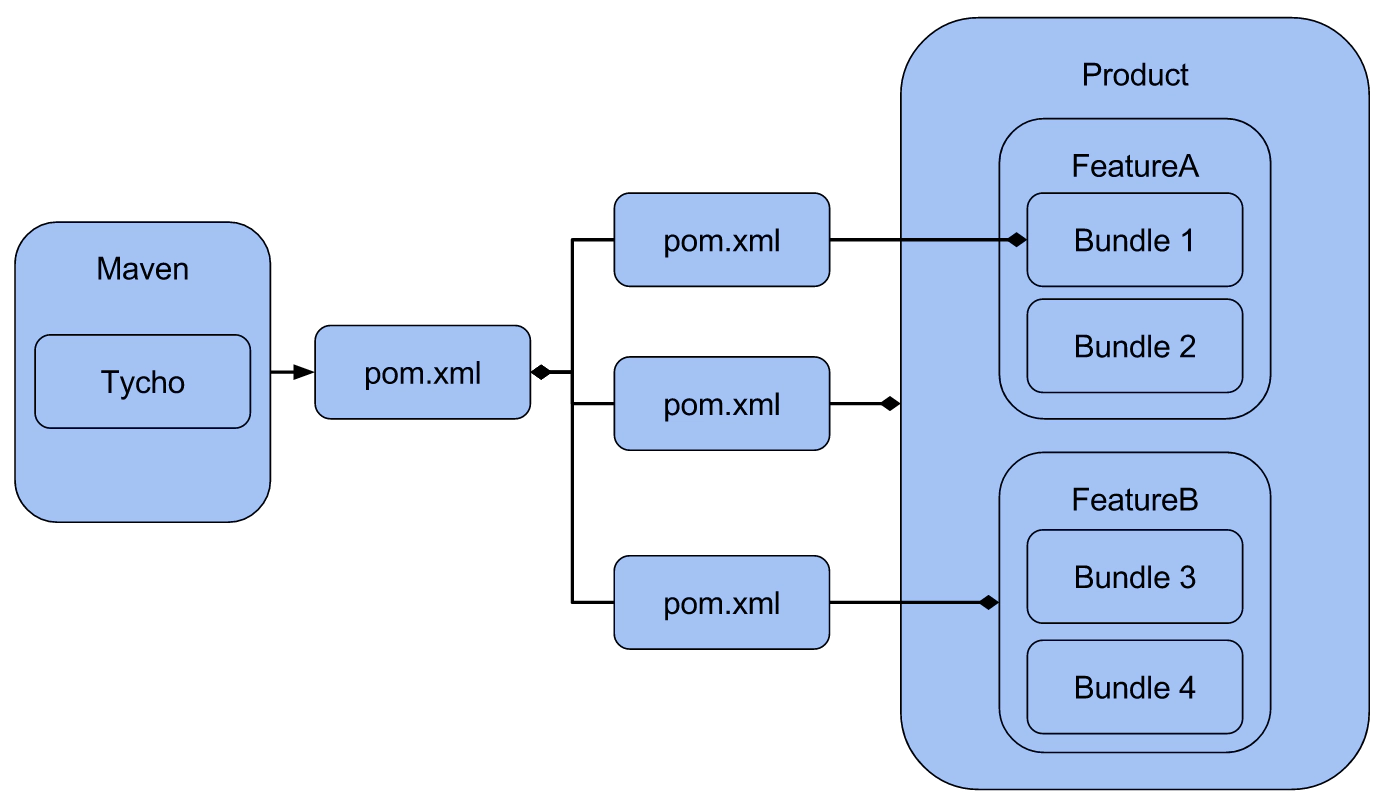
There are many tutorials out there on the topic of setting up a build with Maven Tycho, in this article, we just want to highlight the basic scheme. In general, you will need to configure a pom.xml for every artefact, which is part of the build. These are typically three different types: bundles, features, and products. The first two have already been introduced. The third, product, is an artefact to configure a complete application. It is basically a collection of bundles or features, so it defines, what is in your final application. Products can be setup with bundles or features, we recommend the second option. The definition of a product is contained in a file called “Product Definition”, which can be created within your Eclipse IDE. Beside the list of bundles or features, a product also contains information about the branding of the final application such as a logo, the splash screen, etc.
Eclipse 3.x vs. Eclipse 4 – Which Platform to use?
This is question every Eclipse based project has to deal with. In 2011, an new major release of the Eclipse platform was done (Eclipse 4.x). It provides a new API for the workbench, which replaces the 3.x API. For more information, please have a look at this blog post.
Soft migration from 3.x to Eclipse 4 (e4)?
This questions is mainly relevant for existing projects or for projects, which have to use the compatibility layer. The question is how to do a soft migration to the Eclipse 4 (e4) programming model. For more information about soft migration, please have a look at this tutorial.