Jonas Helming, Maximilian Koegel and Philip Langer co-lead EclipseSource. They work as consultants and software engineers for building web-based and desktop-based tools. …
EMF Forms & JSON Forms
6 min Read
EMF Forms and JSON Forms can be integrated seamlessly with each other. This enables you to use the same UI declaration (a.k.a. view model) to create an EMF Form-based UI, e.g. with SWT, and a web-based UI with JSON Forms.
To fully understand this integration guide, we strongly recommend you read both EMF Forms and JSON Forms “Getting started” tutorials in order to grasp the following topic and setup for both frameworks.
Both frameworks fulfill the same requirements based on two different technology stacks: Efficiently creating a User Interface based on a given Data Schema. In both frameworks, instead of manually coding the UI, it is described by a declarative artifact. The name for this artifact is “UI Schema” in JSON Forms and “View Model” in EMF Forms. Both formats are compatible with each other, therefore, it is possible to convert between the two formats. Currently we offer an automatic transformation from a EMF Forms View Model to a JSON Forms UI Schema. Also we provide a transformation from an Ecore data model definition (used by EMF Forms) to a JSON Schema (used by JSON Forms). This allows you to use the powerful Eclipse-based tooling for EMF Forms, and use EMF to create UI Schemas and JSON Schemas for JSON Forms.
To use the integration, you first need to set up the Eclipse development environment.
Preparation
Installing Eclipse
First, you need to download Eclipse and install the Integration Tooling. For the current purpose, you should download the latest Eclipse Modeling Tools package. Extract the archive and start Eclipse.
The integration feature is included by default since Eclipse Oxygen. If you are using a previously released version of Eclipse (Neon or earlier) or want to upgrade the Integration feature to the latest version, follow these steps:
- Visit the EMF Forms Downloads Page and look for the latest version.Copy the update site url that is revealed when clicking the “Update Site” button and follow the steps provided on the webpage.
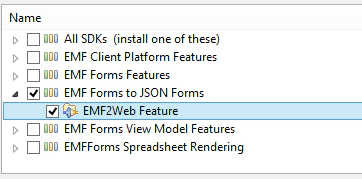
- Install the “JSON Forms Integration” (formerly “EMF2Web”) Feature
Cloning the JSON Forms seed project
The JSON Forms React seed project serves as a starting point for a JSON Forms-based project. It includes everything you need to get started. Of course, you can also use your own JSON Forms based application template.
In order to use the JSON Forms React seed project, first clone the project:
git clone https://github.com/eclipsesource/jsonforms-react-seed.git
When this finishes, switch directories and execute npm install followed by npm start (if you don’t have npm installed, please see here for detailed instructions on how to do so). The local webserver should now serve a single page application with a very basic form in action. The schema and UI schema that this template is based on can be found in the src/ subdirectory of the project (schema.json and uischema.json respectively).
Integration How-to
You’ll now need a EMF Forms View Model which can be exported. We’ll use the EMF Forms ‘Make it happen’ example model in this case. To create the example project, select:
File > New > Example… Now select: EMF Forms > Make it happen: view model
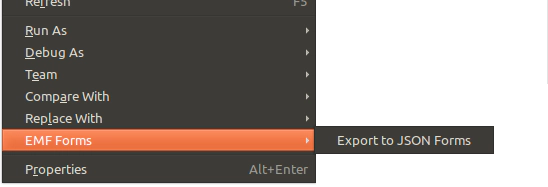
and follow the wizard. When finished, you’ll have three additional projects in your workspace. Within the org.eclipse.emf.ecp.makeithappen.viewmodel project, open the context menu of your viewmodels/User.view model (right-click) and select:
EMF Forms > Export to JSON Forms.
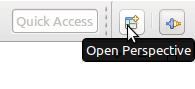
If you are not able to see the “EMF Forms” menu you may have to switch the perspective in the top right corner of Eclipse (e.g. to Java or Plug-in Development)
To understand what happens behind the scenes remember that each view has a “Root EClass”. The exporter generates a JSON Schema for that EClass, as well as a JSON Forms UI Schema for the selected view.
The JSON Schema Generator traverses all EStructuralFeatures of the corresponding EClass, and then generates a property for each one of them. Since JSON Schema uses a simpler set of attributes (number, integer, string and boolean), the Ecore datatypes are mapped to these types. To simplify the generated schemas, we chose to embed referenced EClasses into the JSON Schema directly. Since this can lead to a problem with circular references, all references which are pointing back to the original EClass are removed.
The JSON Forms UI Schema Generator traverses all elements of the given view. It additionally, generates each control with a reference to the corresponding datatype in the JSON Schema.
But enough of the theory, let’s continue with the example. After you selected the Export to JSON Forms action from above, an exporter wizard shows up, which is shown in the screenshot below:

Note: If the dialog offers an optional “Wrap for Seed project” setting, then you are using an old version of the exporter. Please check the “Installing Eclipse” section above and install the latest version of EMF Forms, as the exported schemas will not be usable by the JSON Forms react seed app otherwise.
- The type of the generated model, either “data” or “UI”
- The location where this generated schema will be saved to. By selecting Browse Workspace or Browse Filesystem you can choose a location for your schema. When prompted for a location where to put the data and UI schema, please overwrite the schema.json and the uischema.json in the src subdirectory of the seed project respectively.
- The generated JSON Schema. If you want to quickly inspect or even change the generated file, you can take a look at the content of this textbox. Any edit will also be preserved in the output.
When asked to export the data schema, please select the path to your local “schema.json” and when asked to export the UI schema, please select the path to the “uischema.json” of your JSONForms react seed.
If your local webserver is still running, it should now automatically refresh. Otherwise restart your webserver via npm start.

Workflow
Maintaining two completely different technology stacks, Eclipse + EMFForms on the one side, and AngularJS + JSON Forms on the other, requires a defined process. Therefore, we suggest the following workflow which leverages the best of the two worlds for a unified experience.
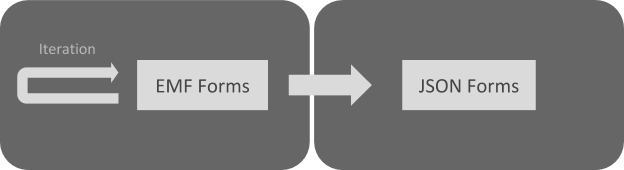
To keep the views and models in both technology stacks consistent, we suggest a single-source model. Since EMF Forms already provides an easy-to-use tree-based editor which offers a powerful converter to JSON Forms, we recommend you use the EMF Ecore and EMF Forms View Models as the source.
When a change to a view or model is needed it is sufficient to change it on the EMF Forms side. Then re-export it to JSON Forms and you are done. Your View and Ecore models will be exported as stand-alone .json files that can immediately be consumed by your application.
If you have any questions or problems you can either open an issue or drop us a mail at [email protected].
Current limitations
The current implementation of the JSON Forms has some limitations which will soon be fixed. Currently, these limitations are:
- per type only a single reference is considered during the export, i.e. when there are multiple references with the same type only one will be considered during the export
- certain layouts and widgets like Categorizations or custom controls are not yet supported
- No support for rules yet
If you find anything that is missing or broken please do not hesitate to open an issue.