Ian is an Eclipse committer and EclipseSource Distinguished Engineer with a passion for developer productivity.
He leads the J2V8 project and has served on several …
p2 is a provisioning platform for Eclipse / Equinox based applications. The p2 platform itself is highly modular, meaning it can be carved and assembled in different ways depending on the task at hand. One such separation is the split between the Metadata (description of what can be installed) and the Artifacts (actual bytes that are laid down on disk).
By splitting the Artifacts and Metadata, many tools can operate on a p2 repository without downloading the full payload. In this tutorial we will show you how to create a simple metadata repository diff tool, a tool that that shows the difference between two p2 repositories.
If you don’t want to follow the entire tutorial, you can jump to the end and download the p2diff from GitHub. Otherwise, fire up your Eclipse IDE and let’s get started.
Before any p2 operation can be performed, a Provisioning Agent must be acquired. The provisioning agent is the management facility for p2, and scopes all the operations. This allows one application to manage another, by acquiring the appropriate agent. An agent is identified by its location on disk. Inside your Eclipse install you will see a p2/ folder, this is the agent for your IDE.
The p2 agent can be acquired as an OSGi service:
private IProvisioningAgent setupAgent(final URI location) throws ProvisionException {
  IProvisioningAgent result = null;
    ServiceReference providerRef = Activator.getContext().getServiceReference(IProvisioningAgentProvider.SERVICE_NAME);
    if (providerRef == null) {
      throw new RuntimeException("No provisioning agent provider is available"); //$NON-NLS-1$
    }
    IProvisioningAgentProvider provider = (IProvisioningAgentProvider) Activator.getContext().getService(providerRef);
    if (provider == null) {
      throw new RuntimeException("No provisioning agent provider is available"); //$NON-NLS-1$
    }
    // obtain agent for currently running system
    result = provider.createAgent(location);
    // When you're done, make sure you 'unget' the service.
    // Activator.getContext().ungetService(providerRef);
    return result;
}
The Metadata in p2 is represented as an Installable Unit (IU). An Installable Unit describes things that can be installed, the capabilities they provide, and the requirements they have. An IU also references the actual artifacts that are to be deployed and lists any installation instructions that must be executed. (Note: IU only reference the artifacts. The artifacts themselves are stored in a separate repository and fetched only when needed.)
IUs are immutable and are uniquely identified by their ID and Version. That is, if two IUs have the same ID + Version, then they are considered identical. Conversely, if anything in an IU changes, it must be published with a new version.
The Installable Unit is considered API. You can explore the API by looking at the IInstallableUnit interface.
In order to obtain a consistent install, a set of IUs are specified and then a resolver is used to ensure that all their dependencies are met (including all transitive dependencies).
Metadata is stored in a Metadata Repository. On disk this is a content.jar file. A metadata repository can be loaded using the IMetadataRepositoryManager, a service which can be accessed via the agent. Repositories are identified by their location. The following code snippet shows how to load the Eclipse Juno metadata repository.
public IMetadataRepository loadRepository(URI repositoryLocation) throws ProvisioningException {
  IMetadataRepositoryManager manager = (IMetadataRepositoryManager) agent.getService(IMetadataRepositoryManager.SERVICE_NAME);
  IMetadataRepository repository = manager.loadRepository(repositoryLocation, new NullProgressMonitor());
}
Once loaded, the repository can be queried to access the individual IUs.
The p2 Query Language (p2ql) is language for querying p2 metadata. While the language is very expressive (and somewhat complicated to use), a helper class has been designed to assist with the most common queries. For example, the following query will return all IUs in a repository.
repository.query(QueryUtil.createIUAnyQuery(), new NullProgressMonitor())
You can also query for IUs that match a particular pattern, have a certain name or contain a specific property. For example, you could query for all ‘groups’ — which are essentially the features in a p2 repository.
repository.query(QueryUtil.createIUGroupQuery(), new NullProgressMonitor())
You can craft your own queries using the p2 query language. Here is an example that will return all IUs that have at least one artifact.
repository.query(QueryUtil.createMatchQuery("artifacts.length > 0", null), new NullProgressMonitor())
Finally, you can combine queries in interesting ways, such as redirecting the results of one query into another one, or running multiple queries in parallel and combining the results. For example, you could query for all the ‘ feature groups’ and then limit the results to only the latest version.
IQuery query = QueryUtil.createIUGroupQuery();
query = QueryUtil.createLatestQuery(query);
repository.query(query, new NullProgressMonitor())
For a complete description of the p2 query language, see the p2 wiki.
Armed with this knowledge, we can now write a simple tool that loads two repositories (A and B) and shows the differences between them. To determine the differences, we take both the relative complement of A in B, and the relative complement of B in A. We then pretty print these two sets.
Collection repositoryAContents = repositoryA.query(QueryUtil.createIUAnyQuery(), new NullProgressMonitor());
Collection repositoryBContents = repositoryB.query(QueryUtil.createIUAnyQuery(), new NullProgressMonitor());
HashSet complementA = new HashSet(repositoryBContents);
HashSet complementB = new HashSet(repositoryAContents);
complementA.removeAll(repositoryAContents);
complementB.removeAll(repositoryBContents);
We could change the query to only return Feature Groups. This would show us the different features available in each repository.
The complete repository diff tool is available on GitHub. The tool uses the concepts we described here to:
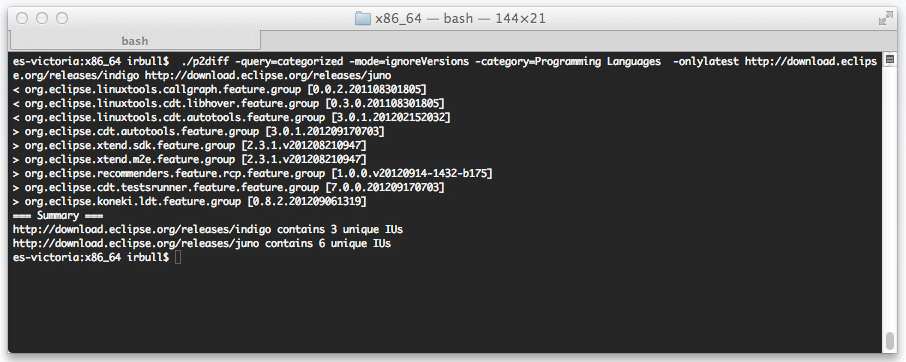
We’ve added a few command line options such query options (only operate on groups or categorized IUs). We also added a ‘mode’ option which can be used to perform a deep compare. A deep compare will show the details of how an IU has changed. This example shows which IUs have been added or removed to the Programming Languages category between the Indigo and Juno releases.
For a complete description of the tool, please see https://github.com/irbull/p2diff

Ian is an Eclipse committer and EclipseSource Distinguished Engineer with a passion for developer productivity.
He leads the J2V8 project and has served on several …