Jonas Helming, Maximilian Koegel and Philip Langer co-lead EclipseSource. They work as consultants and software engineers for building web-based and desktop-based tools. …
Getting started with JSONForms
July 17, 2015 | 5 min ReadJSONForms is an AngularJS-based framework to simplify the creation of forms for data entry and edit in web applications. It allows to declaratively define the content and layout of a form and to embed the form into your HTML with one simple
In the last blog post we explained the core principles of JSONForms and showed you a teaser.
Note: Before you read any further, this blog post is not up-to-date. For an up-to-date tutorial please refer to this documentation. Also a blog series on JSON Forms was just started introducing the features of JSON Forms based on one consistent example.
This time we will be more hands-on: We’ll demonstrate how JSONForms can be integrated into an existing AngularJS application and how it eases the development process of web forms.
Photo by https://www.flickr.com/photos/katmere/
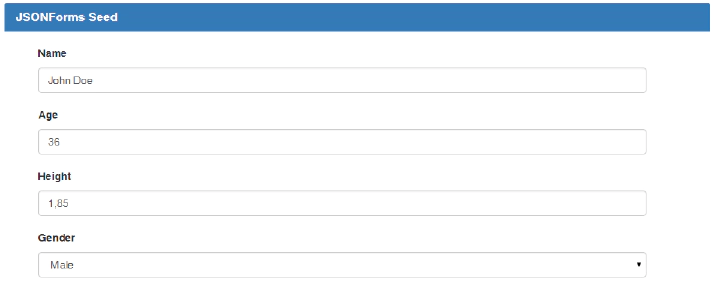
We’ll create a simple form for a “User” based on a JSON schema and a custom UI schema. The rendered result will be bound to the underlying model by making use of Angular’s two-way-databinding. At the end of this tutorial we’ll generate a form describing the basic properties of “User”:
We’ll also change the UI schema to demonstrate the benefits of the declarative approach.
So, let’s get started. First of all, please clone this github repository:
https://github.com/eclipsesource/jsonforms-seed.git
This repository contains a basic JSONForms project template to get you started. It contains an index.html as well as an app.js file containing the application logic. The index.html specifies all relevant dependencies as well as some boilerplate HTML. To retrieve all dependencies we’ll use Bower. If you don’t have Bower yet installed (or never heard of it) please follow these instructions. Then, navigate to the cloned repository and execute the following command from with your shell:
bower install
This will install all relevant dependencies.
Now open the js/app.js file. You’ll see that the file already contains a predefined controller called MyController. The controller gets injected the SchemaService and the UISchemaService which provide the JSON Schema and the UI Schema respectively. In this example we’ll use a stripped-down version of the schema we outlined last time, where a user has only four properties: name, age, gender and birth date.
We also provide a ready-to-use UI Schema, which consists of three controls ordered in a horizontal fashion. Let’s change this layout to feature an additional control and layout the controls side-by-side like illustrated in the following image:
And here’s the complete code for the UI Schema in ui-schema.js:
app.service('UISchemaService', function () {
   this.uiSchema = {
       "type": "HorizontalLayout",
       "elements": [
           {
               "type": "VerticalLayout",
               "elements": [
                   {
                       "type": "Control",
                       "label": "Name",
                       "scope": {
                           "$ref": "#/properties/name"
                       }
                   },
                   {
                       "type": "Control",
                       "label": "Age",
                       "scope": {
                           "$ref": "#/properties/age"
                       }
                   }
               ]
           },
           {
               "type": "VerticalLayout",
               "elements": [
                   {
                       "type": "Control",
                       "label": "Height",
                       "scope": {
                           "$ref": "#/properties/height"
                       }
                   },
                   {
                       "type": "Control",
                       "label": "Gender",
                       "scope": {
                           "$ref": "#/properties/gender"
                       }
                   }
               ]
           }
       ]
   };
});
Writing schemas by hand shouldn’t happen very often, since we will provide tooling for creating UI schemas, but it is beneficial to know that the UI schemas are just regular JSON.
As one might expect, the VerticalLayout layouts all its children vertically while the HorizontalLayout orders its children horizontally.
With the UI schema, all there is left to do is to wire things up. This happens via the usage of a custom directive provided by JSONForms. Open the index.html and replace the TODO comment with this line:
<jsonforms schema="schema" ui-schema="uiSchema" data="data"/>
The attributes schema and ui-schema specify the JSON Schema (describing the data) and the UI schema (describing the form) to be generated, respectively. The data attribute specifies the JSON instance that should be bound to the generated form. Note that JSONForms makes use of Angular two-way-databinding for the data attribute, hence the underlying model will change while editing the form.
Actually, you don’t even need to provide the schema and the ui-schema attributes, since both will be inferred from the data, i.e. a JSON Schema and/or a UI schema can be derived from the structure of the data.
Also, you might have noticed the jsf class attribute in the div that wraps the jsonforms element in the template. Setting this CSS style (which is part of the jsonforms.css) is crucial for every JSONForms application since it is needed to layout the generated form.
You can already run this example and try out the generated form. Open the index.html in a browser and you should see the following page. You can perform any changes within the form and the actual data which is visualized as a JSON object will update.If we now want to rearrange the form, for instance, to align all elements vertically, we can do so by changing a single line in the UI schema. Change the type property of the top-level element from VerticalLayout to HorizontalLayout and you’ll see the form pictured beneath.
This should give you a good impression of why one would like to use JSONForms: Changes to the UI are easy to be made and HTML templates don’t have to be touched. Also, once tooling support for creating UI schemas is available, writing complex forms will be a lot less time-consuming. You are encouraged to play around with the UI schema and move elements around. We would be happy to receive any feedback.
This tutorial is also available on the JSONForms webpage, where you can find more information on JSONForms. Stay tuned for more!
Update: A blog series on JSON Forms was just started introducing the features of JSON Forms based on one consistent example.
Guest Blog Post
Guest Author: Edgar Müller


