
Jonas Helming is co-lead for the EclipseSource team and the project lead of the Eclipse EMF Client Platform and the EMFStore project. He works as an Eclipse Consultant …
What every Eclipse Developer should know about EMF - Part 1
So this is my first post at the new location. As Jochen announced earlier, Maximilian and me are joining EclipseSource in Munich. We are very happy about this and look forward to the collaboration.
Today, we have presented the Tutorial “What every Eclipse Developer should know about EMF” at EclipseCon. I will blog the tutorial here step by step. You can download a PDF version of this tutorial on our website.
So let`s get started
Abstract
You did not use EMF before? What is EMF anyway? What is all this modeling stuff about? And who is this Ed guy?
This tutorial introduces the use of EMF and explains the basics. We show how to build a very simple data-centric application based on EMF including the UI. We explain how to define a model in EMF and how to generate code from it. We explore the API of the generated code to create, navigate and modify model instances. We demonstrate how to build an UI based on this model. As an example we build an application to manage a bowling league and tournaments.
In the first step of the tutorial we will create the underlying model of our example application.
To follow this tutorial, please use a (fresh) instance of the Eclipse Modeling Tools Helios for your OS.
Later in the tutorial, we will use this example solution: exampleSolution
Authors:
- Jonas Helming (Basic Tutorial, EMF CP Ignite), [email protected]
- Maximilian Koegel (Basic Tutorial, EMFStore Ignite), [email protected]
- Markus Herrmannsdoerfer (Edapt Ignite)
- Eike Stepper (CDO Ignite)
- Saurav Sarkar (EMF Query Ignite)
- Mariot Chauvin (EEF and GMF Ignites)
- Cedric Brun (EMF Compare Ignite)
Table of Contents
1 Introduction
2 Example Model
3 Modeling
3.1 Code Generation
3.2 Model refinement
3.3 Why is this better than writing POJOs?
4 EMF API
5 Import Sample Solution
6 AdapterFactories
7 EMF Data-Management
8 EMF UI
9 Additional EMF-based Technologies
1 Introduction
For the question “What is EMF” we borrow the description from the EMF website:
“The EMF project is a modeling framework and code generation facility for building tools and other applications based on a structured data model. From a model specification described in XMI, EMF provides tools and runtime support to produce a set of Java classes for the model, along with a set of adapter classes that enable viewing and command-based editing of the model, and a basic editor.”
It is noteworthy that EMF has also been a stable standard for many modeling technologies.
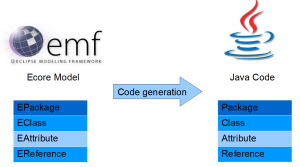
We suggest using EMF for any structured data model you have to create in Eclipse, especially if it gets stored, displayed and modified in UIs. The basic EMF workflow is very pragmatic; a model is created defined in the Ecore format. Ecore is basically a sub-set of UML Class diagrams. From an Ecore model, you can generate Java code.
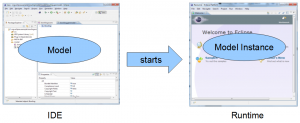
Later in this tutorial we will have two running instances of Eclipse. In the first instance, the “IDE”, we will define the model and generate code from it. The second instance, the “Runtime”, will be started from the IDE and contain instances of the generated model.
2 Example Model
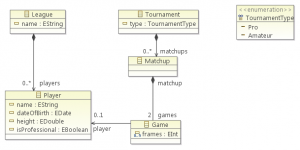
In this tutorial we will create an example model for managing a bowling league and tournaments. A League contains an arbitrary number of Players. A Tournament consists of an arbitrary number of Matchups. A Matchup always contains of two Games. A Game is a list of frames (the score) and is assigned to a certain Player. Finally a Tournament has an Enumeration determining the type of the Tournament.
In the next step, we will show how to create this model and generate code form it.
3 Modeling
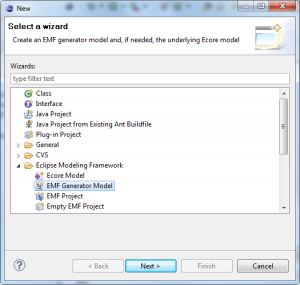
We will create our example model in EMF to generate the entity classes for our application. The first step is to create an empty modeling project in your workspace:

The essential part of the modeling project is the model itself, defined in the format “Ecore”. Please create a new “ecore” file in the model folder in your new modeling project. We will name the file “bowling.ecore”:
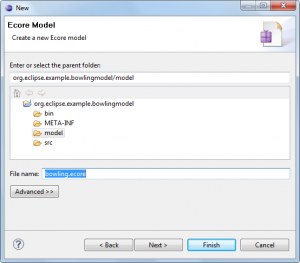
Click finish to create the model. It will be opened in the default Ecore editor. This editor allows defining Ecore models in a tree-based view. There are several additional possibilities to define Ecore models, including graphical modeling, textual modeling, Java annotations and import from UML tools. We will stick to the default editor in this tutorial and shortly demonstrate the graphical editor for Ecore.
In the tree of the Ecore editor you can create and delete model elements as well as modify the structure of your model via drag and drop. Properties of model elements can be modified in a second view, which opens up on double-click or right-click => “Open Properties View”.
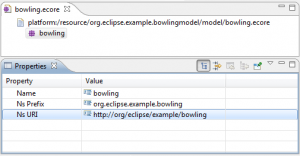
First, give the root package of your new model a name and an URI. This is used to identify the model later on. Name the package “bowling”, set the Ns Prefix to “org.eclipse.example.bowling” and the Ns URI to “http://org/eclipse/example/bowling ”:
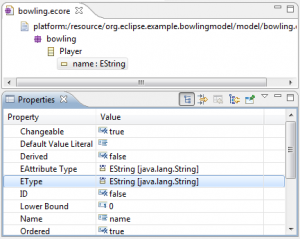
Now, we can define our model elements as children of the root package. Please right click the root package and create a new EClass and name it Player.

From the context menu of an EClass, you can add EAttributes and EReferences to it. Create an EAttribute and open the Property view for it. The properties of an EAttribute define its name, its data-type and other properties, which we will cover later in this tutorial. Add an EAttribute to the Player, name it “name” and assign the EType “EString” (java.lang.string). Repeat this step and add a second EAttribute named “dateOfBirth” of type “EDate”.
EMF models usually build up a structured hierarchy, meaning model element instances, e.g. the Player “Jonas” are contained in a specific container object. This provides a tree-structure, which is useful for navigability and allows for serialization. This tree structure is often referred to as containment tree. In our model, Players are contained in a League. Please note that this also implies that every Player is referenced by exactly one League, thus cannot be part of more than one League. Therefore EMF will automatically take care that a player cannot have more than one league. If you add a player to another league, its reference to the original league vanishes.

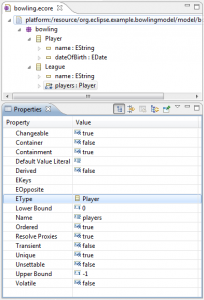
Create a second EClass and name it “League”. To identify the League, also create a EString attribute called name. The next step is to create a EReference between League and Player by right-clicking on the League model element. Name the references “players”. Set the EType of the reference to “Player”. As a League can contain an arbitrary number of Players, set the upper bound to “-1”, equivalent to “many”. Finally set the property Containment to “true” determining that the EReference is a containment reference.
 After this first model iteration, we can already generate code from it. EMF provides an example editor to create and modify model instances. This allows us, to initially test the created model, before we further refine and add more EAttributes and EReferences in a second iteration to complete the example model.
3.1 Code Generation
In this step, we will generate the entities from the Ecore file we have created. Please note that you can regenerate the entities again, if you need to change you model. EMF can deal with simple changes like adding model elements or EAttributes. If you have complex changes, like moving an attribute to another class, you would have to migrate existing instances of the model. This is supported by the EDAPT framework.
To generate entities, we have to create a generator model file first. This file allows configuring properties for the generation, which are not part of the model itself, for example the plugin and subfolder, the source code is generated to. Please create a new generator file in the model folder and select our previously created Ecore as a source model.
 In the root node of the generator model, you can set the properties for the code generation. In the tree of the generator model, we can set properties for every generated entity. For the first code generation, we just use the default settings. Based on the generator model, we can now generate the source code. EMF allows generating four different plugins for a defined model:
- Model: The model contains all entities, packages and factories to create instances of the model.
- Edit: The edit plugin contains providers to display a model in an UI. For example the providers offer a label for every model element, which can be used to display an entity showing an icon and a name.
- Editor: The editor plugin is a generated example editor to create and modify instances of a model.
- Test: The test plugin contains templates to write tests for a model.
To generate the plugins, right click on the root node of the generator model and select the plugin. For our tutorial, please select “generate all”.
Before we look at the generated code, let’s first start the application and create an entity of our model. Please right click on the model plugin and select “Debug as => Eclipse Application”.
Please create a new empty project and a bowling model. This file will contain a serialized version of our model instance.
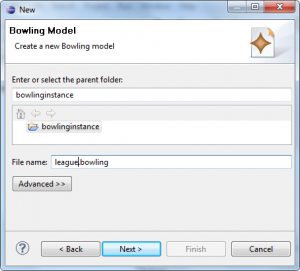
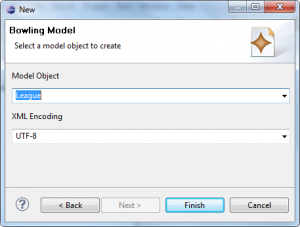
Select League to be the model object. This determines the root object of the model instance we are about to create.
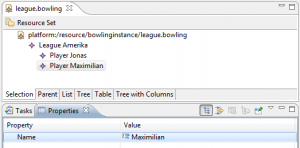
The generated editor for model instances works similar to the Ecore editor. Model element instances can be created via a right-click, EAttributes can be modified in the properties view. Please name the League and create two Players. On save, all created instanced are serialized in the XMI file “league.bowling”.
3.2 Model refinement
Let`s switch back to our IDE Eclipse environment, complete the model and regenerate the source code. In this second model iteration we will add different type of EReferences, as well as EEnums and Multi-EAttributes. First please add the following classes to the bowling model:
- Tournament
- Matchup
- Game
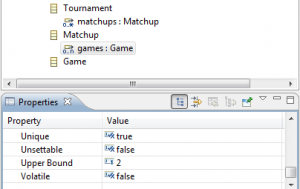
These classes model the results of bowling tournaments build up a second tree in our model. Therefore we add containment EReferences from Tournament to Matchup and from Matchup to Game. Following the bowling rules, a Matchup consists of two Games (each from one Player). We model this by setting the upper bound and lower bound of the EReference “games” of the EClass Matchup to “2”.
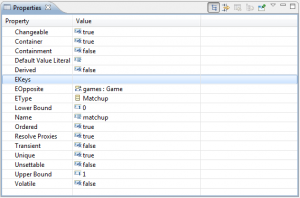
Furthermore we defined that the EReference between Matchup and Game is bi-directional. That means, the reference can be navigated from both ends. Therefore we have to create a second EReference from Game to Matchup and bind both EReferences. EMF will take care of the bidirectional synchronization. In other words adding a matchup to a game will automatically add the game to the matchup.
Please add a EReference to Game called “matchup” with the EType “Matchup”. By setting the EOpposite to the EReference “games”, both EReferences are coupled bi-directionally. Note, that the property “Container” will automatically be set to true.
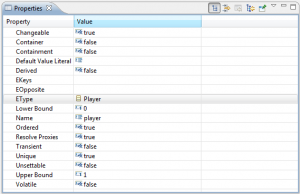
The next step is to add a cross-EReference. In contrast to containment EReferences, cross-referenced model elements do not contain each other. In our model we add a cross EReference from Game to Player named “player”. Let both, container and containment properties “false”. An arbitrary number of games can be assigned to a Player now; the Player is still contained in a League.
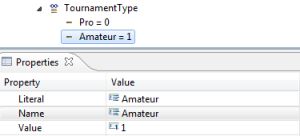
As a final mandatory step, we will create an EEnumeration for the type of a tournament. A tournament can be of type “Pro” and “Amateur” in our model. Please create a EEnum by right-clicking on the root bowling model package, just like creating a class. Add two EEnum Literals to this EEnum.
Please add an EAttribute to the EClass Tournament, name it “type” and set the EType to “TournamentType”.
The extended example model contains more EAttributes and EReferences to be added including all basic types and some special cases as the Multi-Integer EAttribute in Game. Depending on your time, please model the following features:
Player
- height: EDouble
- isProfessional: EBoolean
Game
- frames: EInt, UpperBound = 10
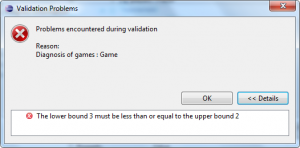
After applying complex changes to the model it is always a good idea to validate it, done with a right-click on the model root in the Ecore editor. Let`s do something wrong in the model and set the lower bound of the EAttribute “games” (in Matchup) to 3. As the upper bound is 2, this model doesn`t make too much sense. This will be detected by the model validation, something which is impossible in plain Java Code.
After this model refinement, we will re-generate the code to reflect our changes. Start the runtime Application again and create a second model “tournament”. Add a Matchup and two Games. To add assign the Games to Players you will have to load the “league” model created before. Select “Load Ressource” from the menu “Bowling Editor” and select the first model file. Now, link the Games to the Players in the properties view.
3.3 Why is this better than writing POJOs?
You might ask, why to use EMF instead of creating the model just writing plain POJOs. Without considering benefits like the generated editor for rapid testing and all additional frameworks available for EMF, let`s look at two very simple and exemplary benefits.
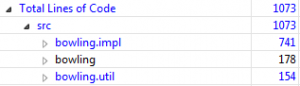
Before we even look at the generated code (we will do that in a minute), let`s consider the amount of code we have just produced. The Eclipse metrics plugin tells us, we have generated over 1000 LOC, while only 150 is part of utility classes. Even very simple code is considered to be worth 1$ per LOC. So we have just earned 1000$ just by clicking some buttons?
In the next part, we will explore the EMF API of the code we have just generated. You can follow this blog to get notified about new posts. You can download a PDF version of this tutorial on our website. ices/).